Getting Started: Generating Your Wix API Key
Before connecting your Wix site to UP-TO-DATE, you'll first need to generate an API key from Wix. This key allows UP-TO-DATE to securely communicate with your Wix account and access the necessary site data for integration.
To get started, log in to your Wix Dashboard and navigate to the API settings, where you'll create a new API key specifically for this connection. Once generated, keep this key handy. You'll need to enter it in the next step to complete the connection.
Step 1: Access the Site Menu
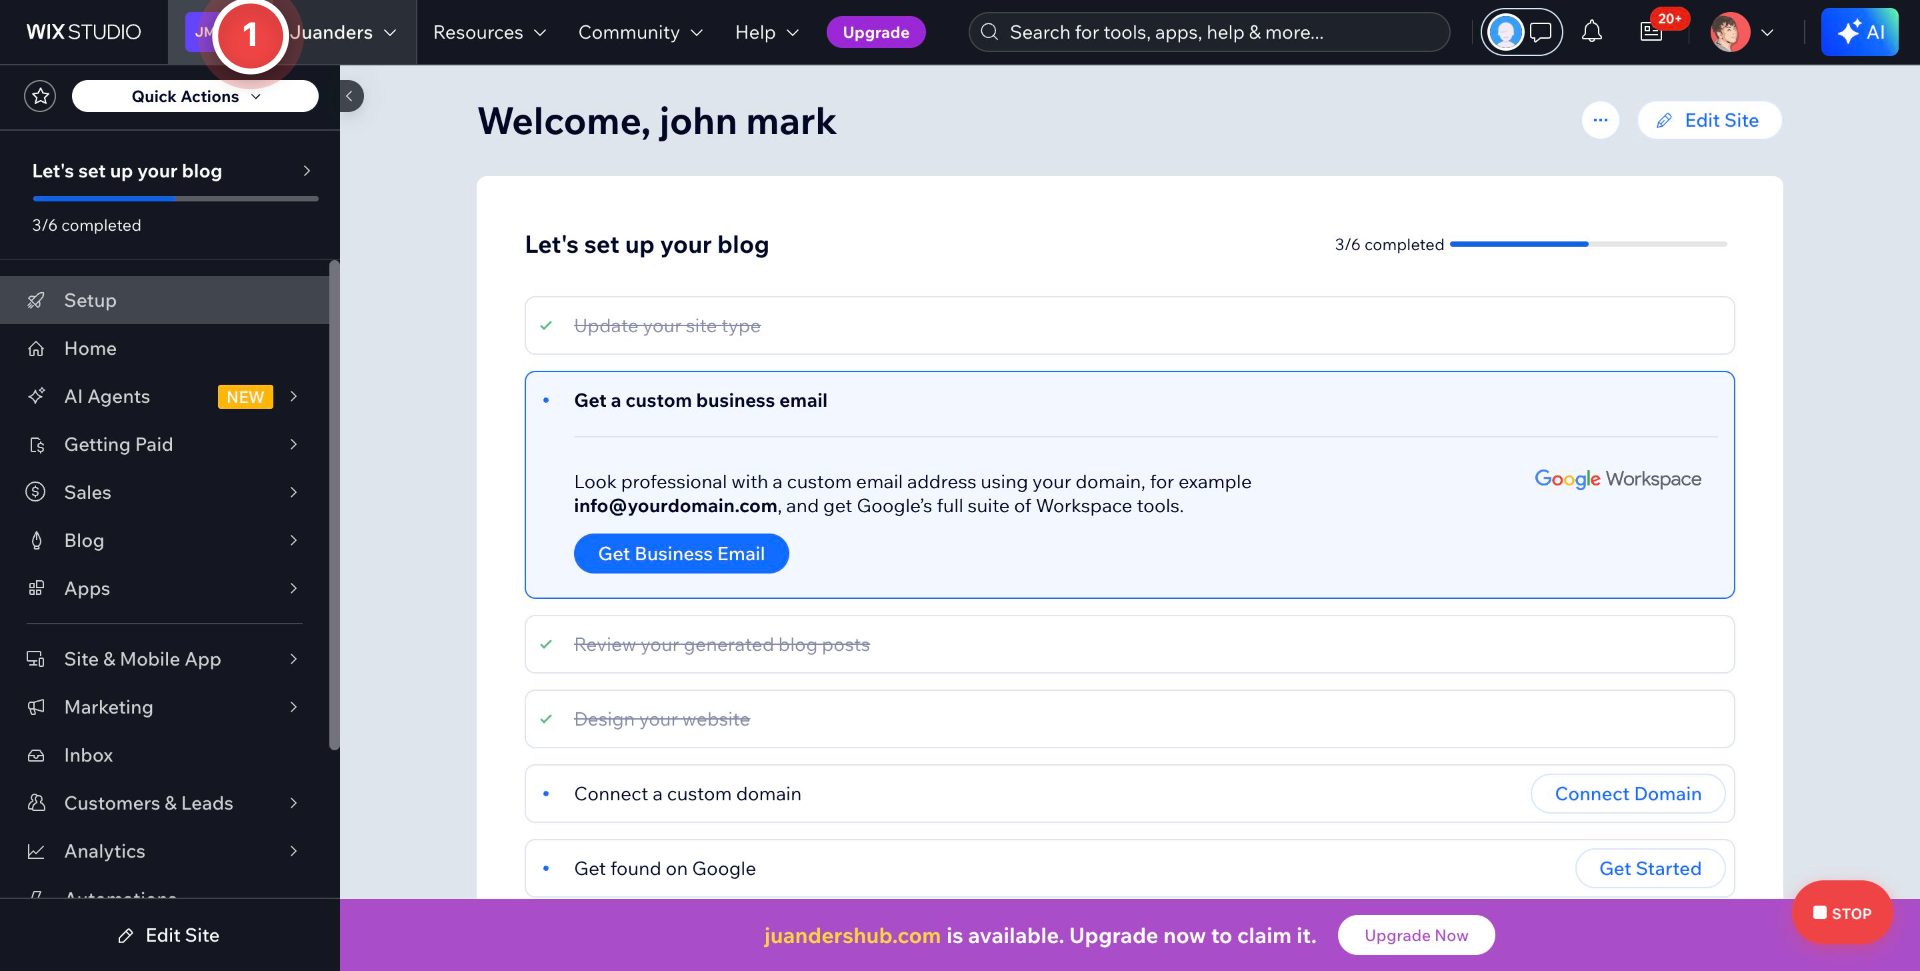
In your Wix Dashboard, click the menu icon located in the top-left corner, next to the WIX STUDIO logo. This opens the site selector, allowing you to navigate to the correct site settings needed for the next steps.
Step 2: Open Workspace Settings
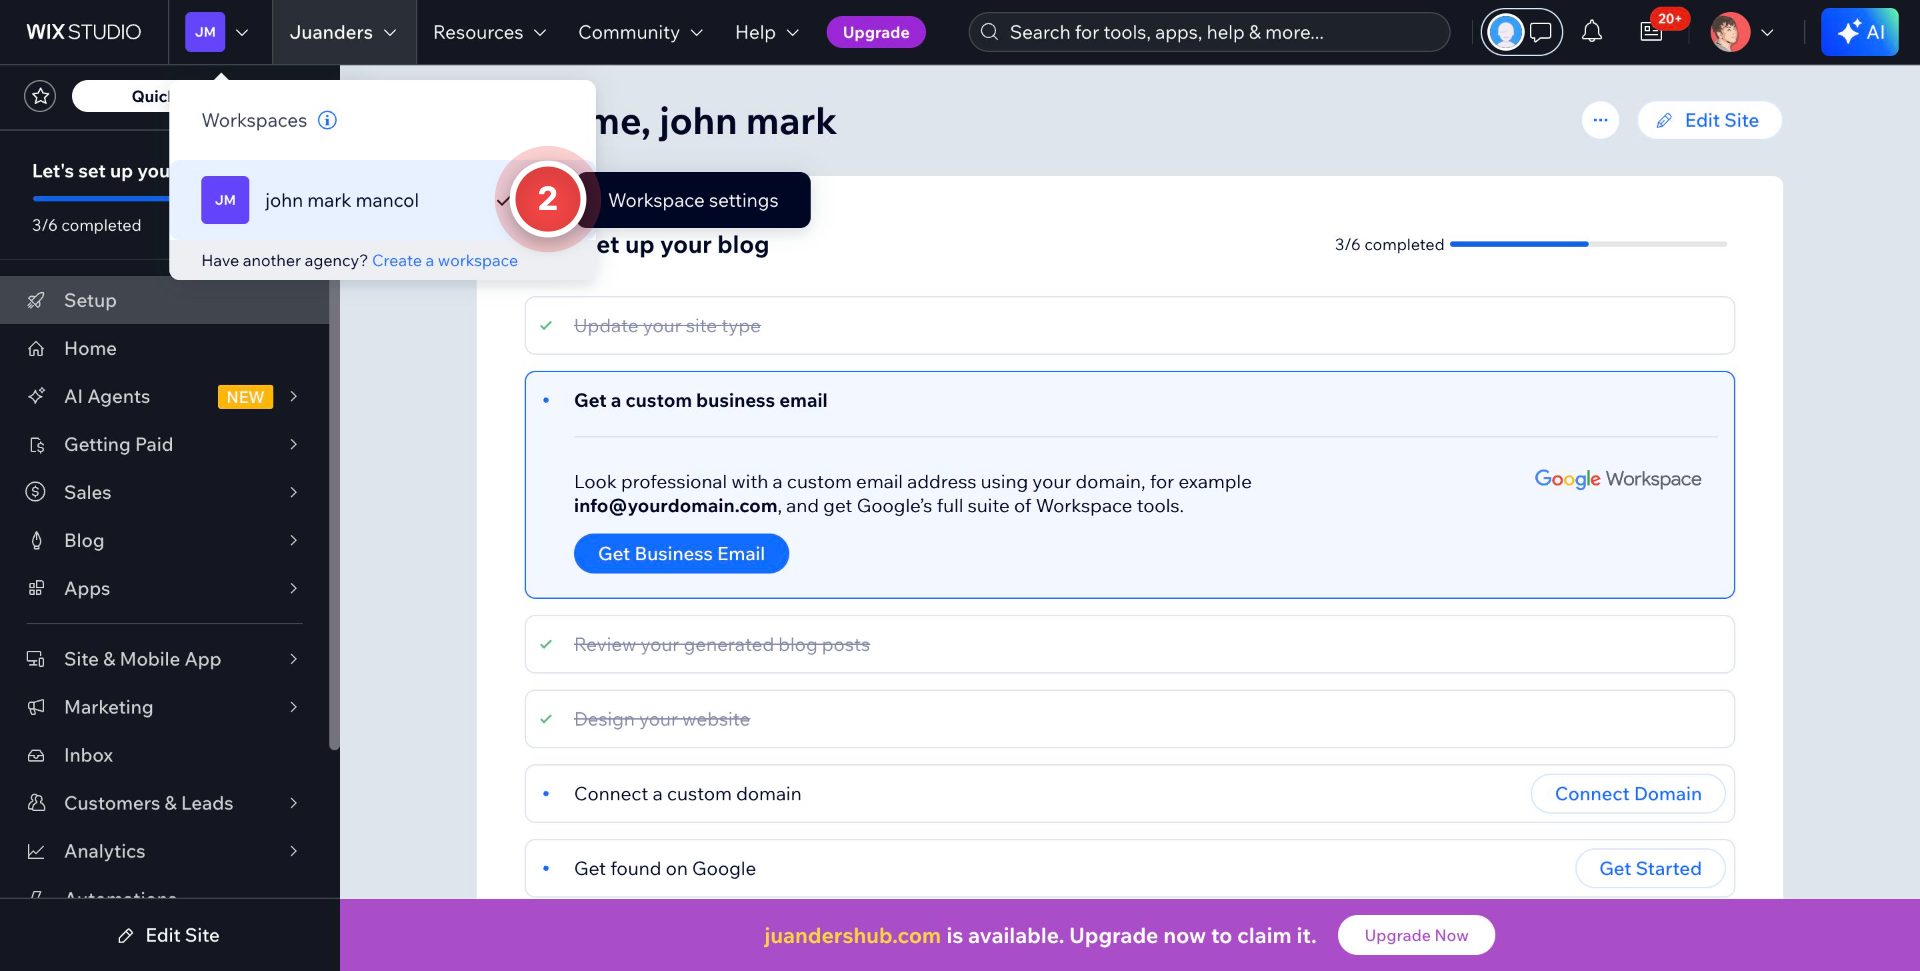
From the dropdown that appears, select Workspace settings. This will take you to the workspace-level configuration where you can manage integrations, permissions, and API access for your site.
Step 3: Open API Keys
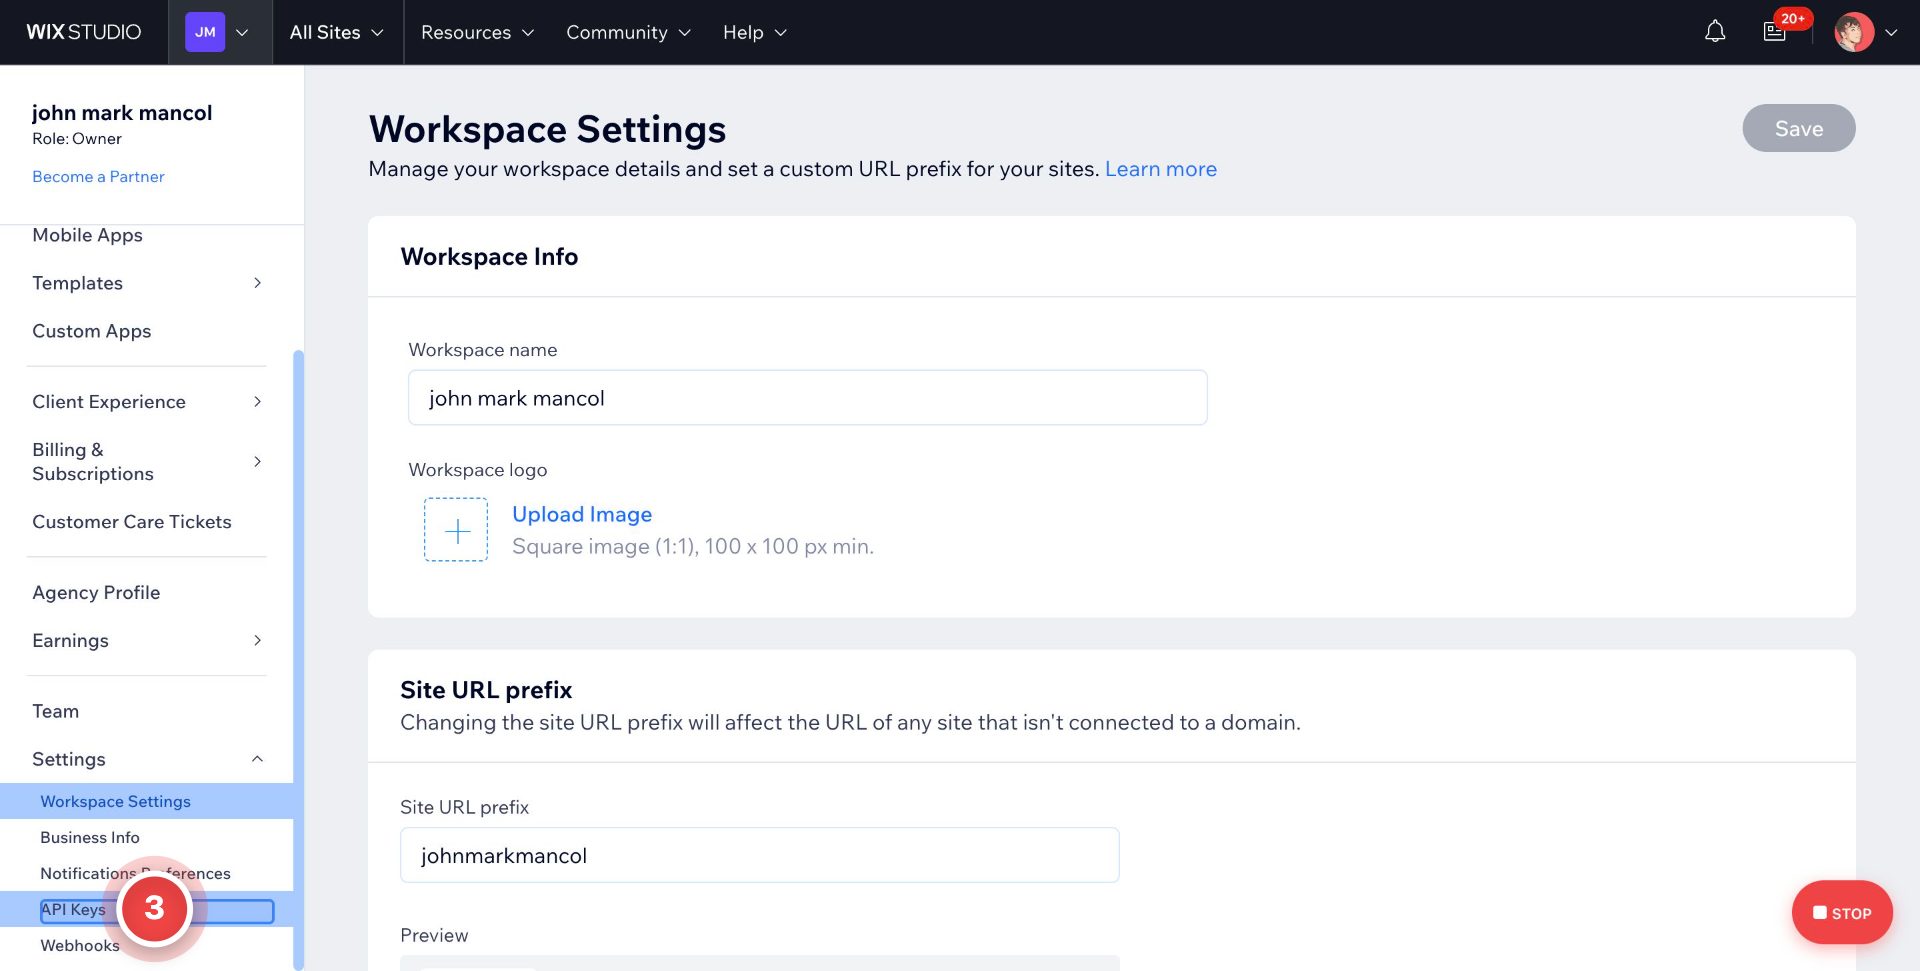
In the left sidebar, under Settings, click API Keys. This is where you'll generate and manage the API key needed to connect your Wix site to UP-TO-DATE.
Step 4: Generate a New API Key
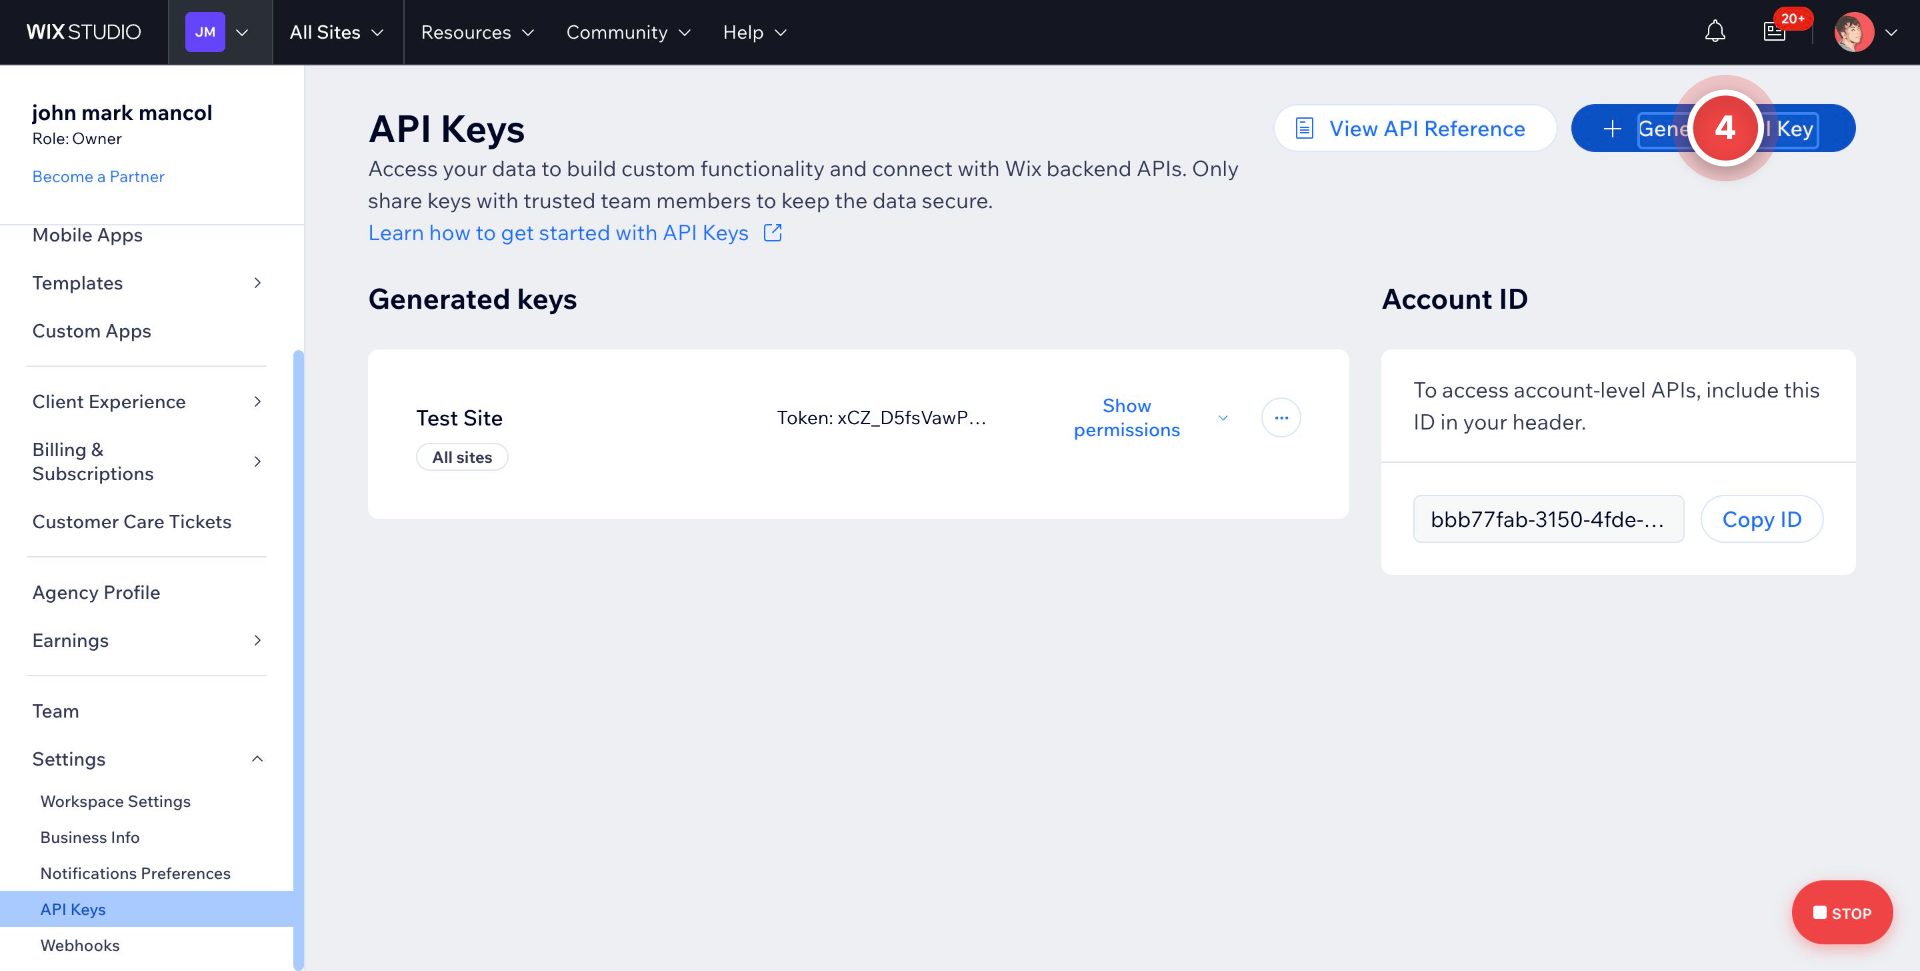
On the API Keys page, click the + Generate API Key button in the top-right corner. This will open a setup flow where you can name your key, assign permissions, and select which site(s) it applies to.
Step 5: Name Your API Key
In the Name field, enter a clear, descriptive name for your key (e.g., "UP-TO-DATE Integration") so you can easily identify it later if you manage multiple keys.
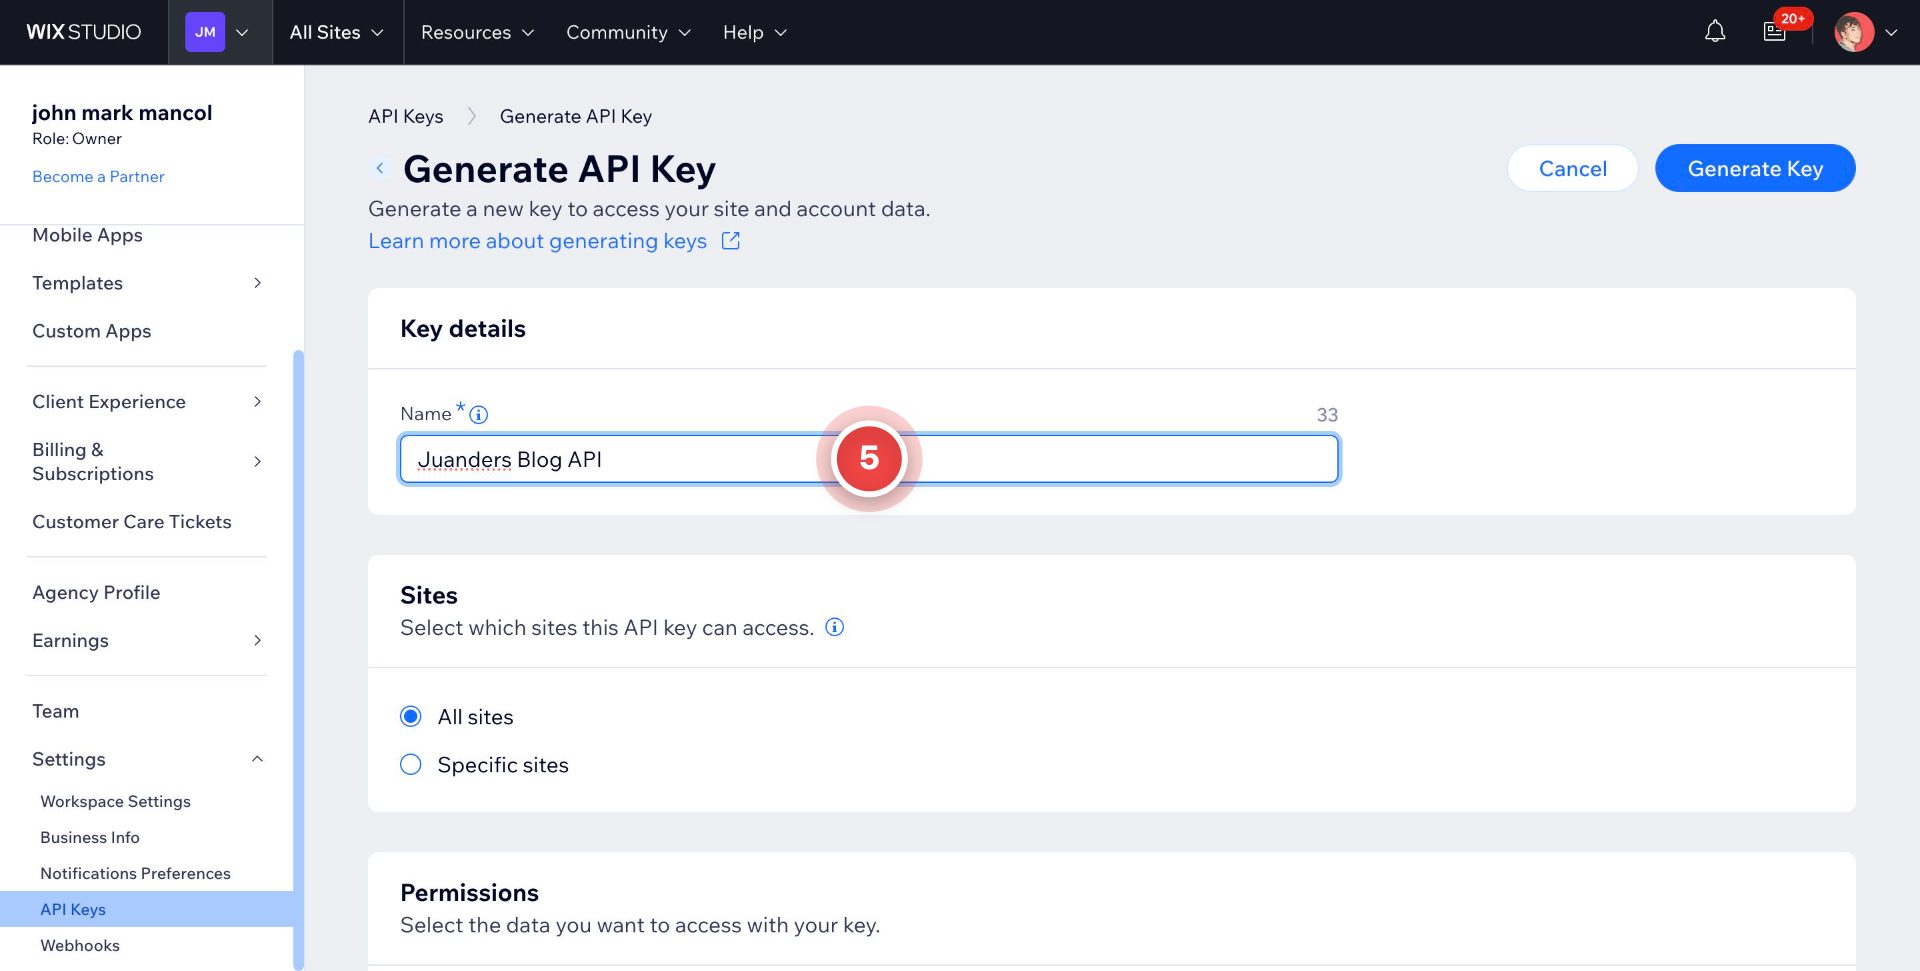
Step 6: Choose Site Access
Under the Sites section, select which site(s) this API key is allowed to access:
All sites: the key can access every site currently in your Wix workspace, including any sites added in the future. Use this only if you manage a single site or want one key to cover everything.
Specific sites: the key is limited to only the site(s) you manually select. This is the more secure option, since it prevents the key from being used to access sites outside your intended integration.
Select "Specific Sites"
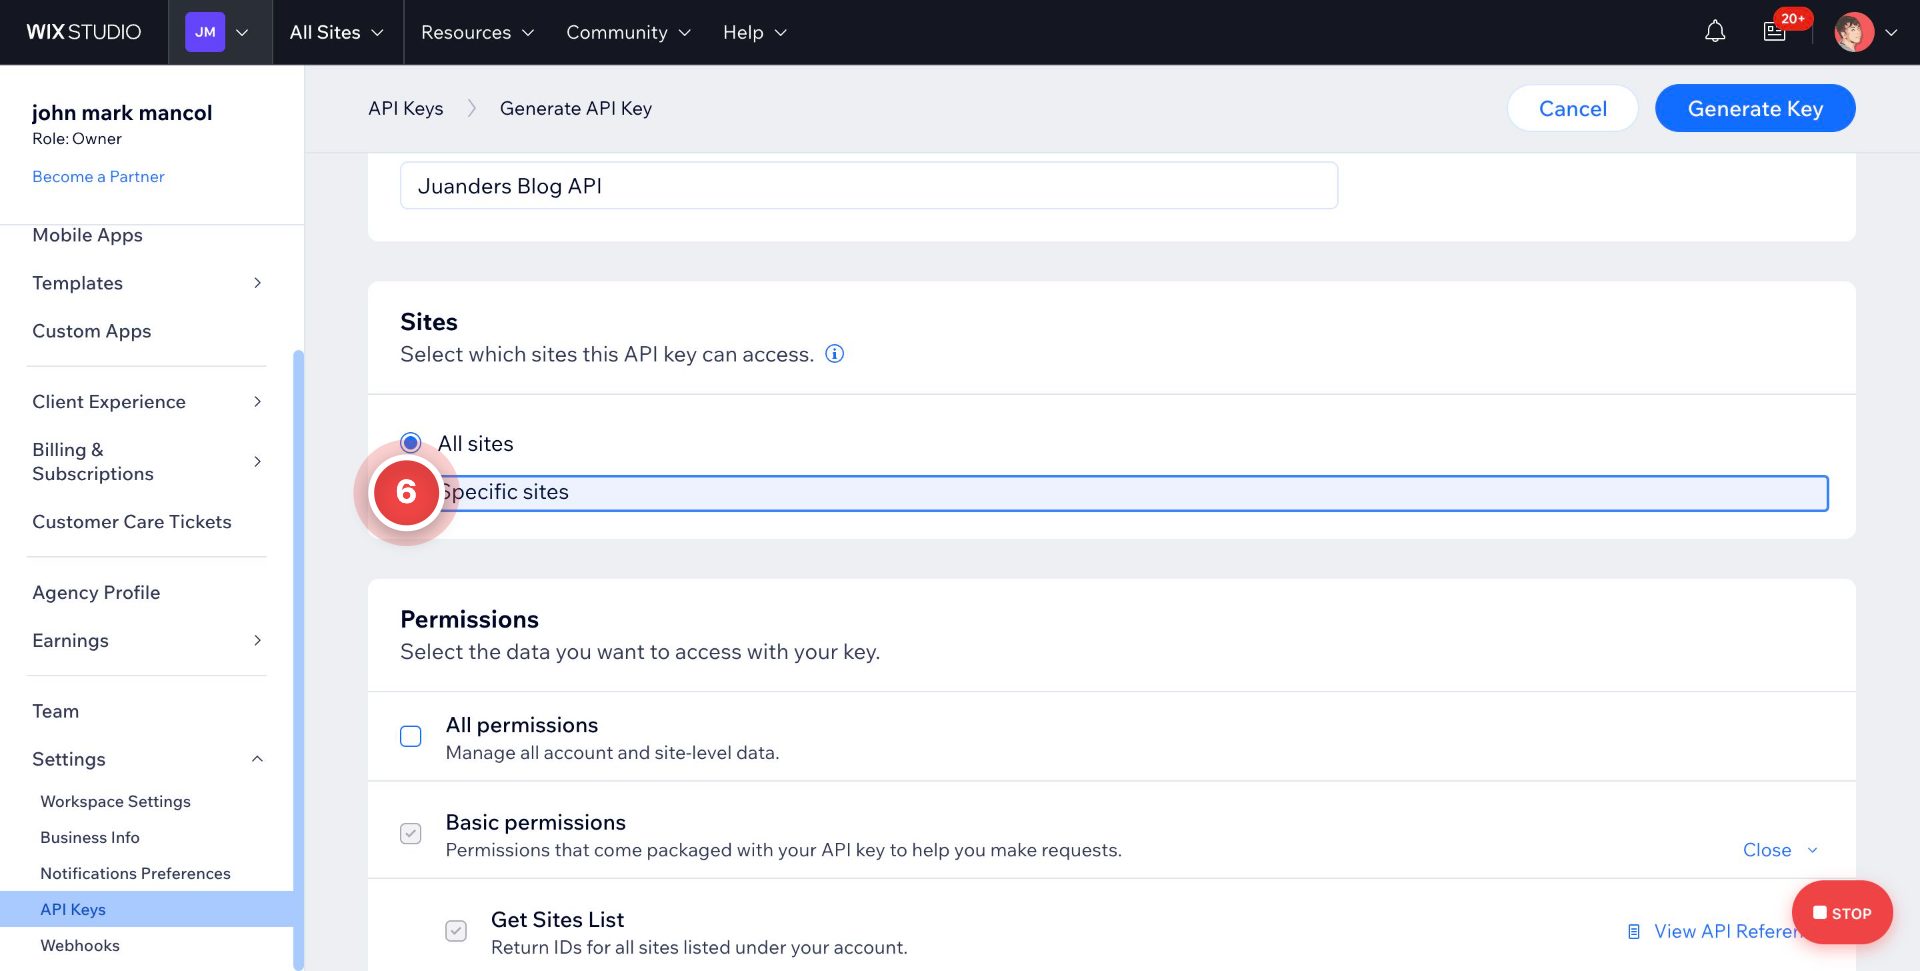
Step 7: Select Your Site
An Add sites window will pop up, listing all the sites in your workspace. Use the search bar to quickly find your site, or scroll through the list, then check the box next to the site you want to connect to UP-TO-DATE.
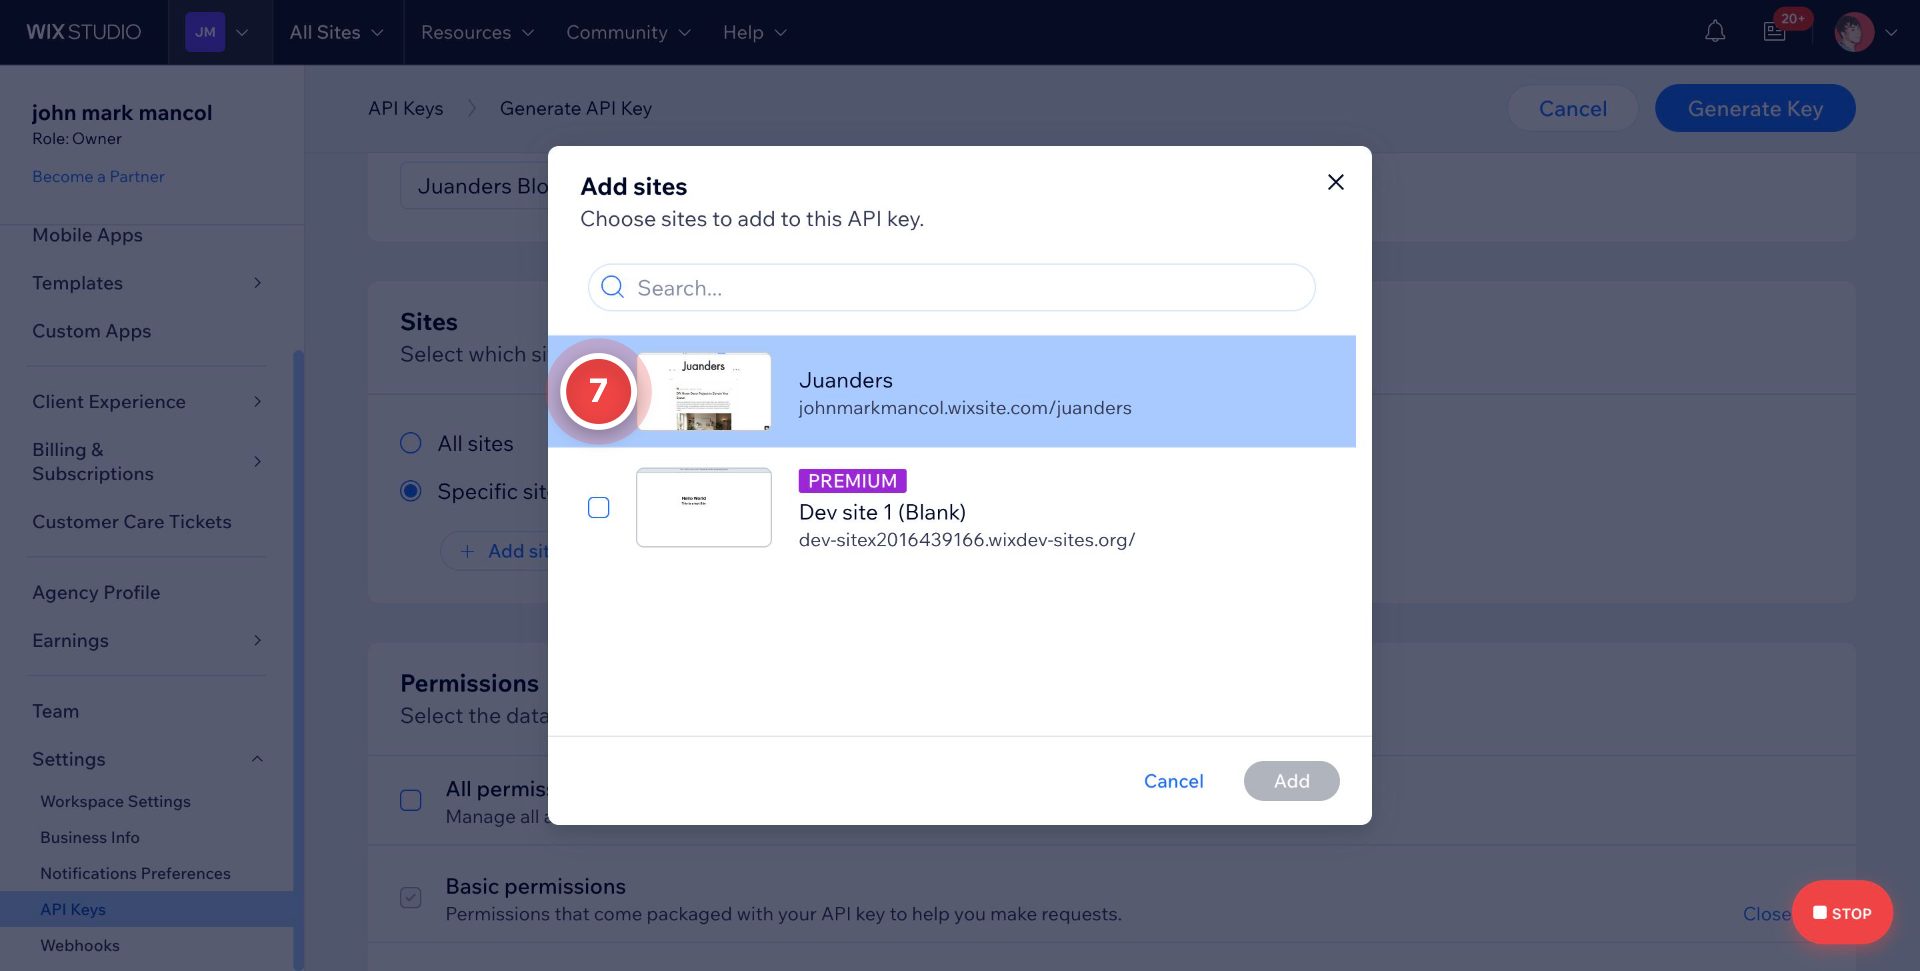
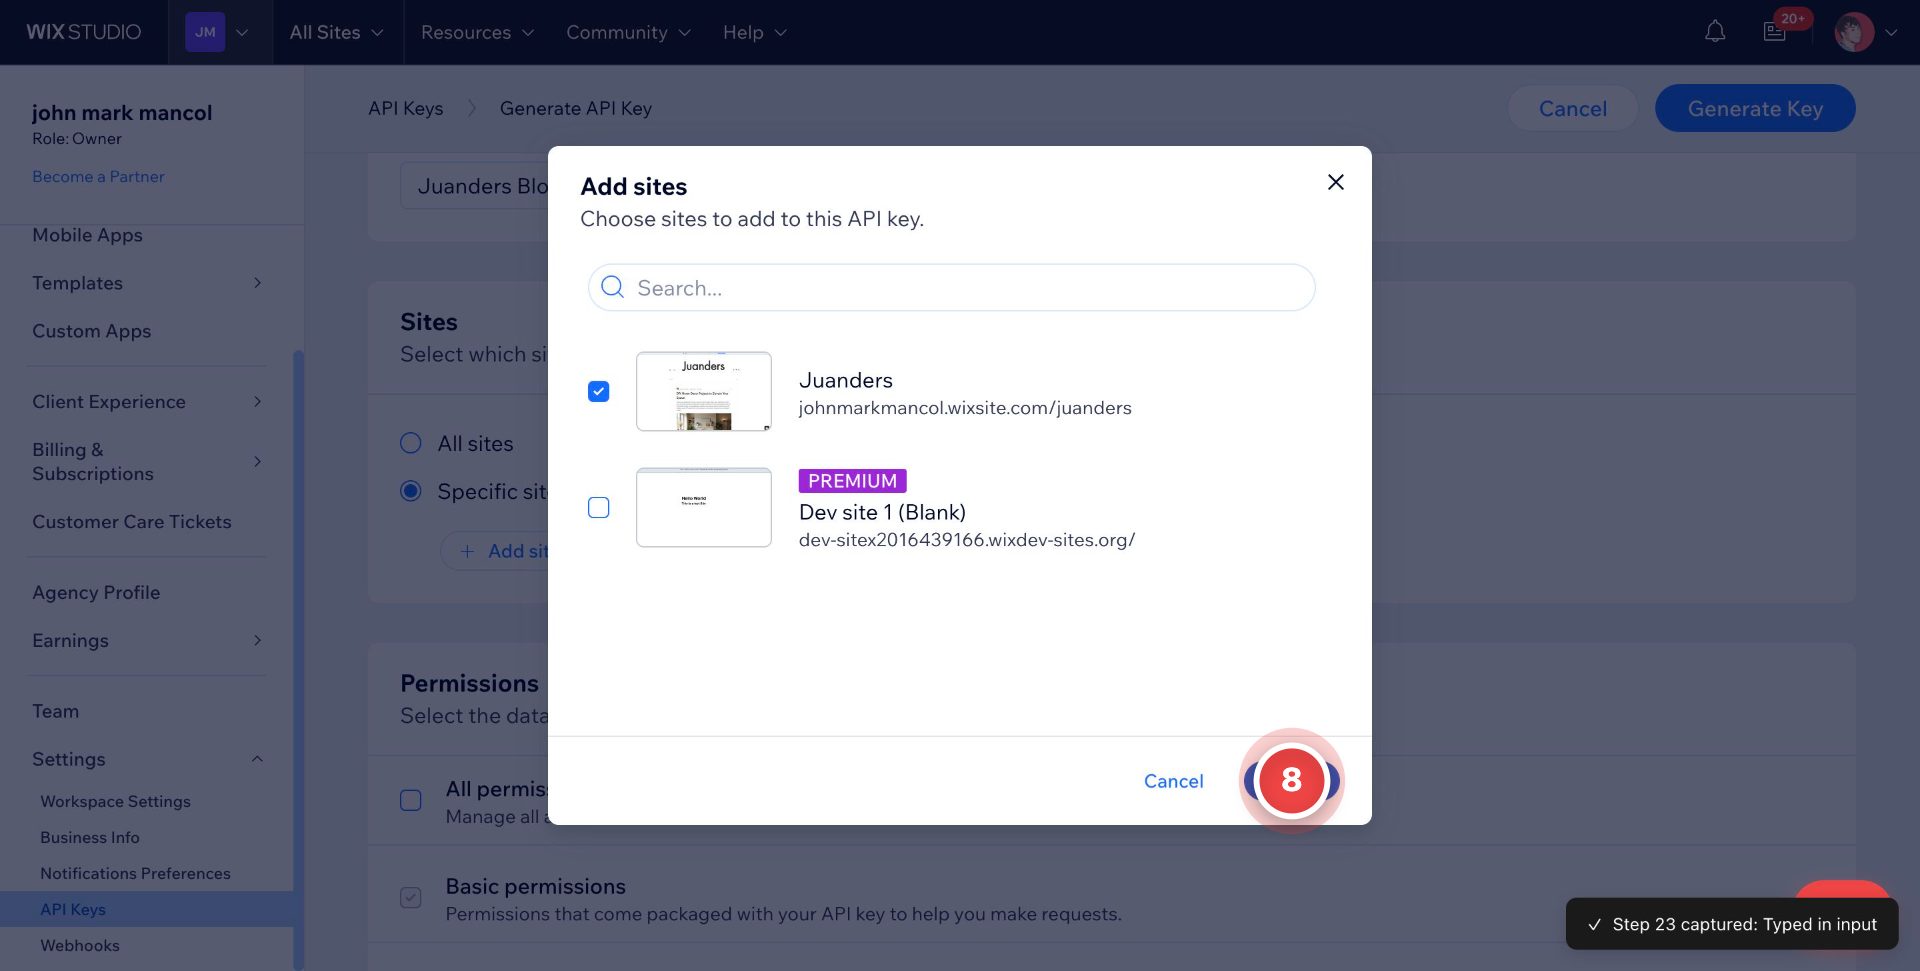
Step 8: Confirm Site Selection
With your site checked (in this example, Juanders), click Add to confirm your selection and close the dialog. Your chosen site will now be linked to this API key.
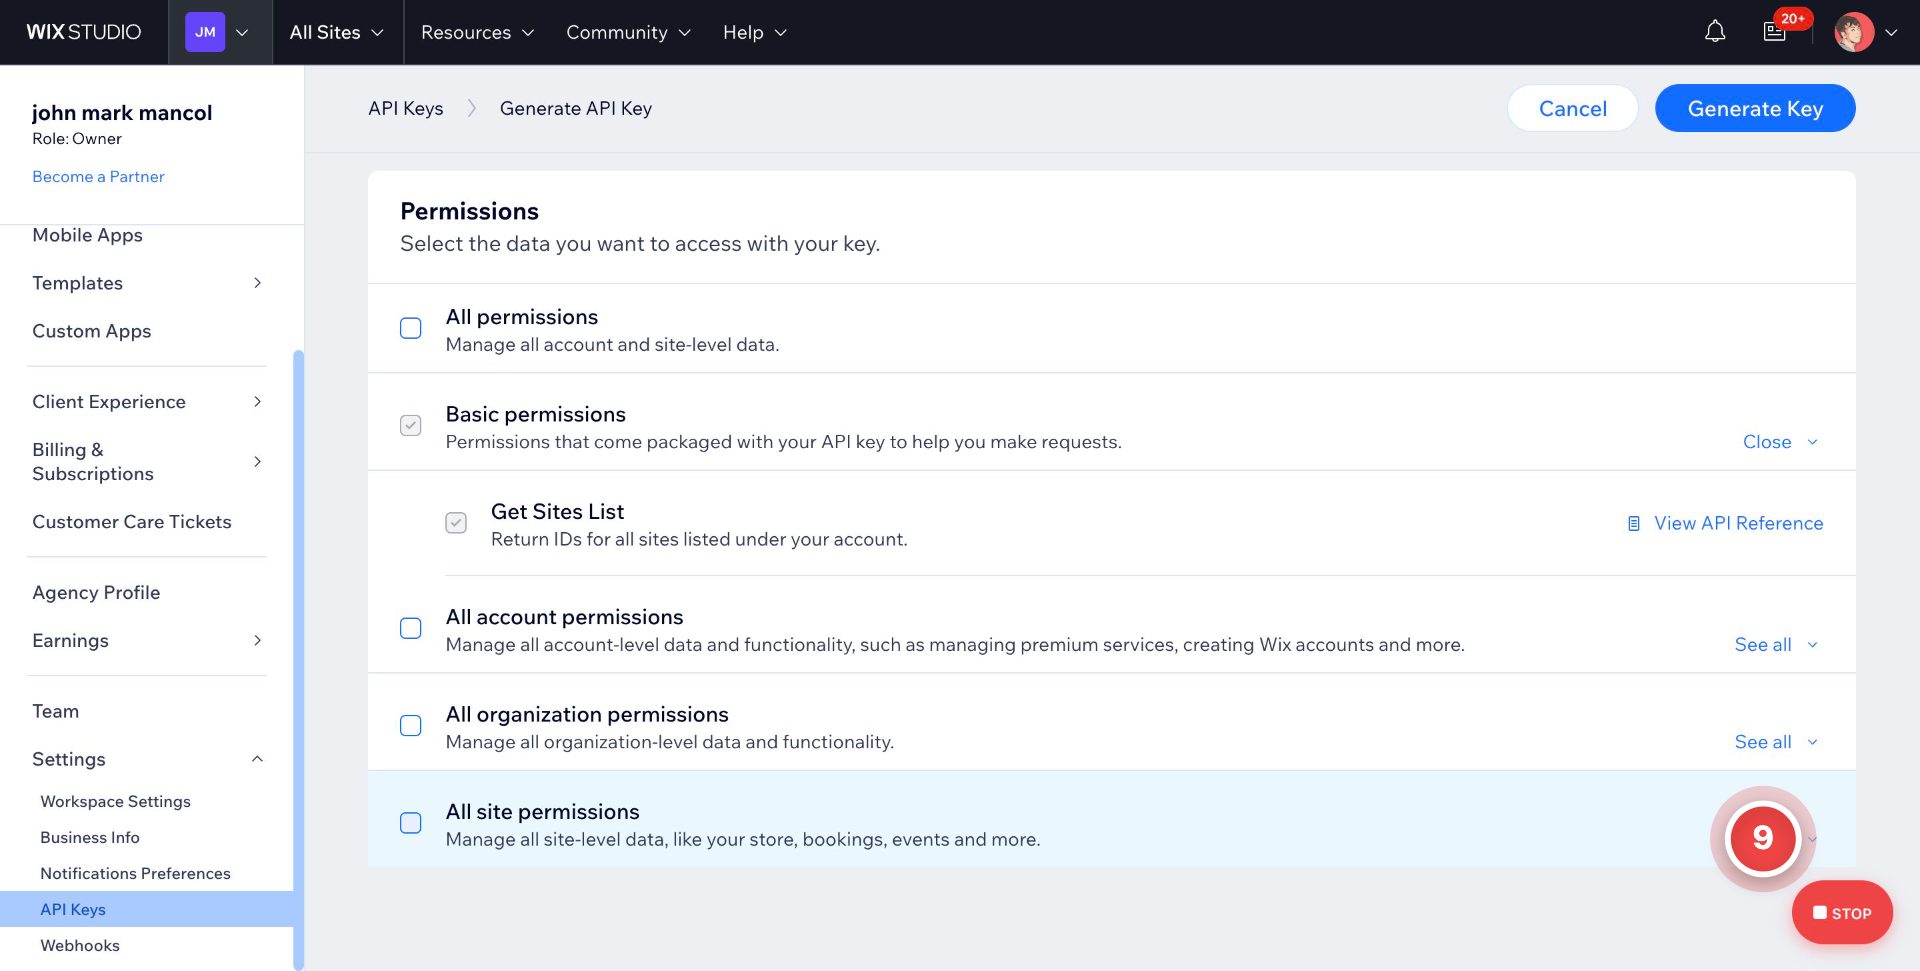
Step 9: Select Permission Scope
Scroll down to the Permissions section. Here you'll choose exactly what data your API key can access:
All permissions: full access to everything (account, organization, and site data)
Basic permissions: a small default set (like Get Sites List) automatically included with every key
All account permissions / All organization permissions: broader access to account- or organization-level settings
All site permissions: access to site-specific data like your store, bookings, events, and more
For most platform integrations, you'll only need specific permissions under All site permissions rather than granting full access. Click See all next to this option to view and select the individual permissions required for your integration.
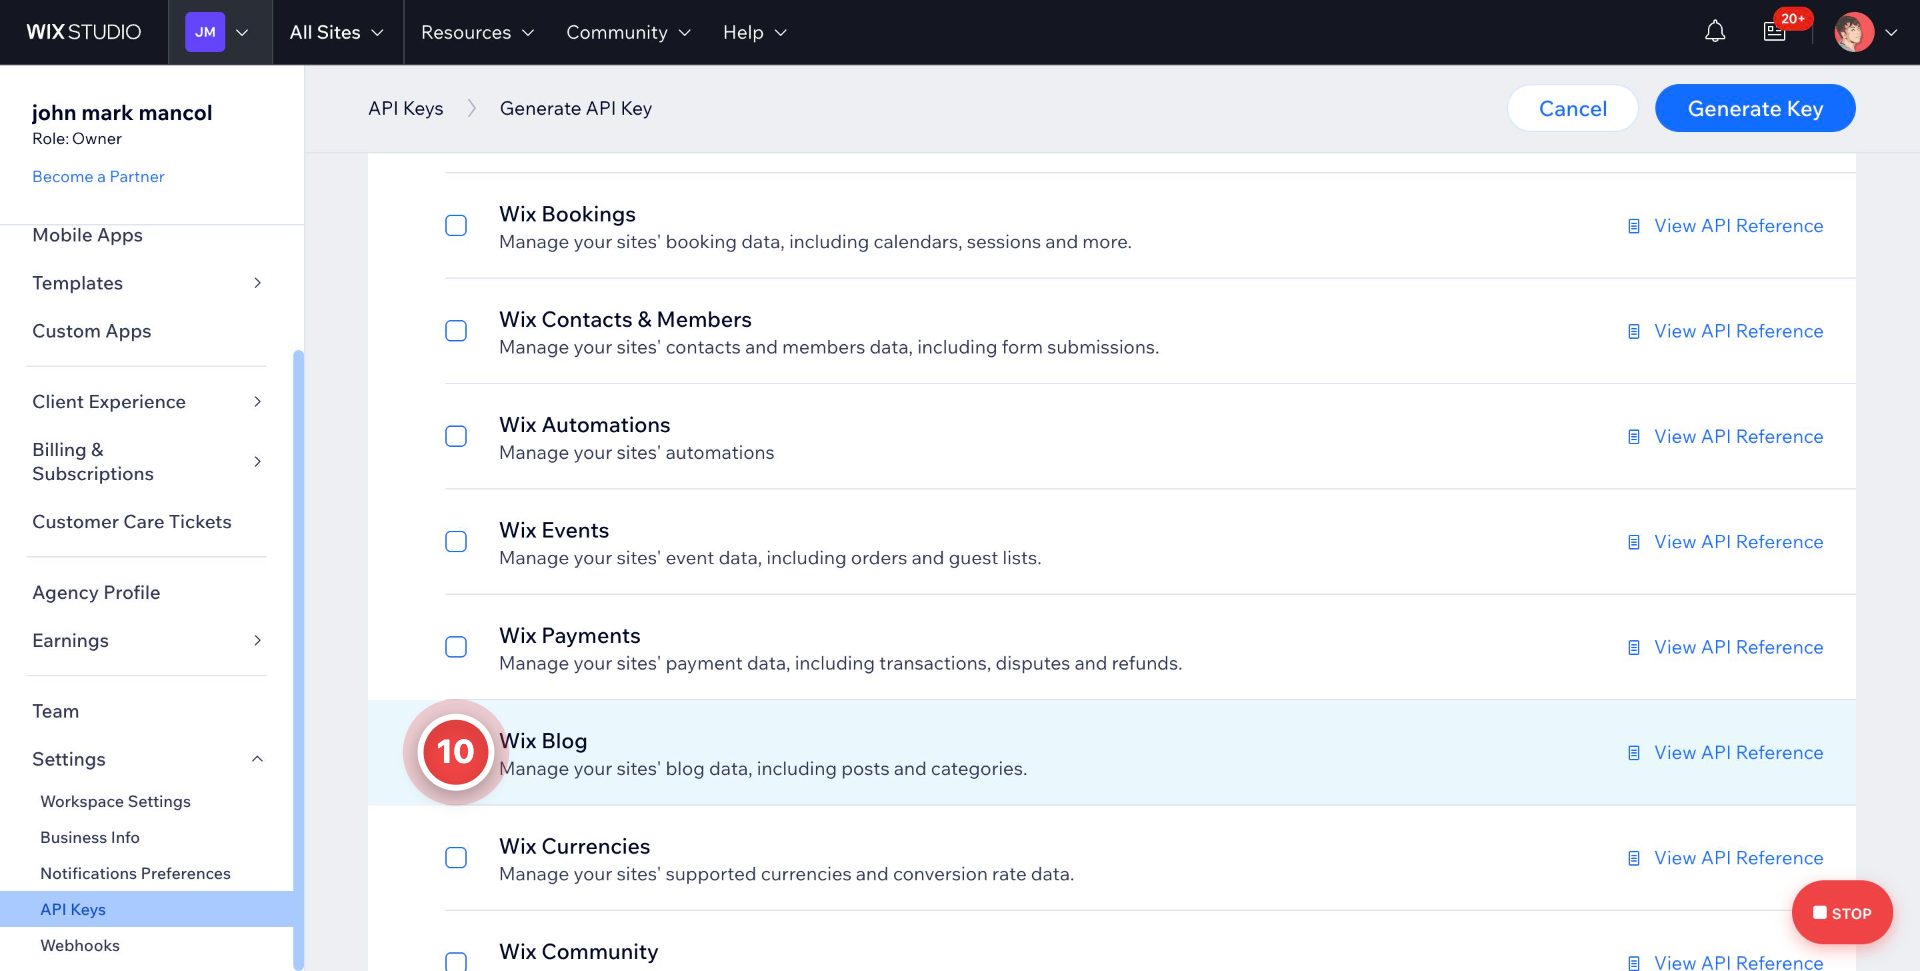
Step 10: Select the Wix Blog Permission
Under All site permissions, scroll to find Wix Blog and check its box. This grants access to manage your site's blog data, including posts and categories. This is the only permission needed for this integration.
Leave all other permission categories (Bookings, Contacts & Members, Automations, Events, Payments, Currencies, Community, etc.) unchecked to keep your API key scoped to only what UP-TO-DATE requires.
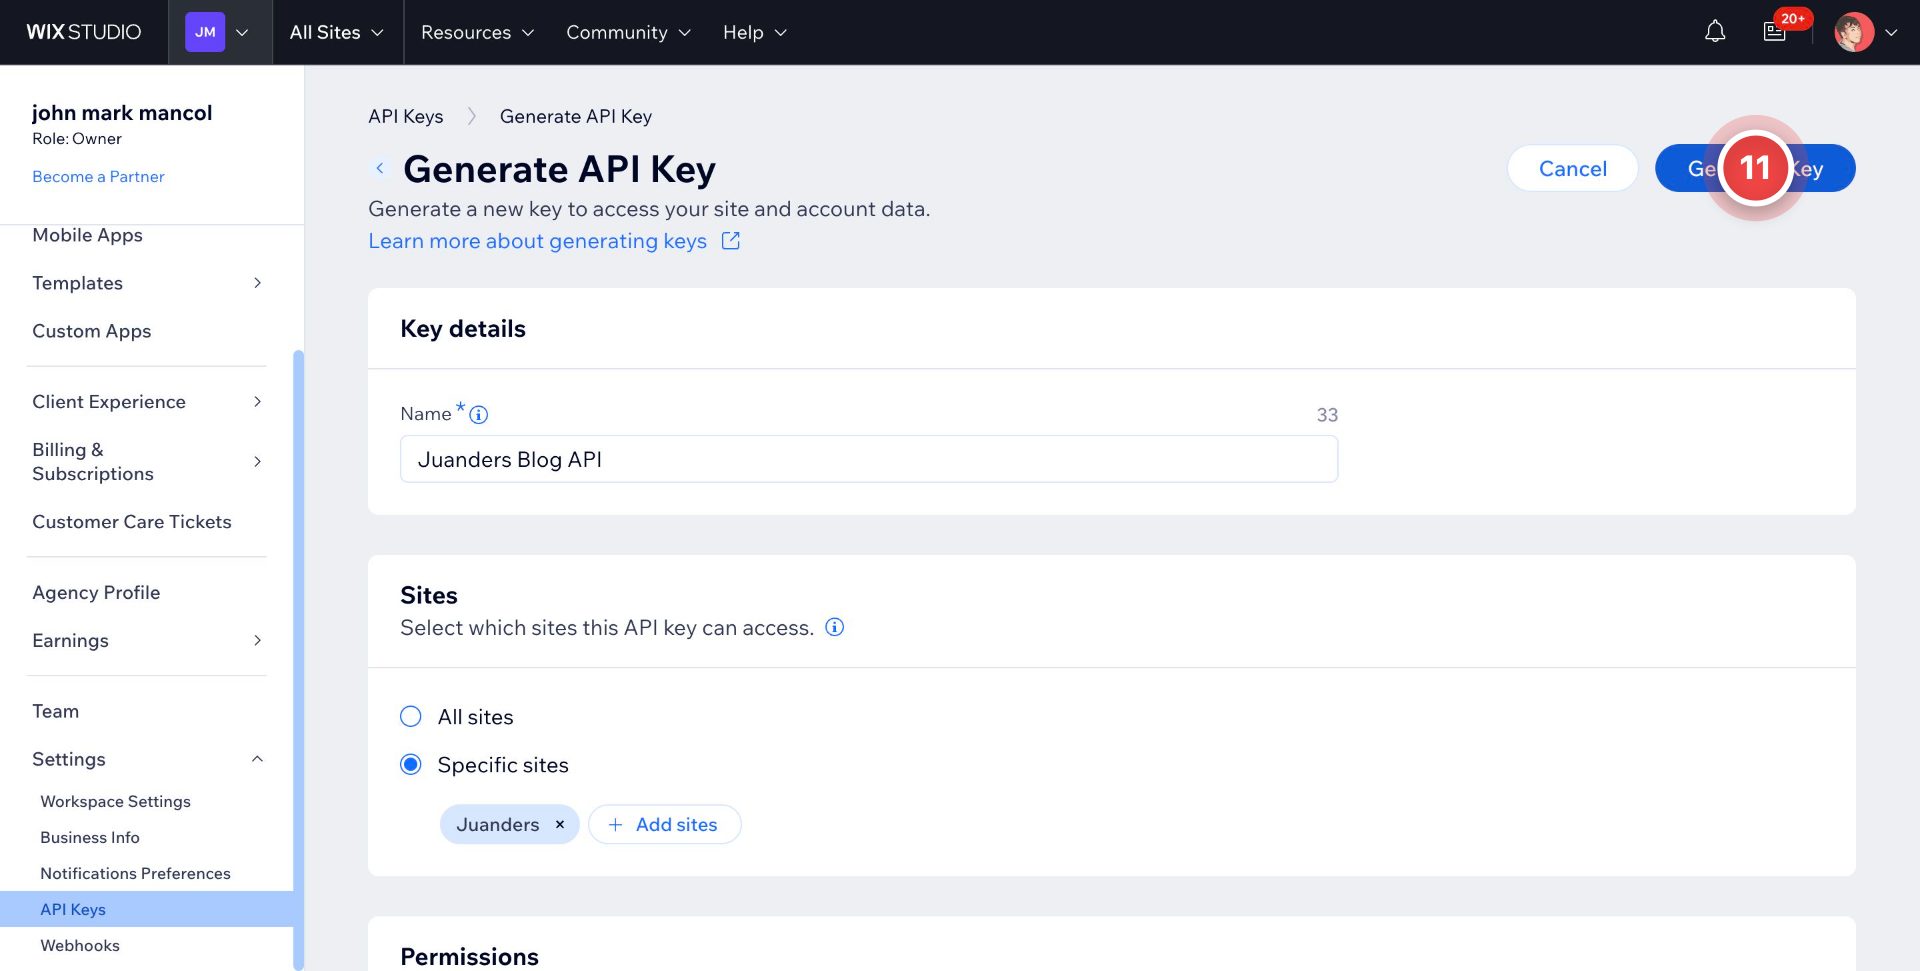
Step 11: Generate the API Key
Review your key details before finalizing:
Name: "Juanders Blog API" (or your chosen name)
Sites: Specific sites > your selected site (e.g., "Juanders")
Permissions: Wix Blog
Once everything looks correct, click Generate Key in the top-right corner to create your API key.
Important: After the key is generated, Wix will display it only once. Copy and securely store it immediately. You'll need to enter this key, along with your Site ID, in Accounts to complete the connection.
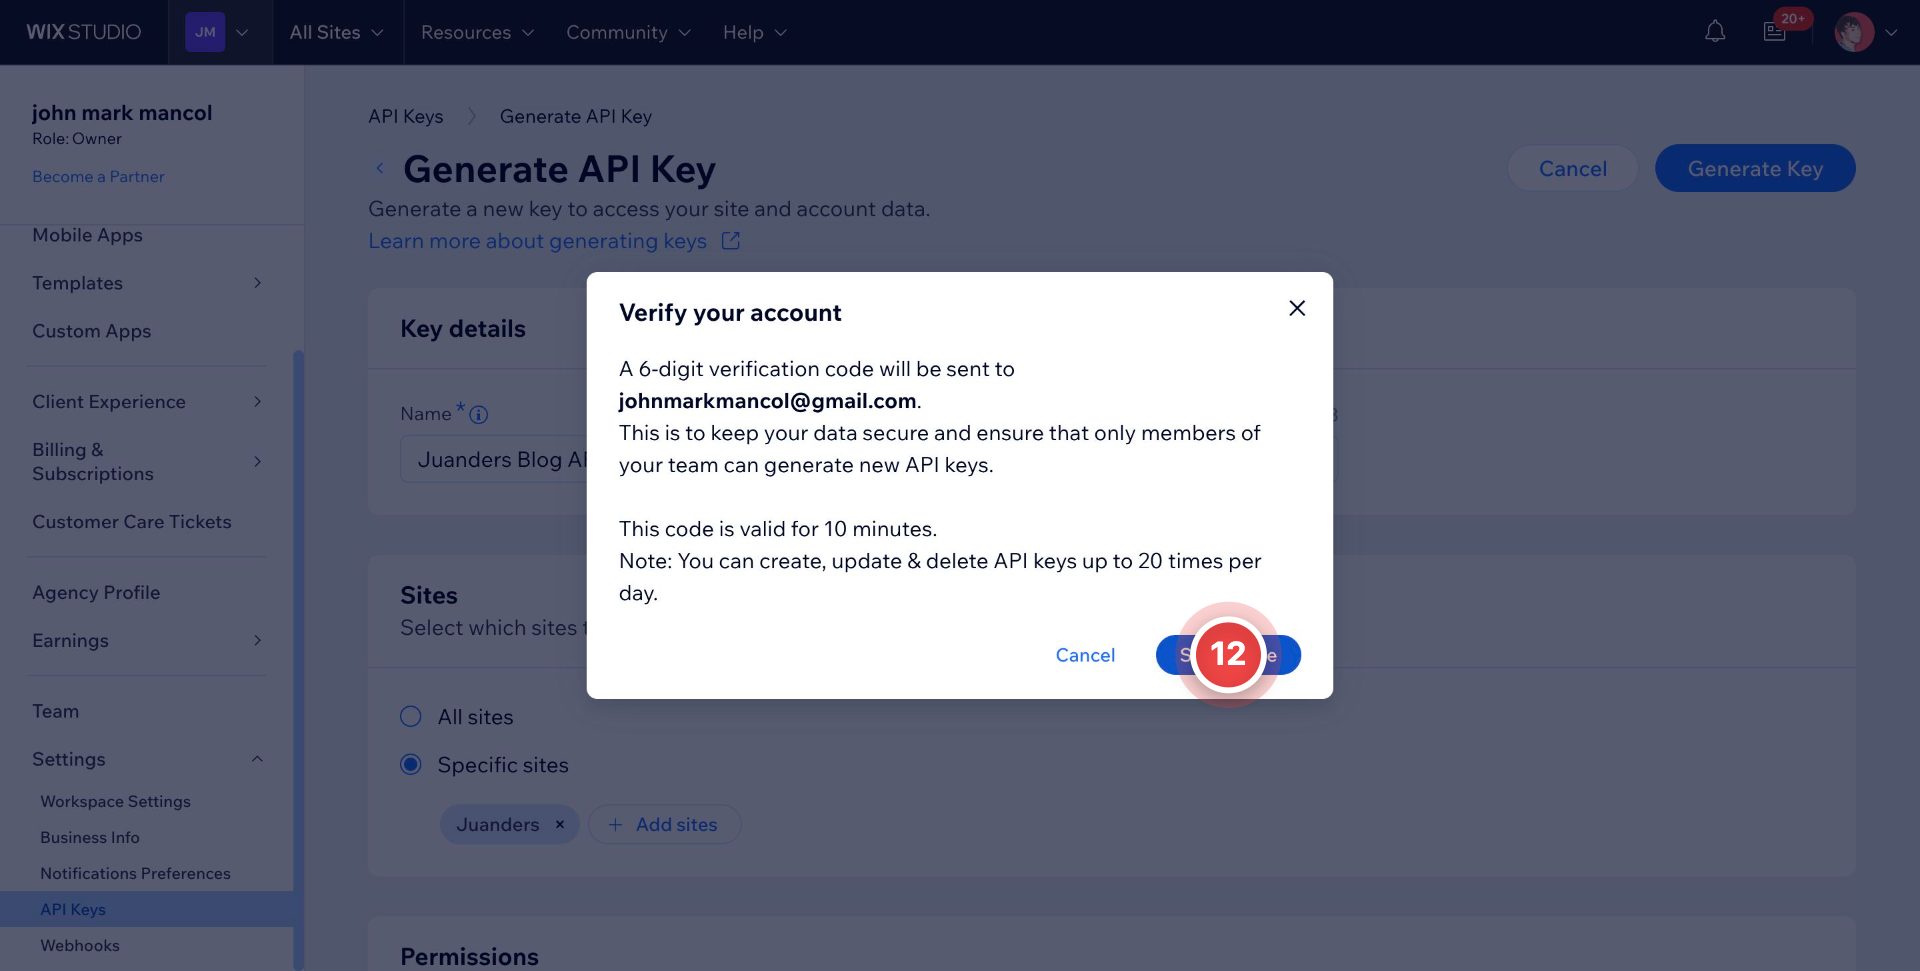
Step 12: Verify Your Account
For security, Wix will ask you to verify your identity before generating the key. Click Send Code to receive a 6-digit verification code at your account email address.
Note: The code is valid for 10 minutes, and you can create, update, or delete up to 20 API keys per day.
Step 13: Enter the Verification Code
Check your email for the 6-digit code Wix sent you, then enter it in the Code field.
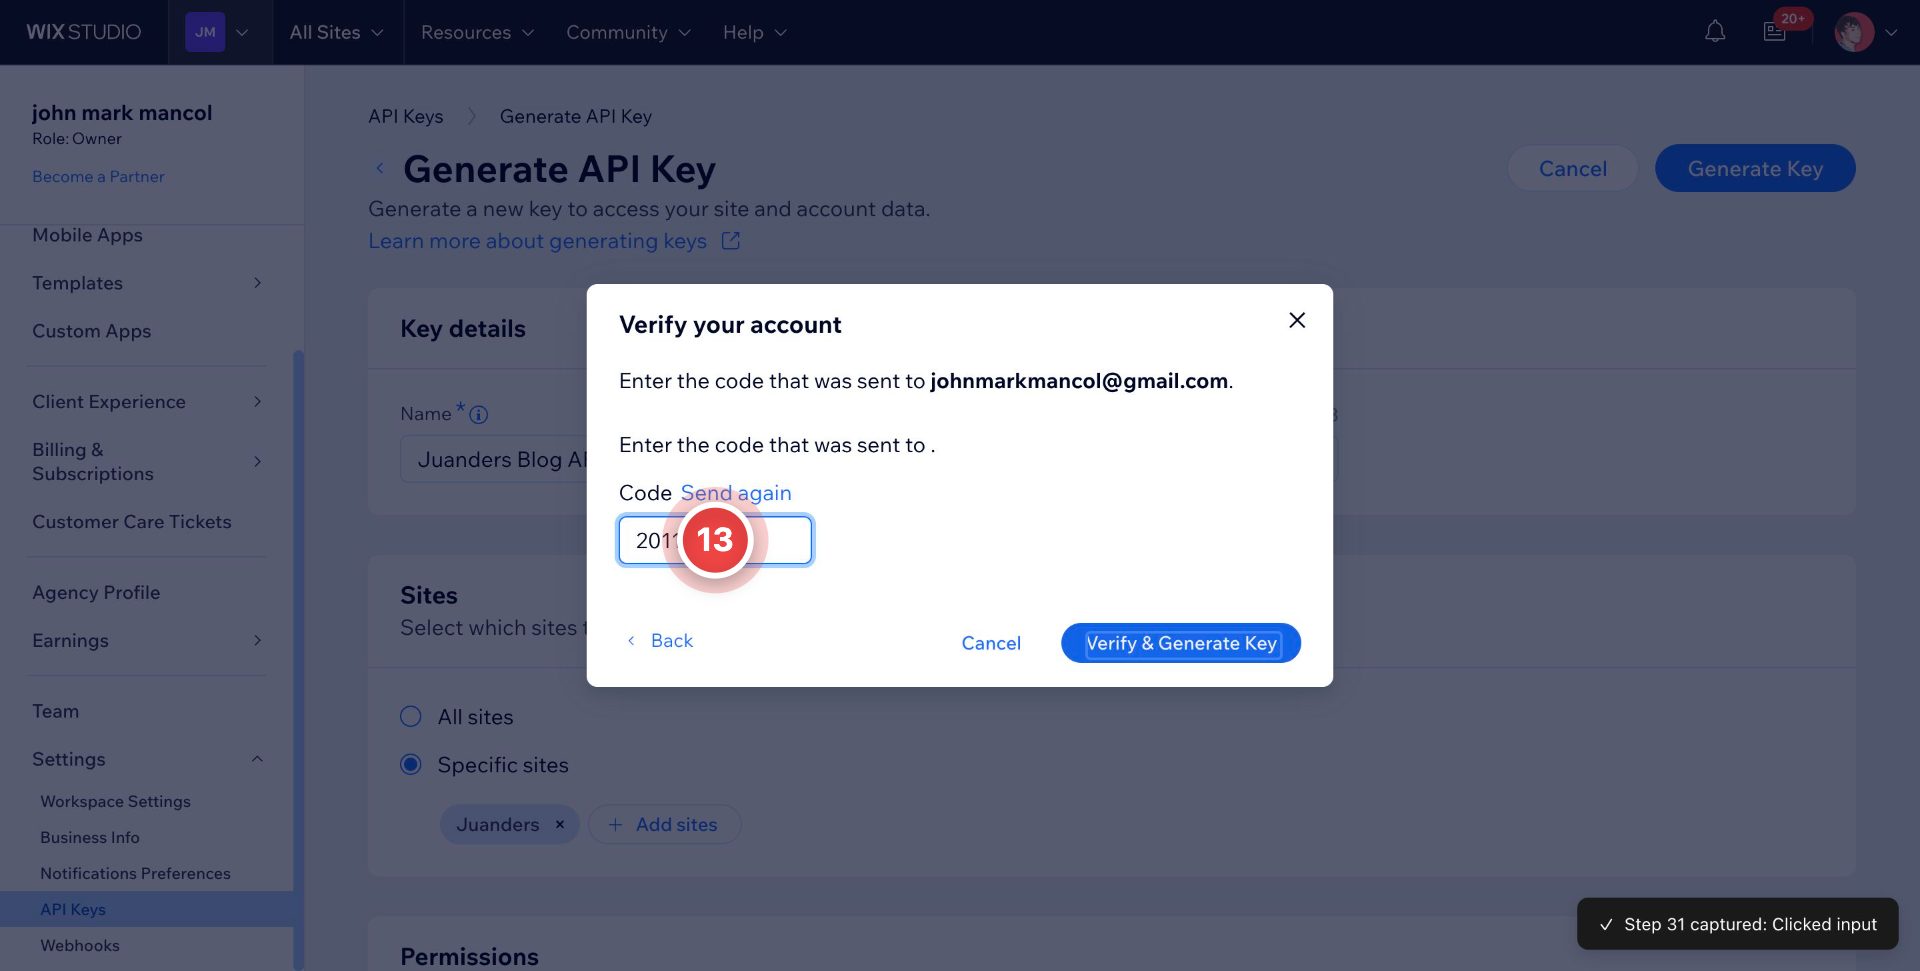
Step 14: Confirm and Generate the Key
With the verification code entered, click Verify & Generate Key to finalize the process. Wix will verify the code and immediately generate your new API key.
Important: Your API key will be displayed only once immediately after this step. Copy it right away and store it somewhere secure. You'll need it, along with your Site ID, to complete the connection in Accounts.
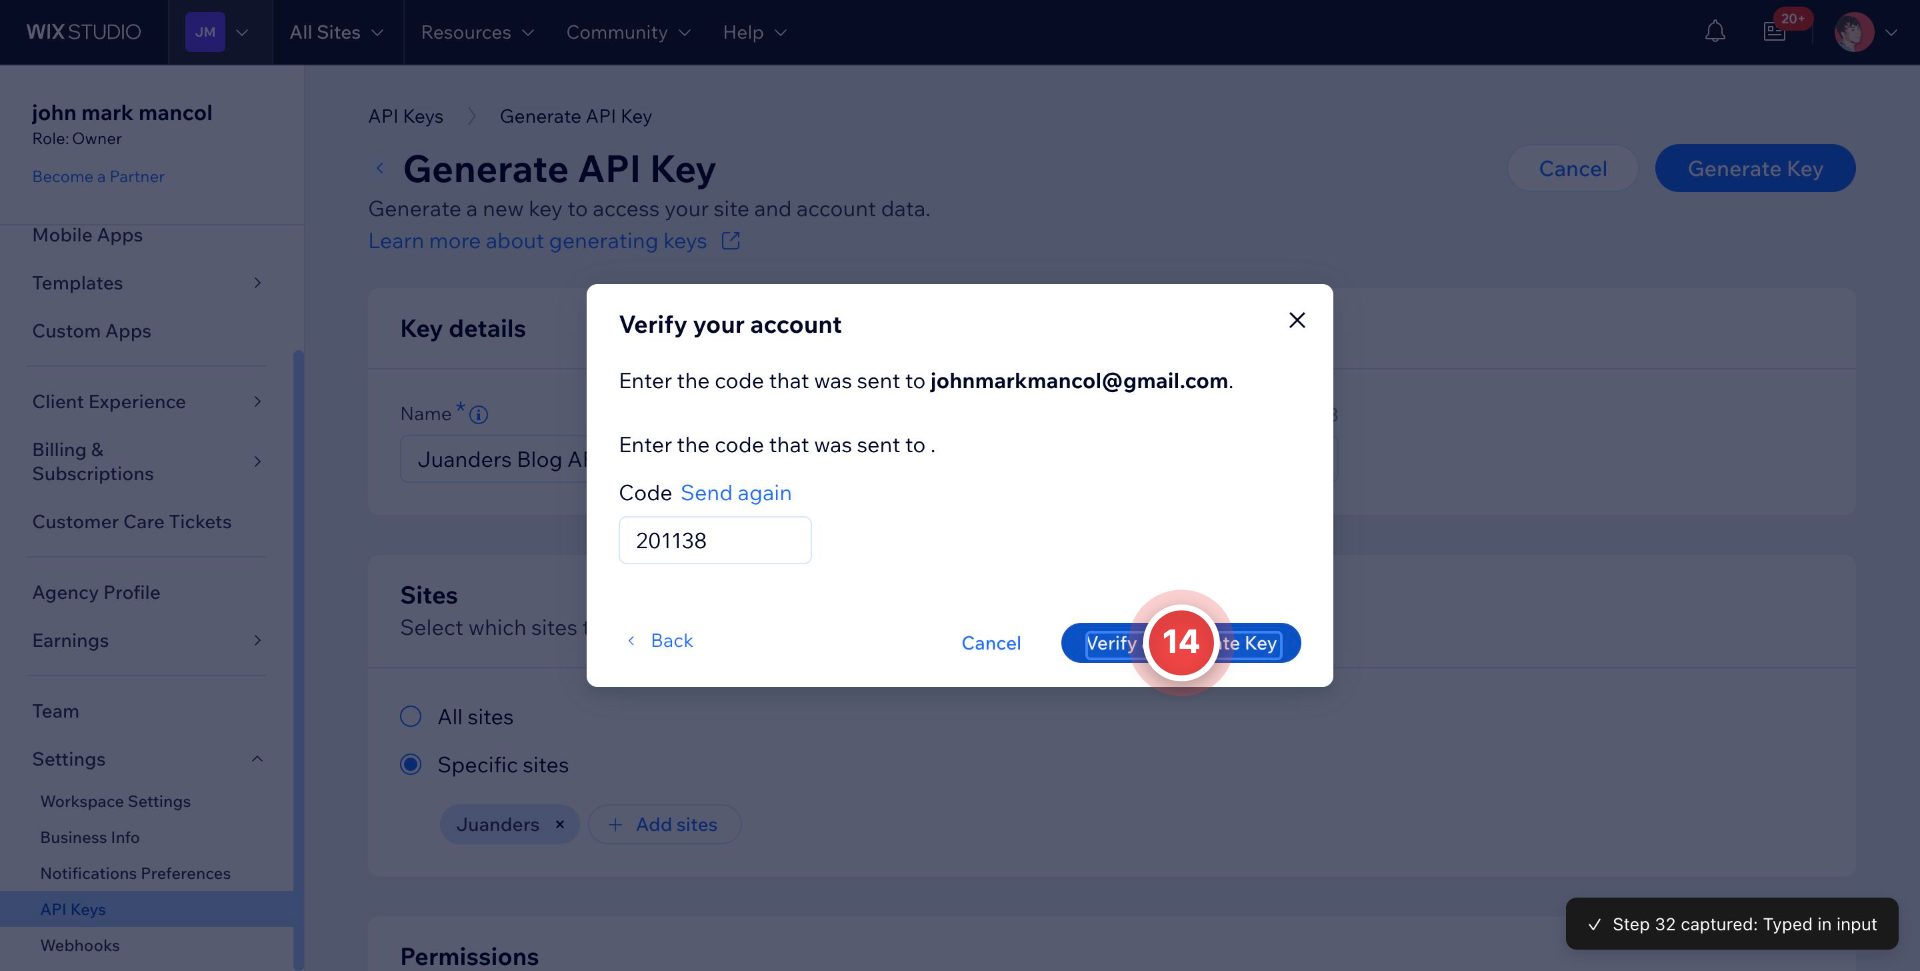
Step 15: Copy Your API Key
Wix will now display your generated token. This is the only time the full key will be shown, so click Copy Token & Close to copy it to your clipboard immediately.
Important: Store this token somewhere secure right away (e.g., a password manager). If you lose it, you'll need to generate a new key. Wix won't display this exact token again.
Once copied, you're ready to move to the next part of this guide: entering your API Key and Site ID into the connection form to complete the connection.
Integration Setup
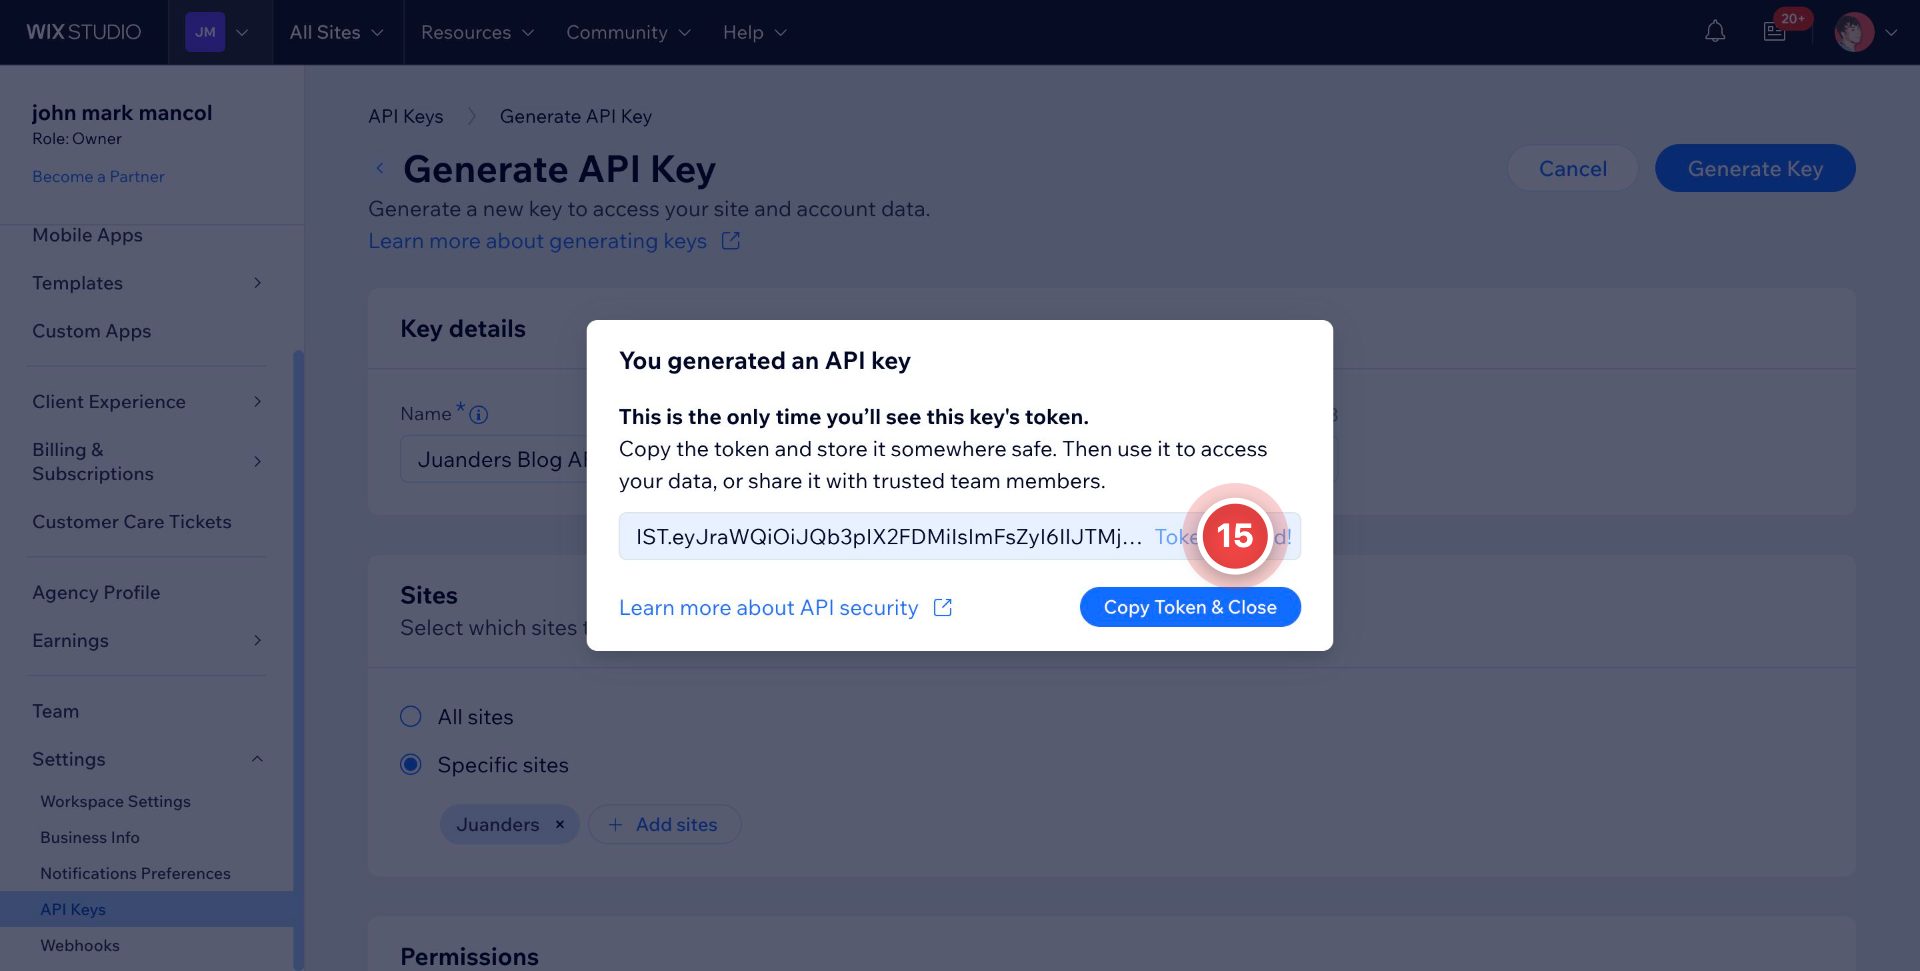
Step 16: Select Your Company
On the Accounts (accounts.uptodateconnect.com) platform, go to Companies in the left sidebar. From the list of registered companies, click on the company where you want to integrate your Wix site. In this example: "Juanders."
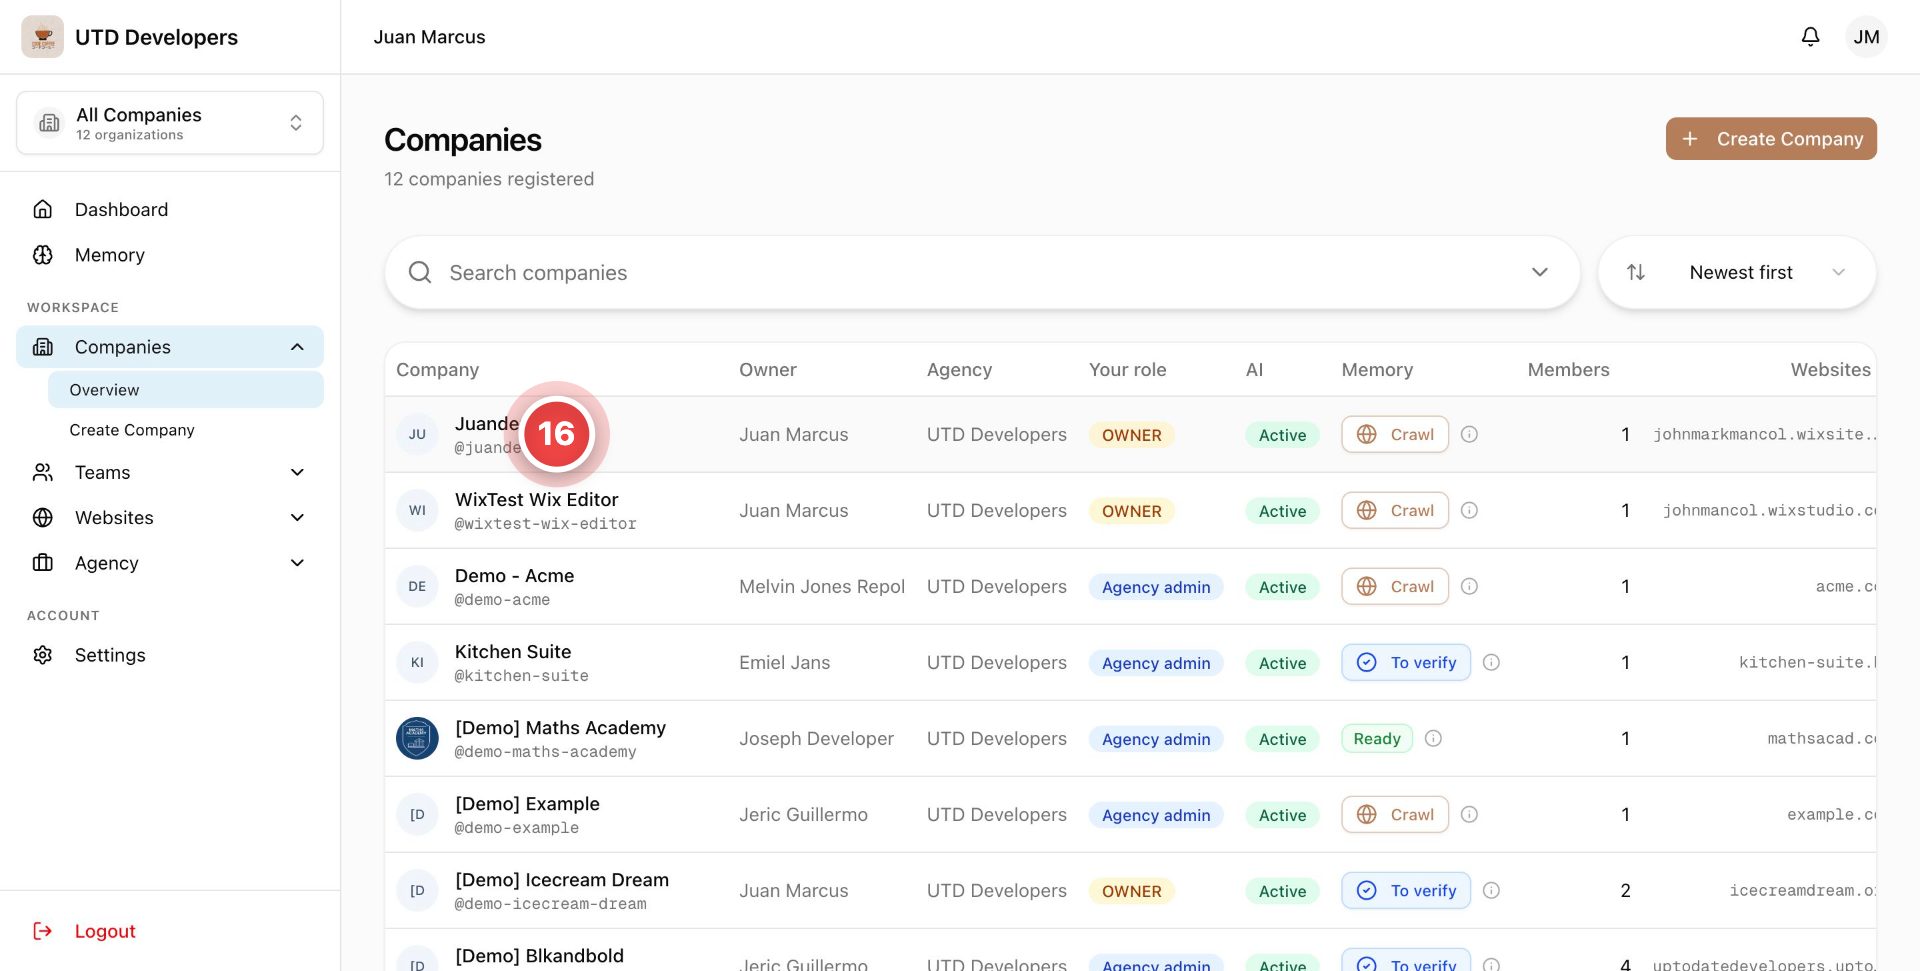
Step 17: Add a Website
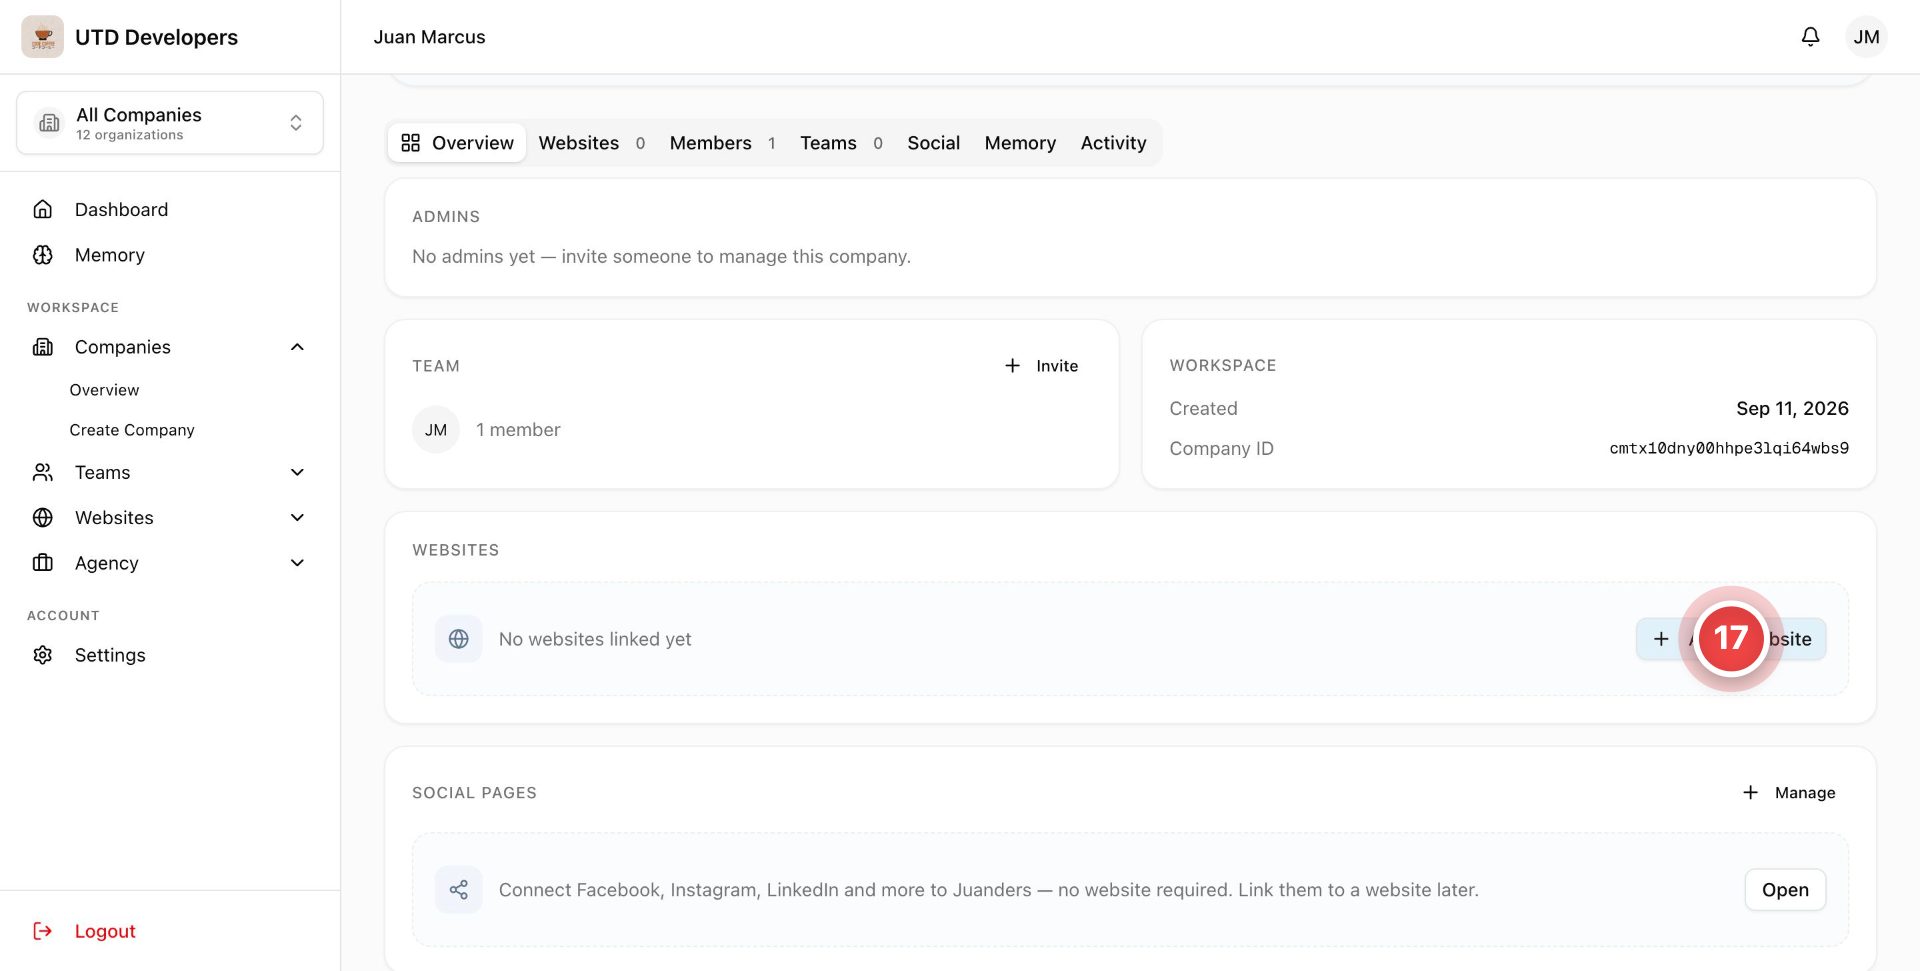
On the company's Overview page, scroll to the Websites section. Since no websites are linked yet, click + Add a website to begin connecting your Wix site to this company.
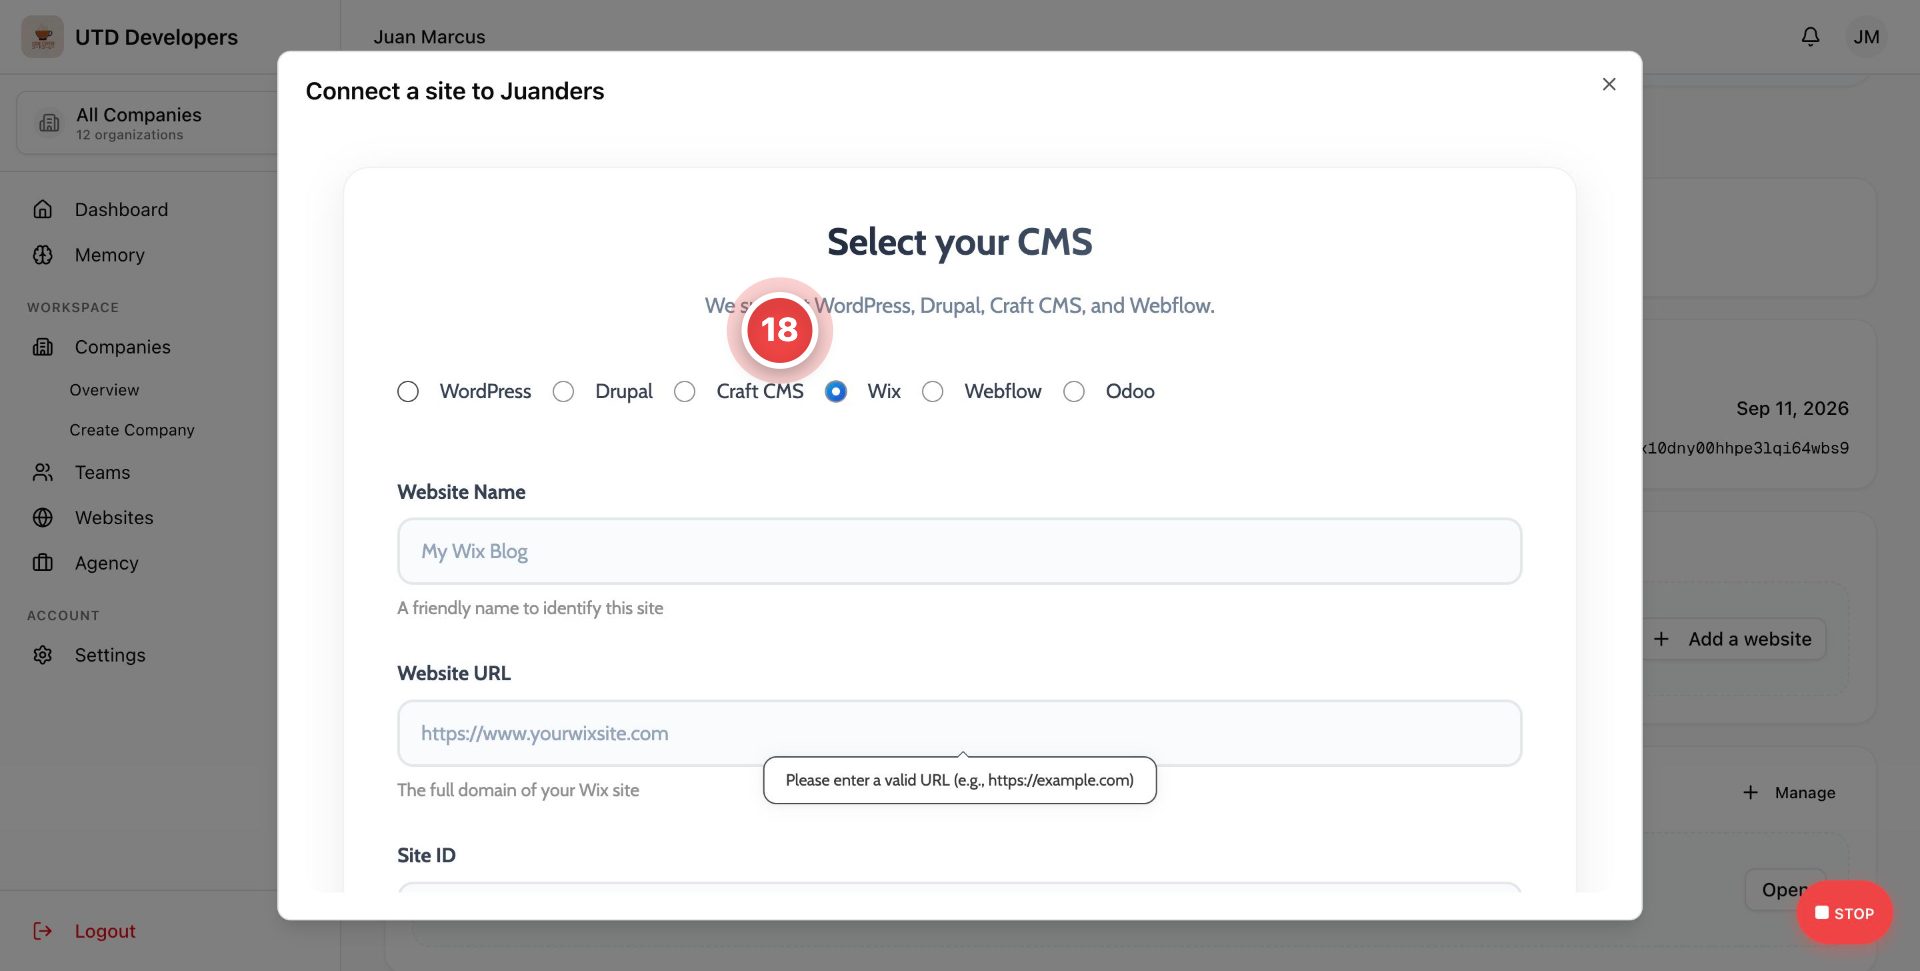
Step 18: Select Wix as Your CMS
A "Connect a site to Juanders" window will open. Under Select your CMS, choose Wix (already selected in this example) from the list of supported platforms.
Then fill in the following fields:
Website Name: a friendly label to identify this site (e.g., "My Wix Blog")
Website URL: the full domain of your Wix site (e.g.,
https://www.yourwixsite.com)Site ID (continue scrolling to complete this field)
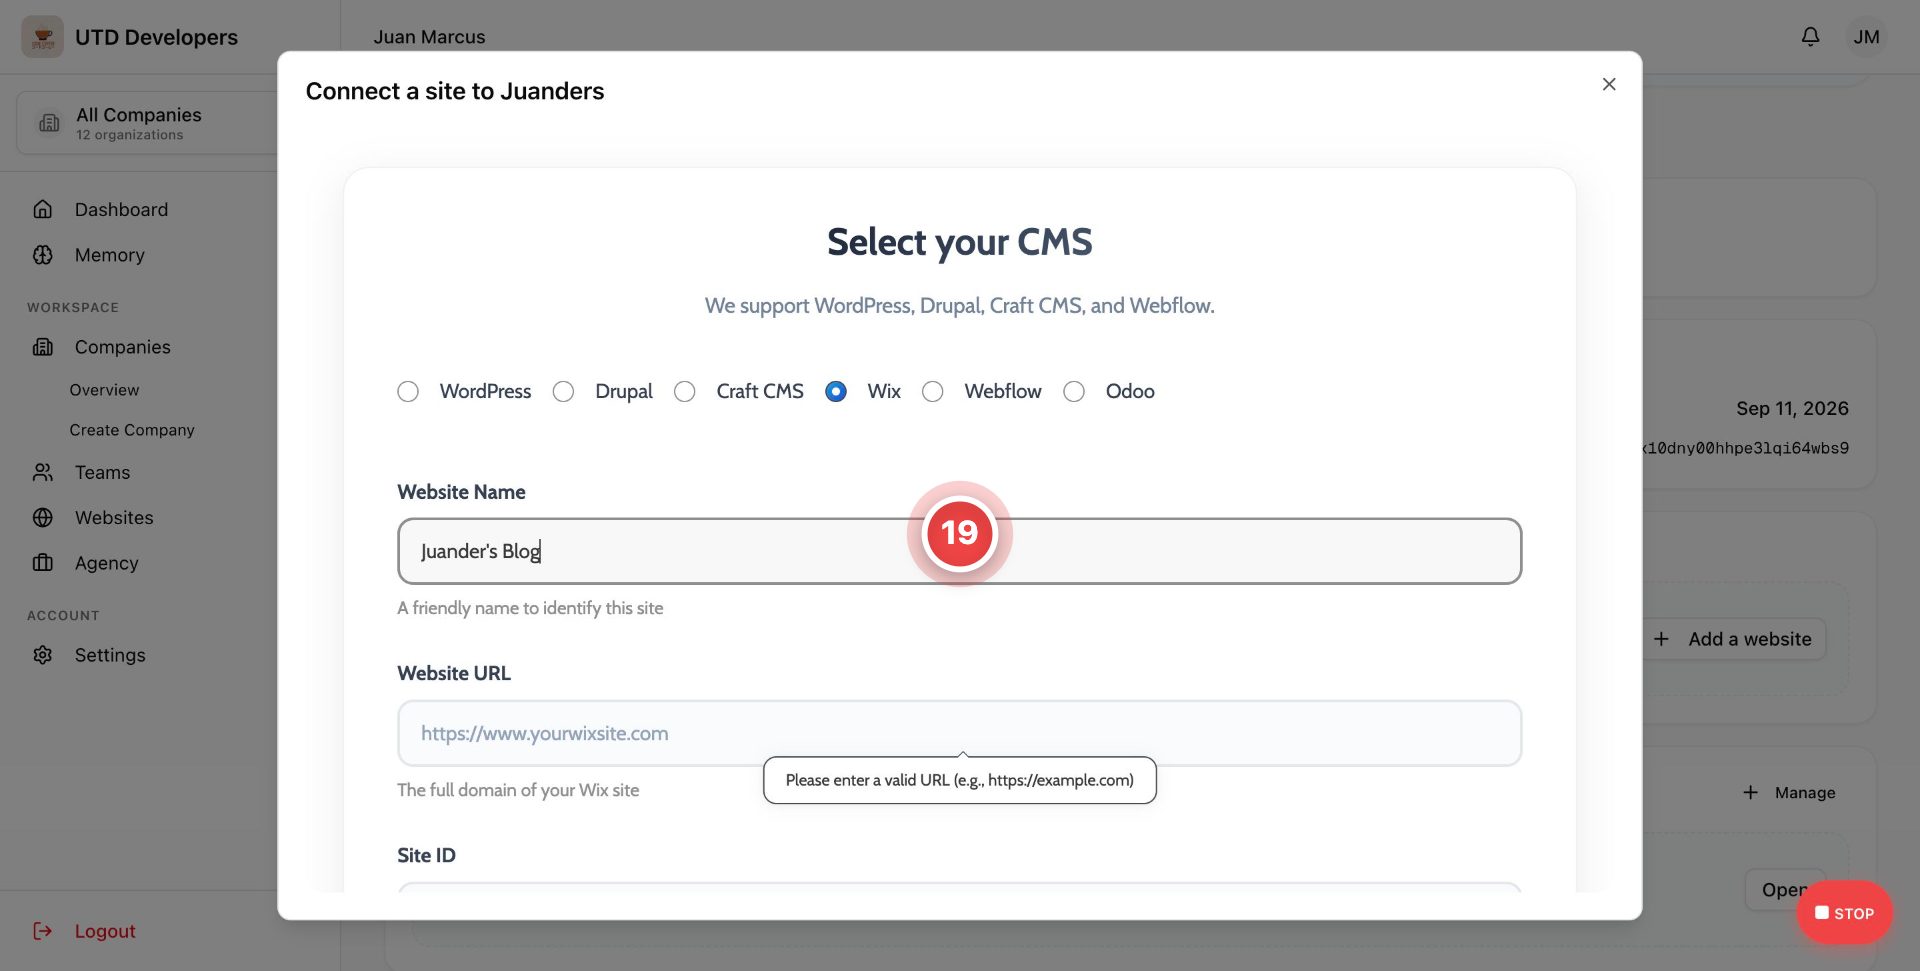
Step 19: Enter a Website Name
In the Website Name field, type a friendly label to identify this site, for example "Juander's Blog." This name is just for your reference within the platform and doesn't need to match your Wix site's actual title.
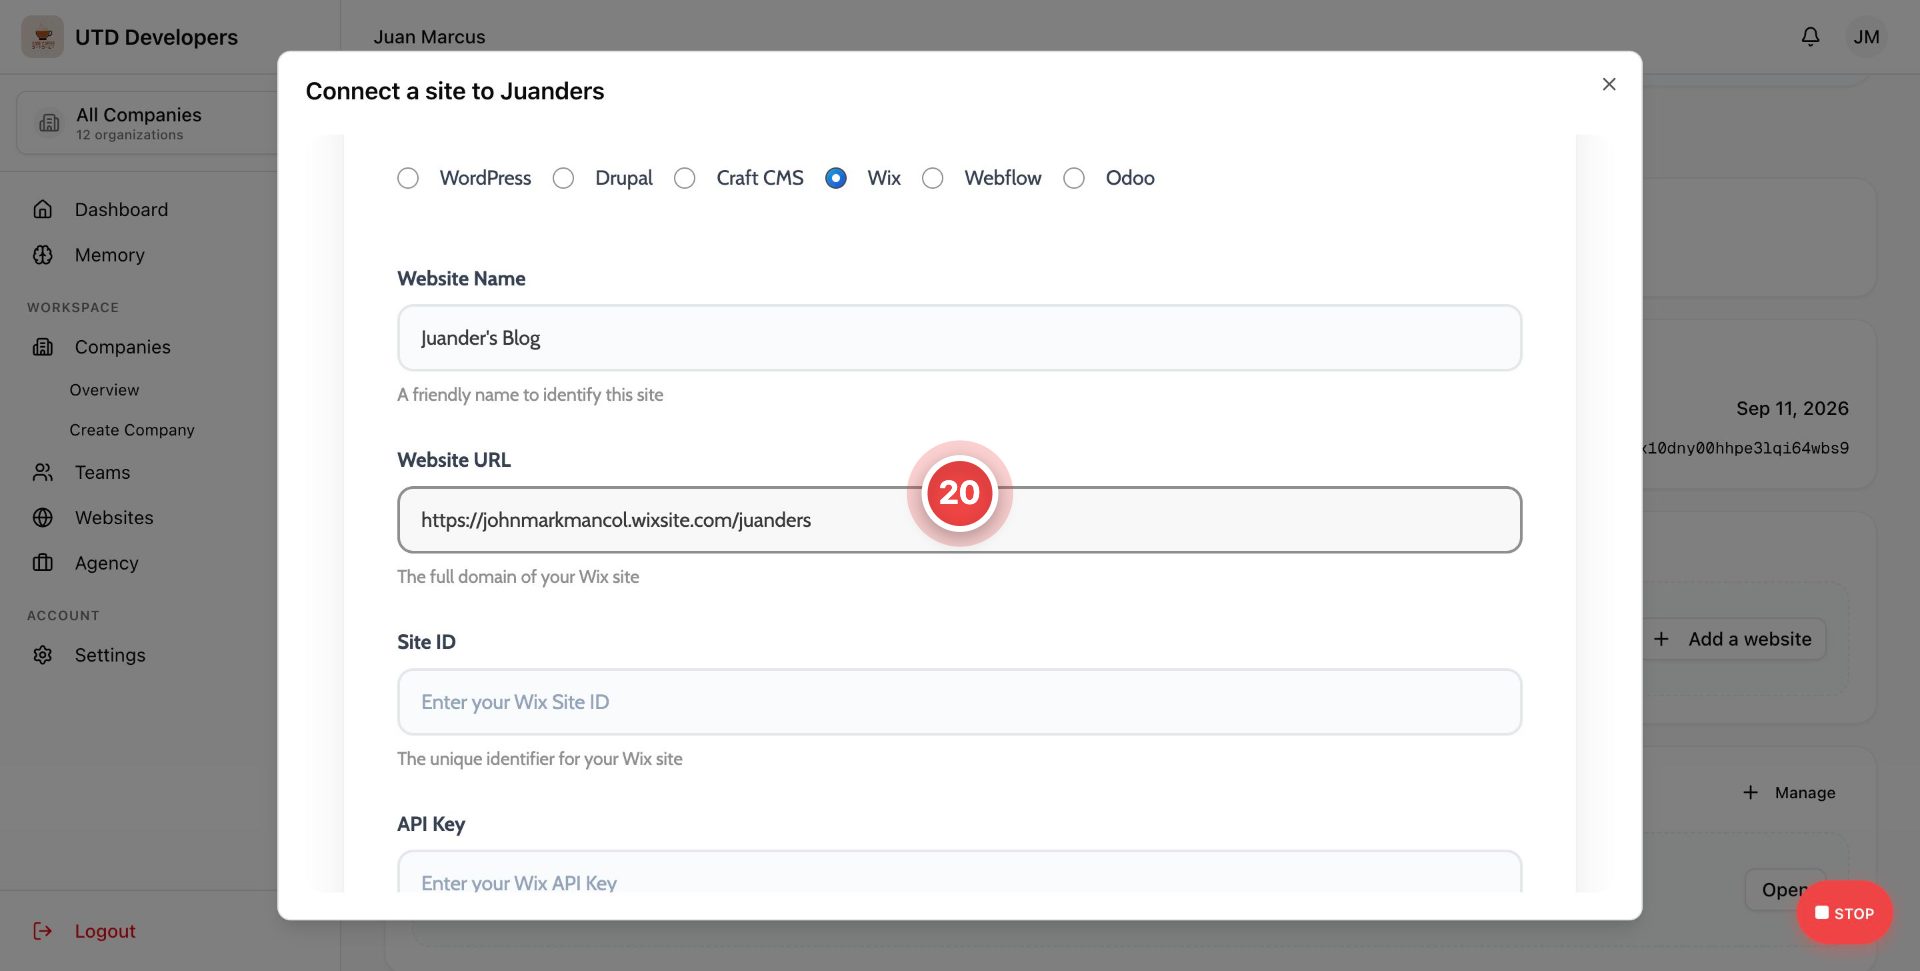
Step 20: Enter Your Website URL
In the Website URL field, enter the full domain of your Wix site, for example https://johnmarkmancol.wixsite.com/juanders. This should match your live Wix site's actual web address.
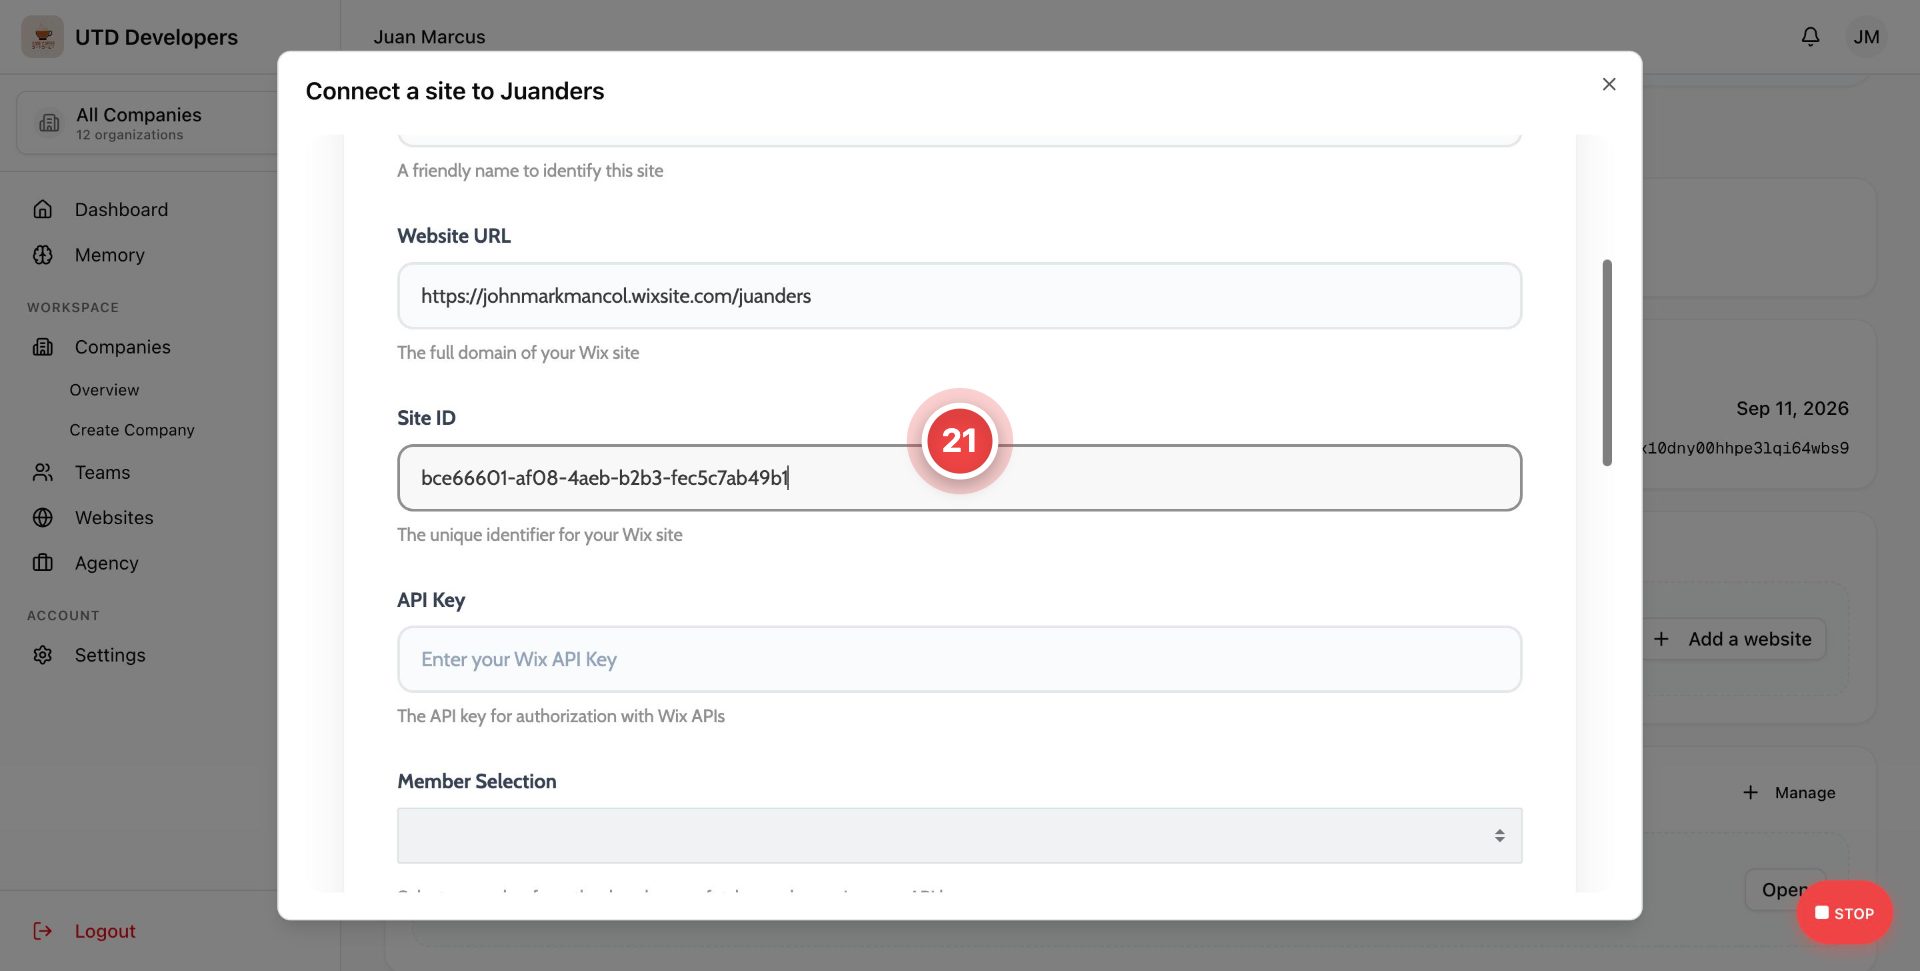
Step 21: Enter Your Wix Site ID
In the Site ID field, paste your site's unique identifier. This tells UP-TO-DATE exactly which Wix site to connect to.
Finding Your Wix Site ID
Your Wix Site ID can be found directly in your browser's address bar while viewing your site's dashboard in Wix. It's the string of letters and numbers that appears in the URL, formatted like a UUID (e.g., bce66601-af08-4aeb-b2b3-fec5c7ab49b1).
For example:
https://manage.wix.com/dashboard/bce66601-af08-4aeb-b2b3-fec5c7ab49b1/setup?referralInfo=sites-dropdownCopy just that ID segment from the URL. You'll need it when connecting your site on UP-TO-DATE.
Step 22: Enter Your Wix API Key
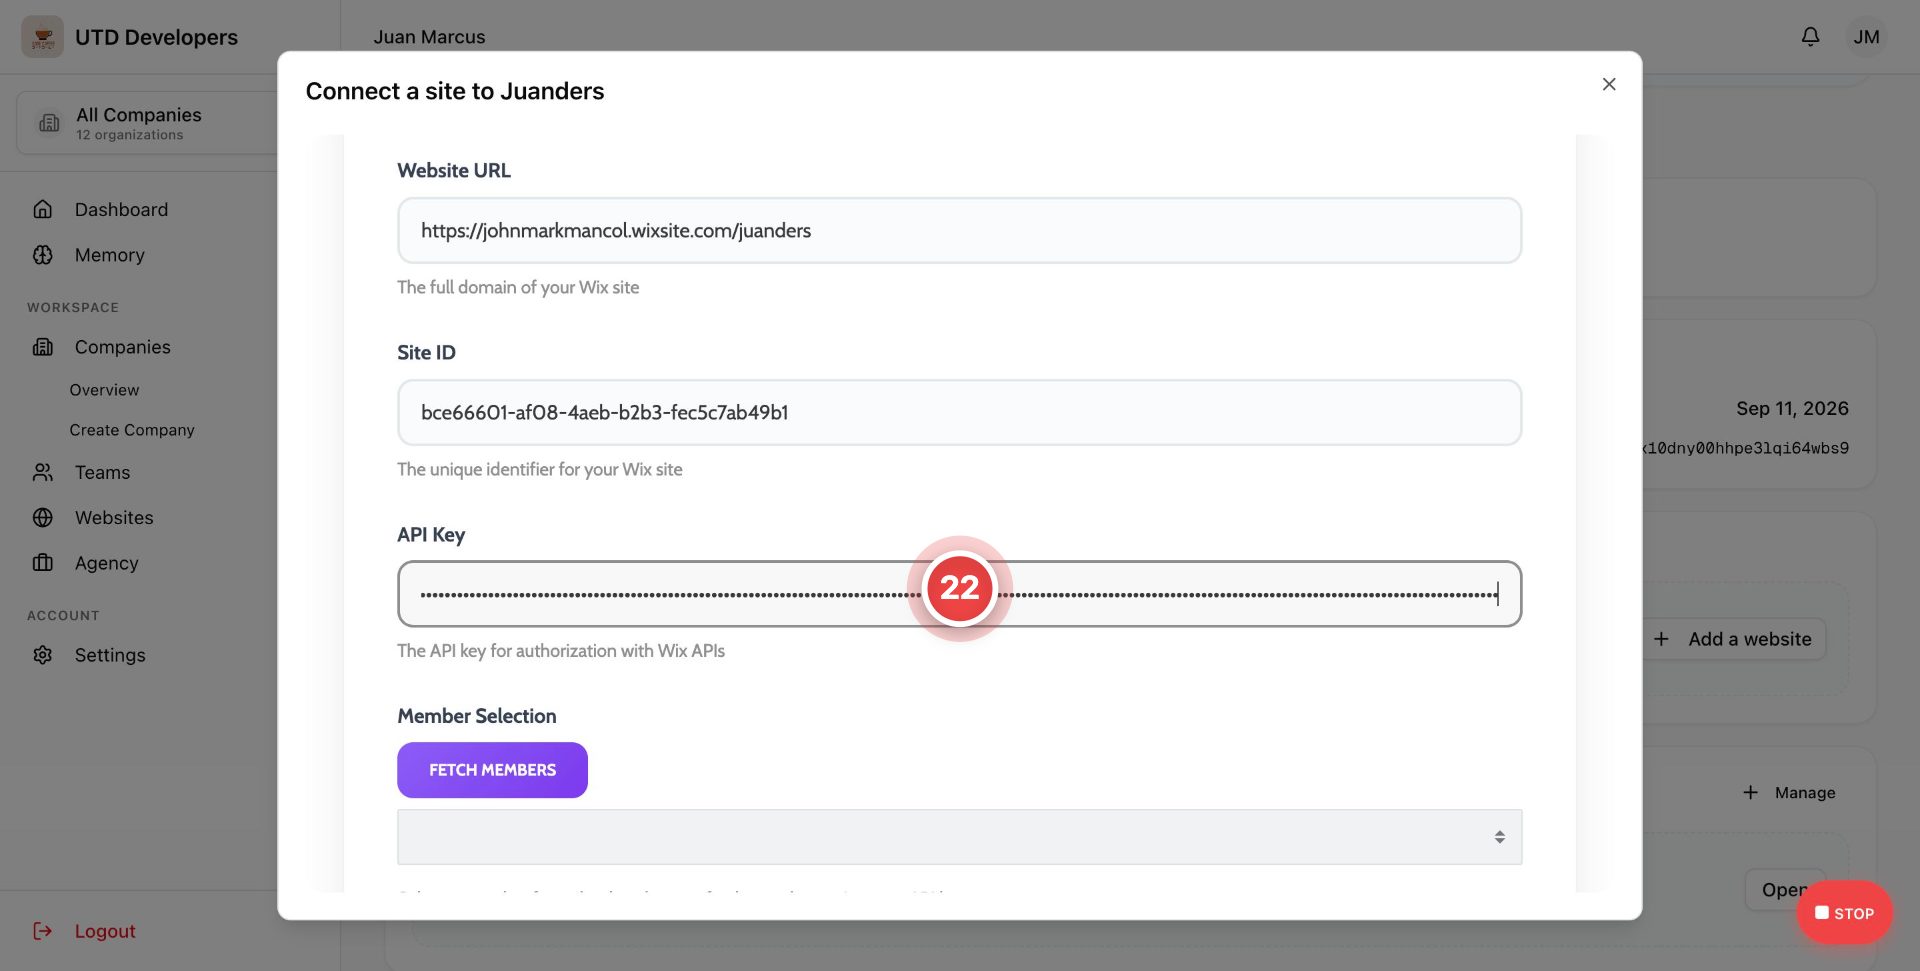
In the API Key field, paste the token you generated and copied back in Step 15. This key is what authorizes UP-TO-DATE to securely access your Wix site's blog data on your behalf.
Note: For security, this field masks your input as you type. This is normal and doesn't affect the connection.
Step 23: Fetch and Select a Member
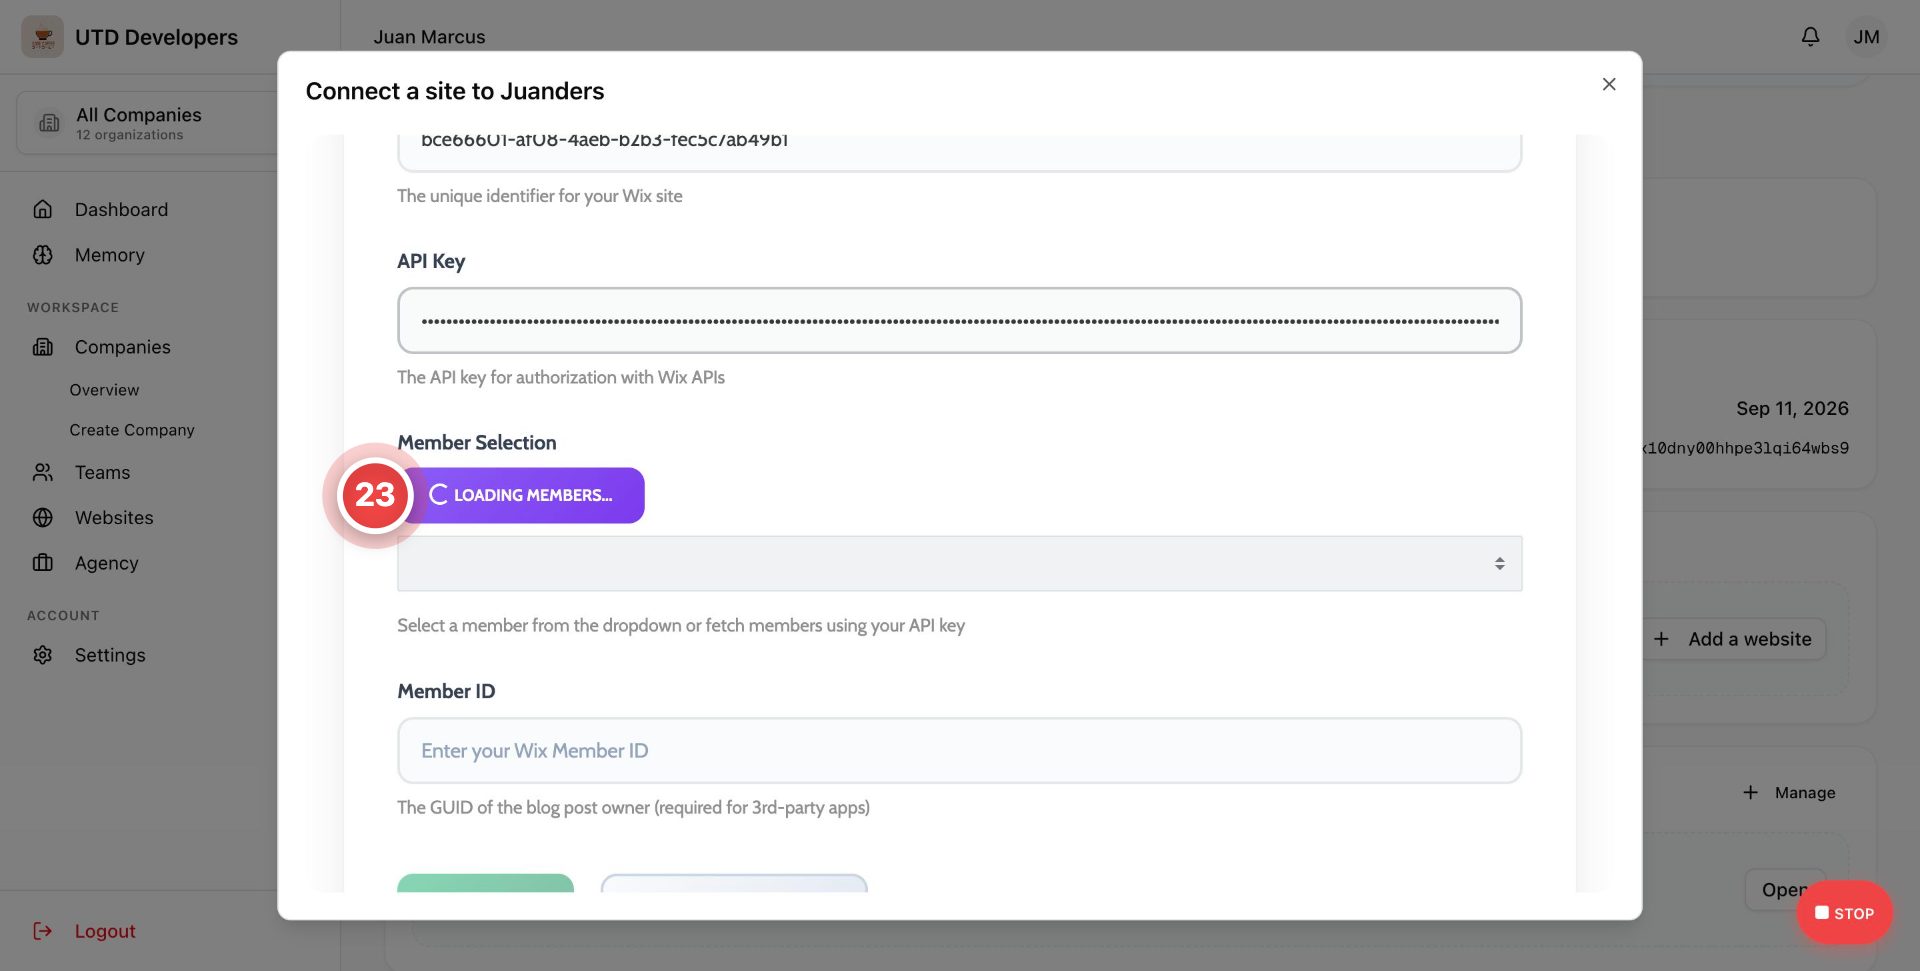
Click Fetch Members to pull the list of members from your Wix site using the API key you just entered. Once loaded, select the appropriate member from the dropdown. This will be used to identify the blog post owner.
Alternatively, if you already know the specific member's ID, you can skip the dropdown and enter it directly in the Member ID field below.
Note: The Member ID is the GUID (unique identifier) of the blog post owner, and is required for third-party app integrations like this one.
Step 24: Select the Member
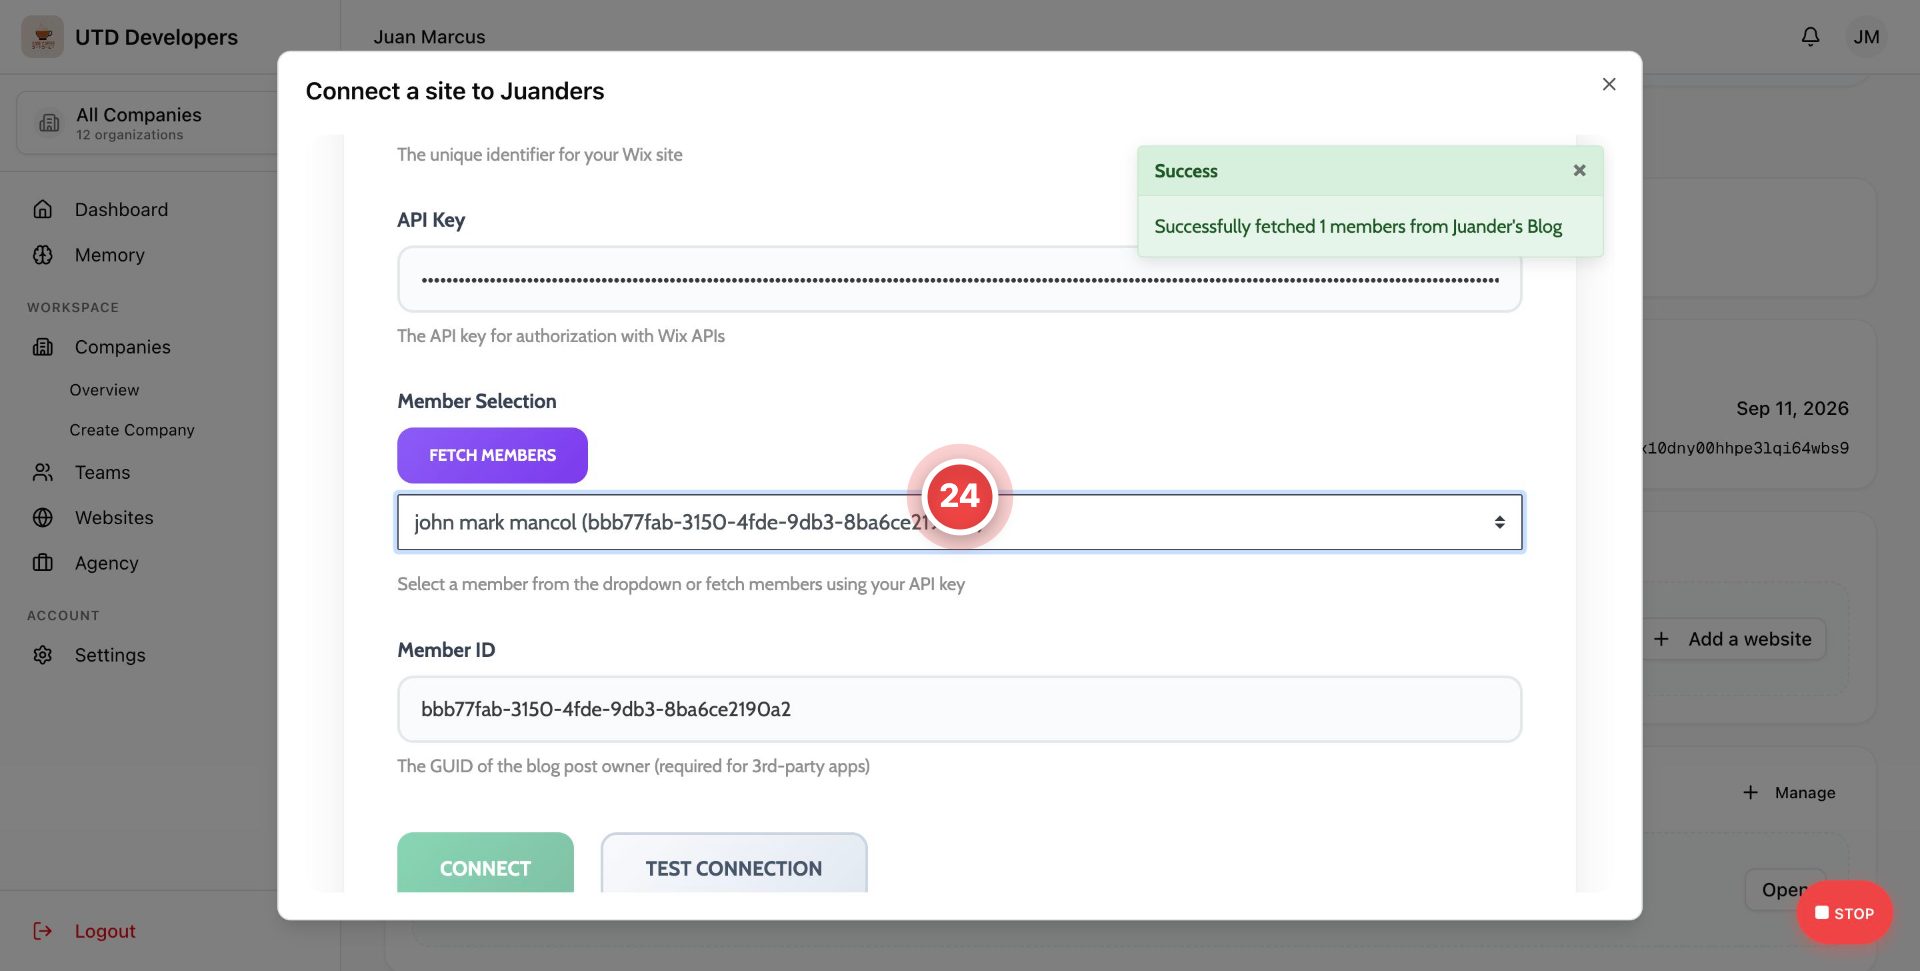
After clicking Fetch Members, a success message confirms the members were retrieved (e.g., "Successfully fetched 1 members from Juander's Blog"). From the Member Selection dropdown, choose the appropriate member. In this example: "john mark mancol."
Selecting a member automatically populates the Member ID field below with the corresponding GUID (e.g., bbb77fab-3150-4fde-9db3-8ba6ce2190a2).
Step 25: Test the Connection
Before finalizing, click Test Connection to verify that your Wix site details and API key are correctly configured and able to communicate with UP-TO-DATE.
Tip: If the test succeeds, you're ready to proceed. If it fails, double-check your API Key, Site ID, and Website URL for typos before trying again.
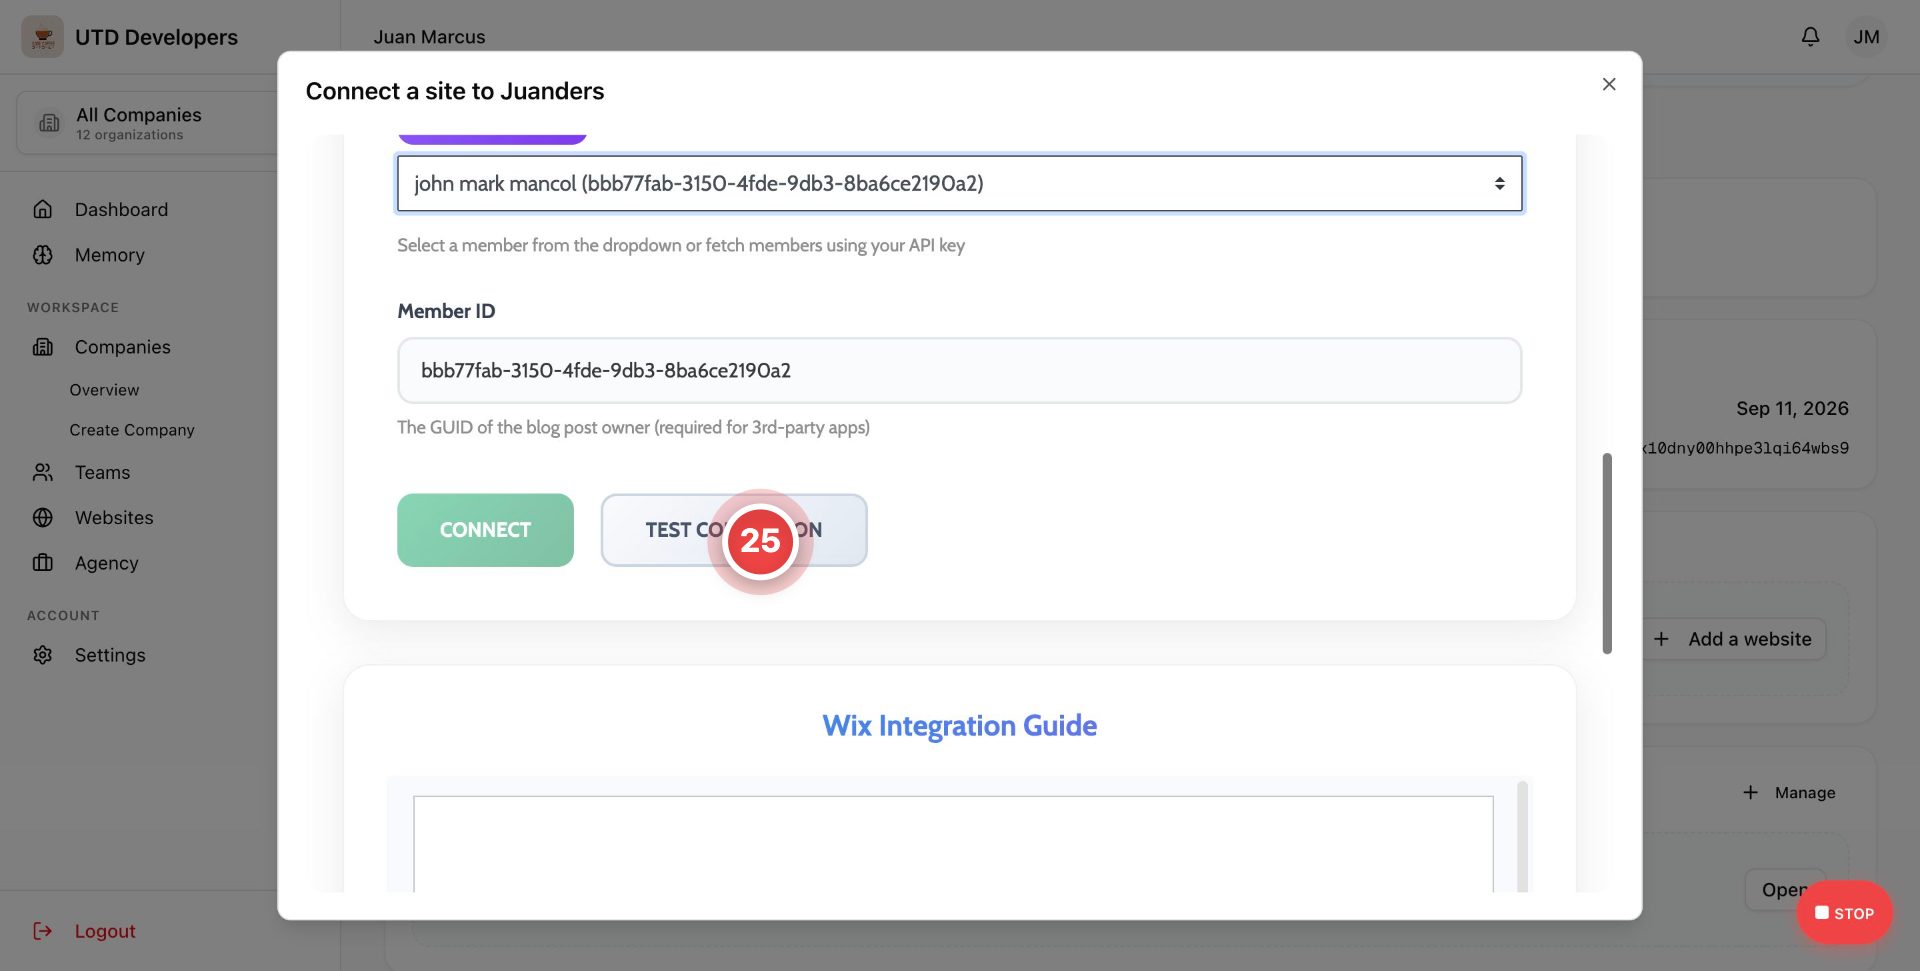
Step 26: Review Connection Test Results
While the test runs, you'll see a "Testing connection..." status. Wait for it to complete before proceeding. This confirms whether your entered details (API Key, Site ID, and Website URL) are valid and successfully communicating with your Wix site.
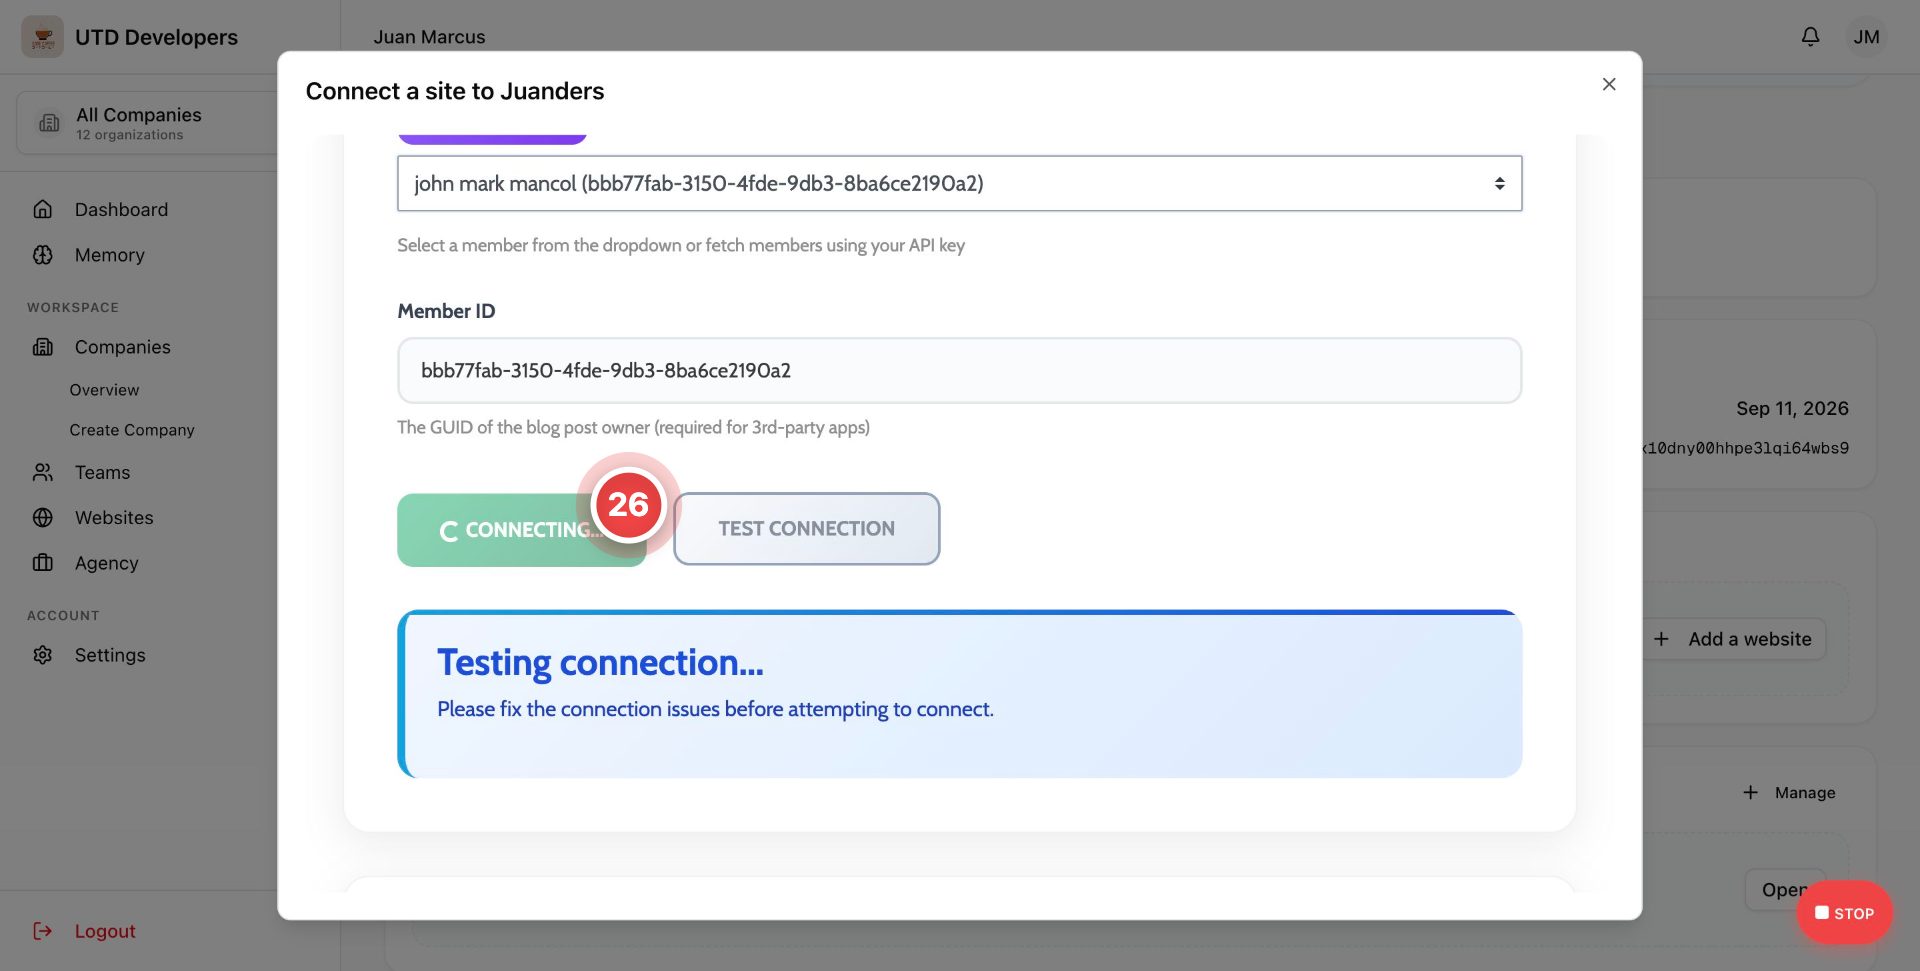
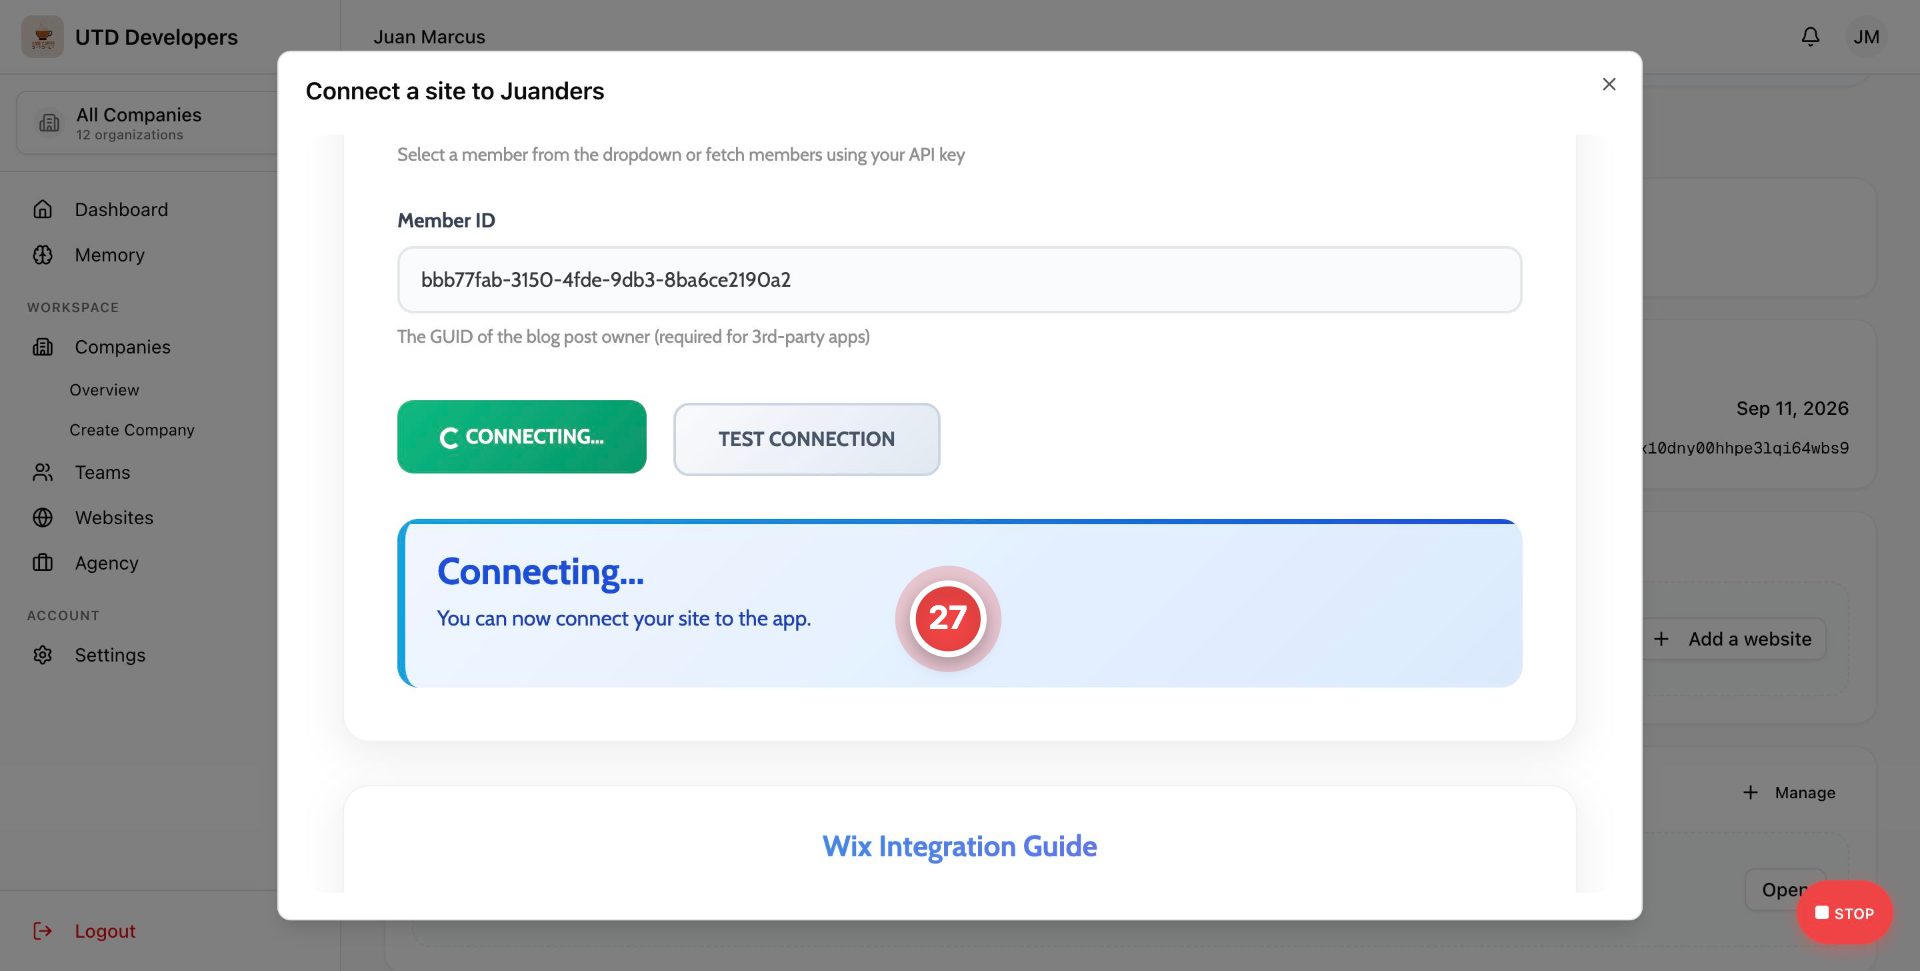
Step 27: Complete the Connection
Once the test succeeds, the status updates to "Connecting... You can now connect your site to the app." Click Connect to finalize the integration between your Wix site and UP-TO-DATE.
Getting Your Wix Application Ready for Blog Auto-Posting
Before your integration can automatically publish blog posts, your Wix site needs the Wix Blog app installed. This app is required for our platform to create, manage, and publish content directly to your site.
Already have Wix Blog installed? You can skip ahead to the next section — this step only applies if the app isn't set up yet.
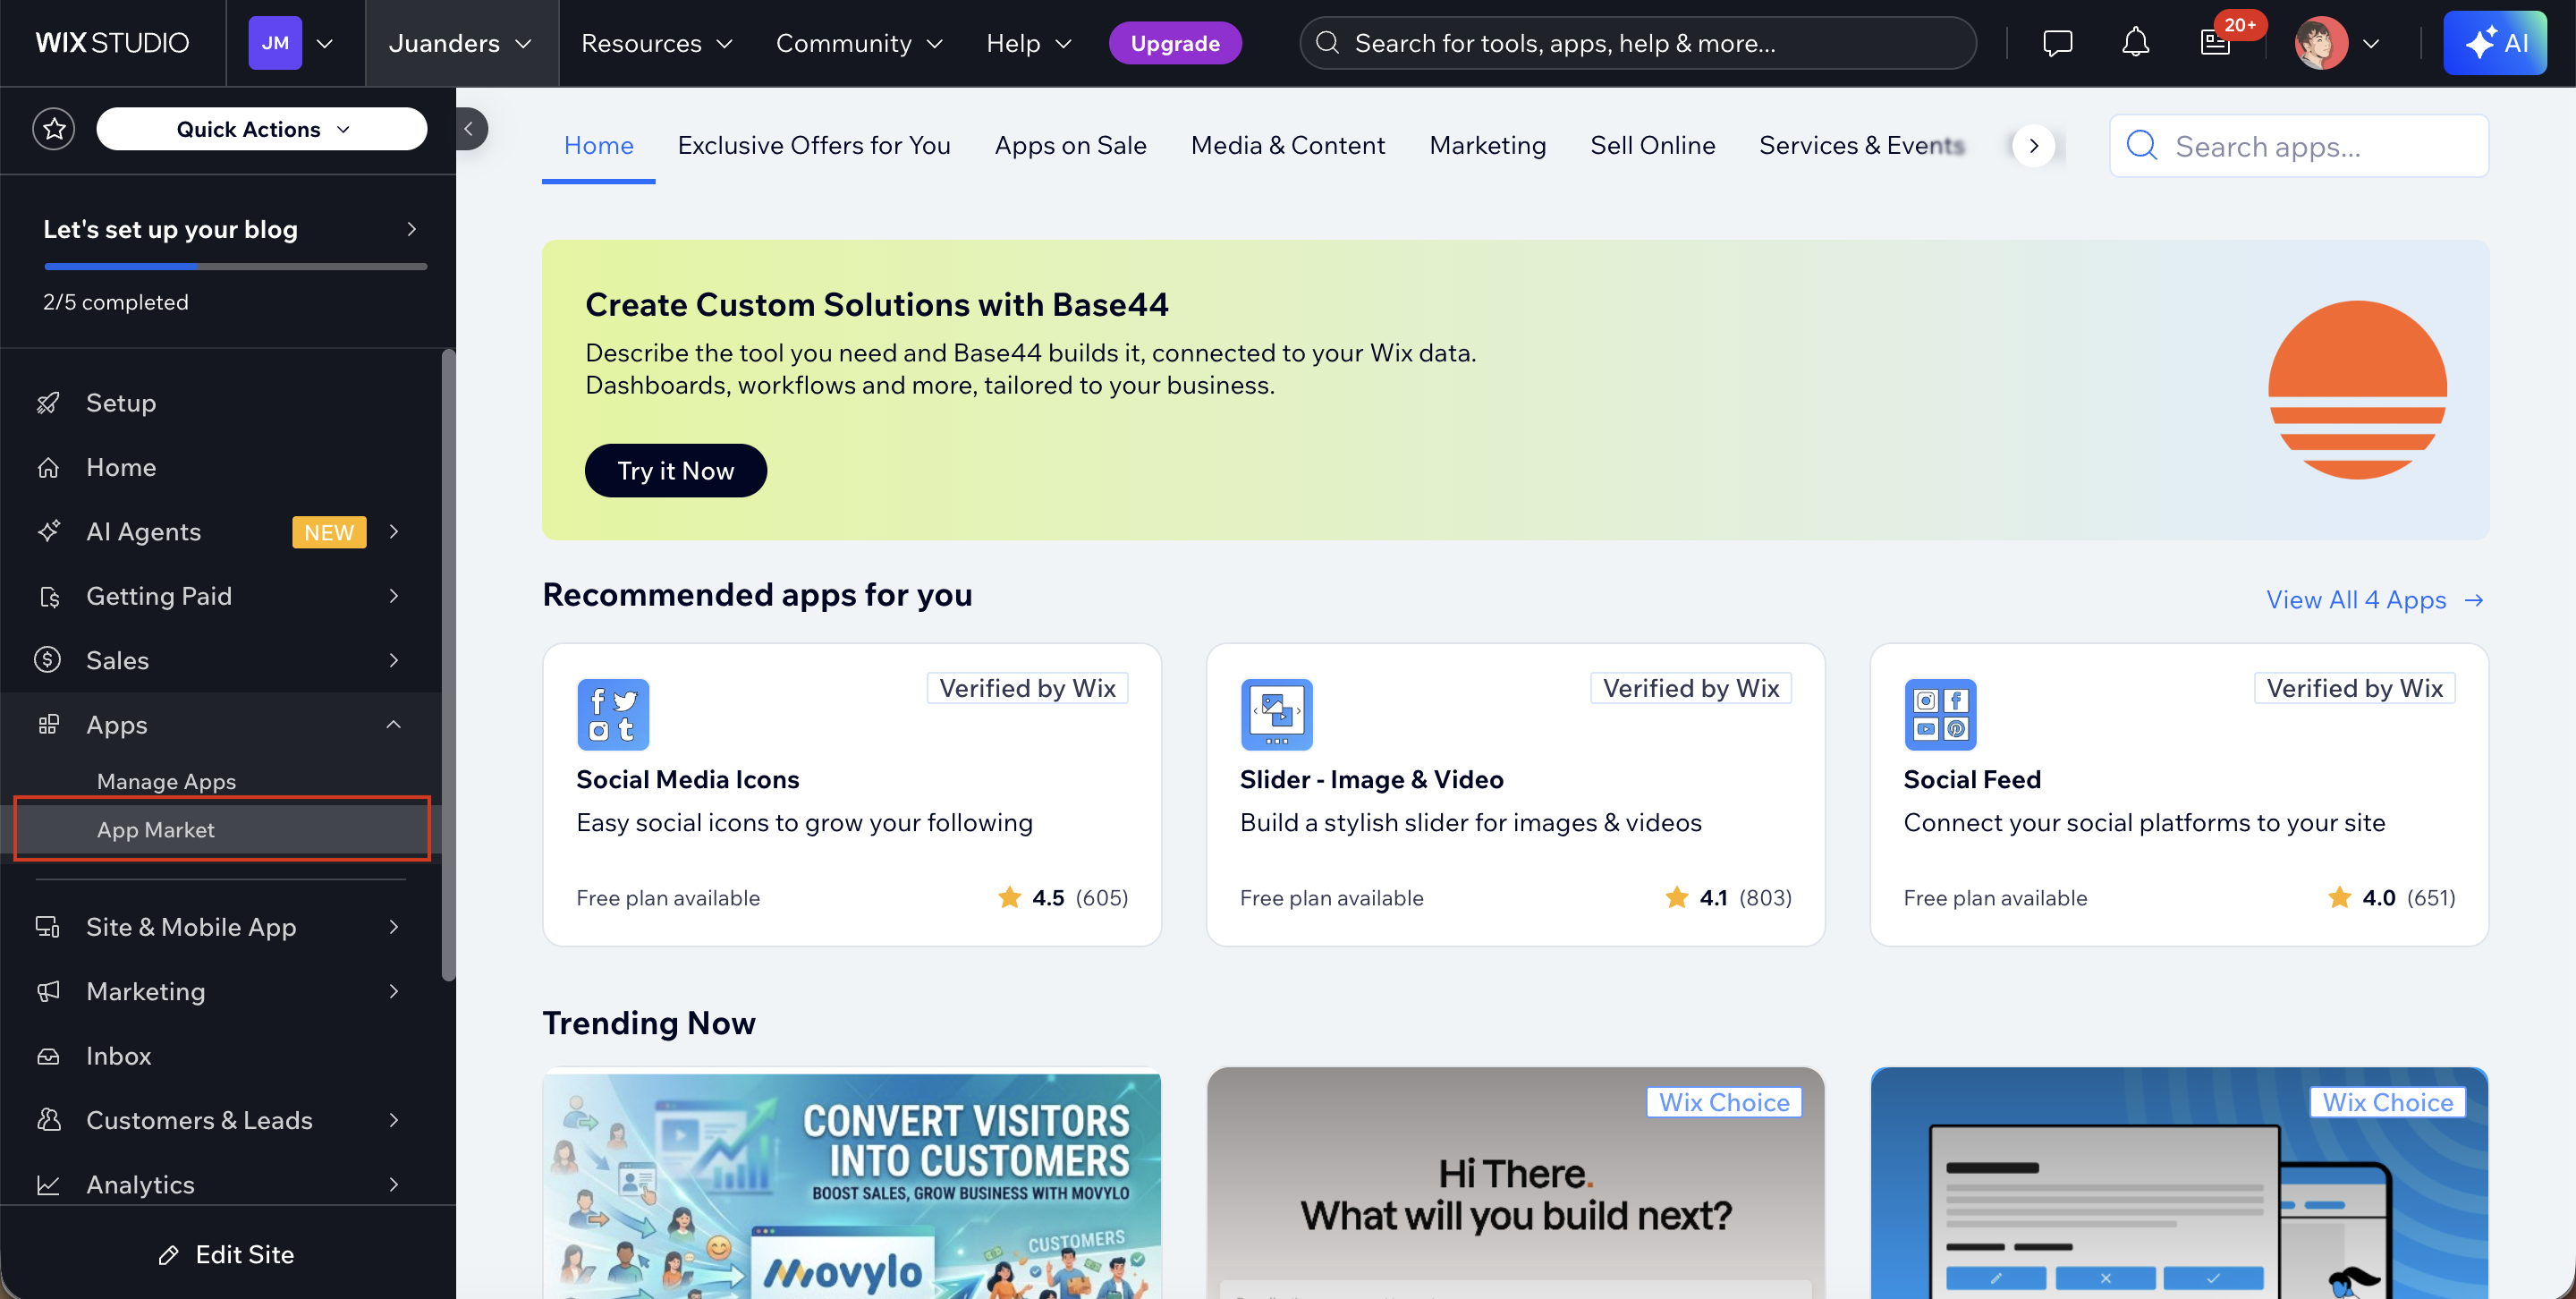
Step 28: Navigate to App Market from your Wix Dashboard
From your Wix Dashboard, navigate to the Apps section (or App Market) to search for and install the Wix Blog app onto your site.
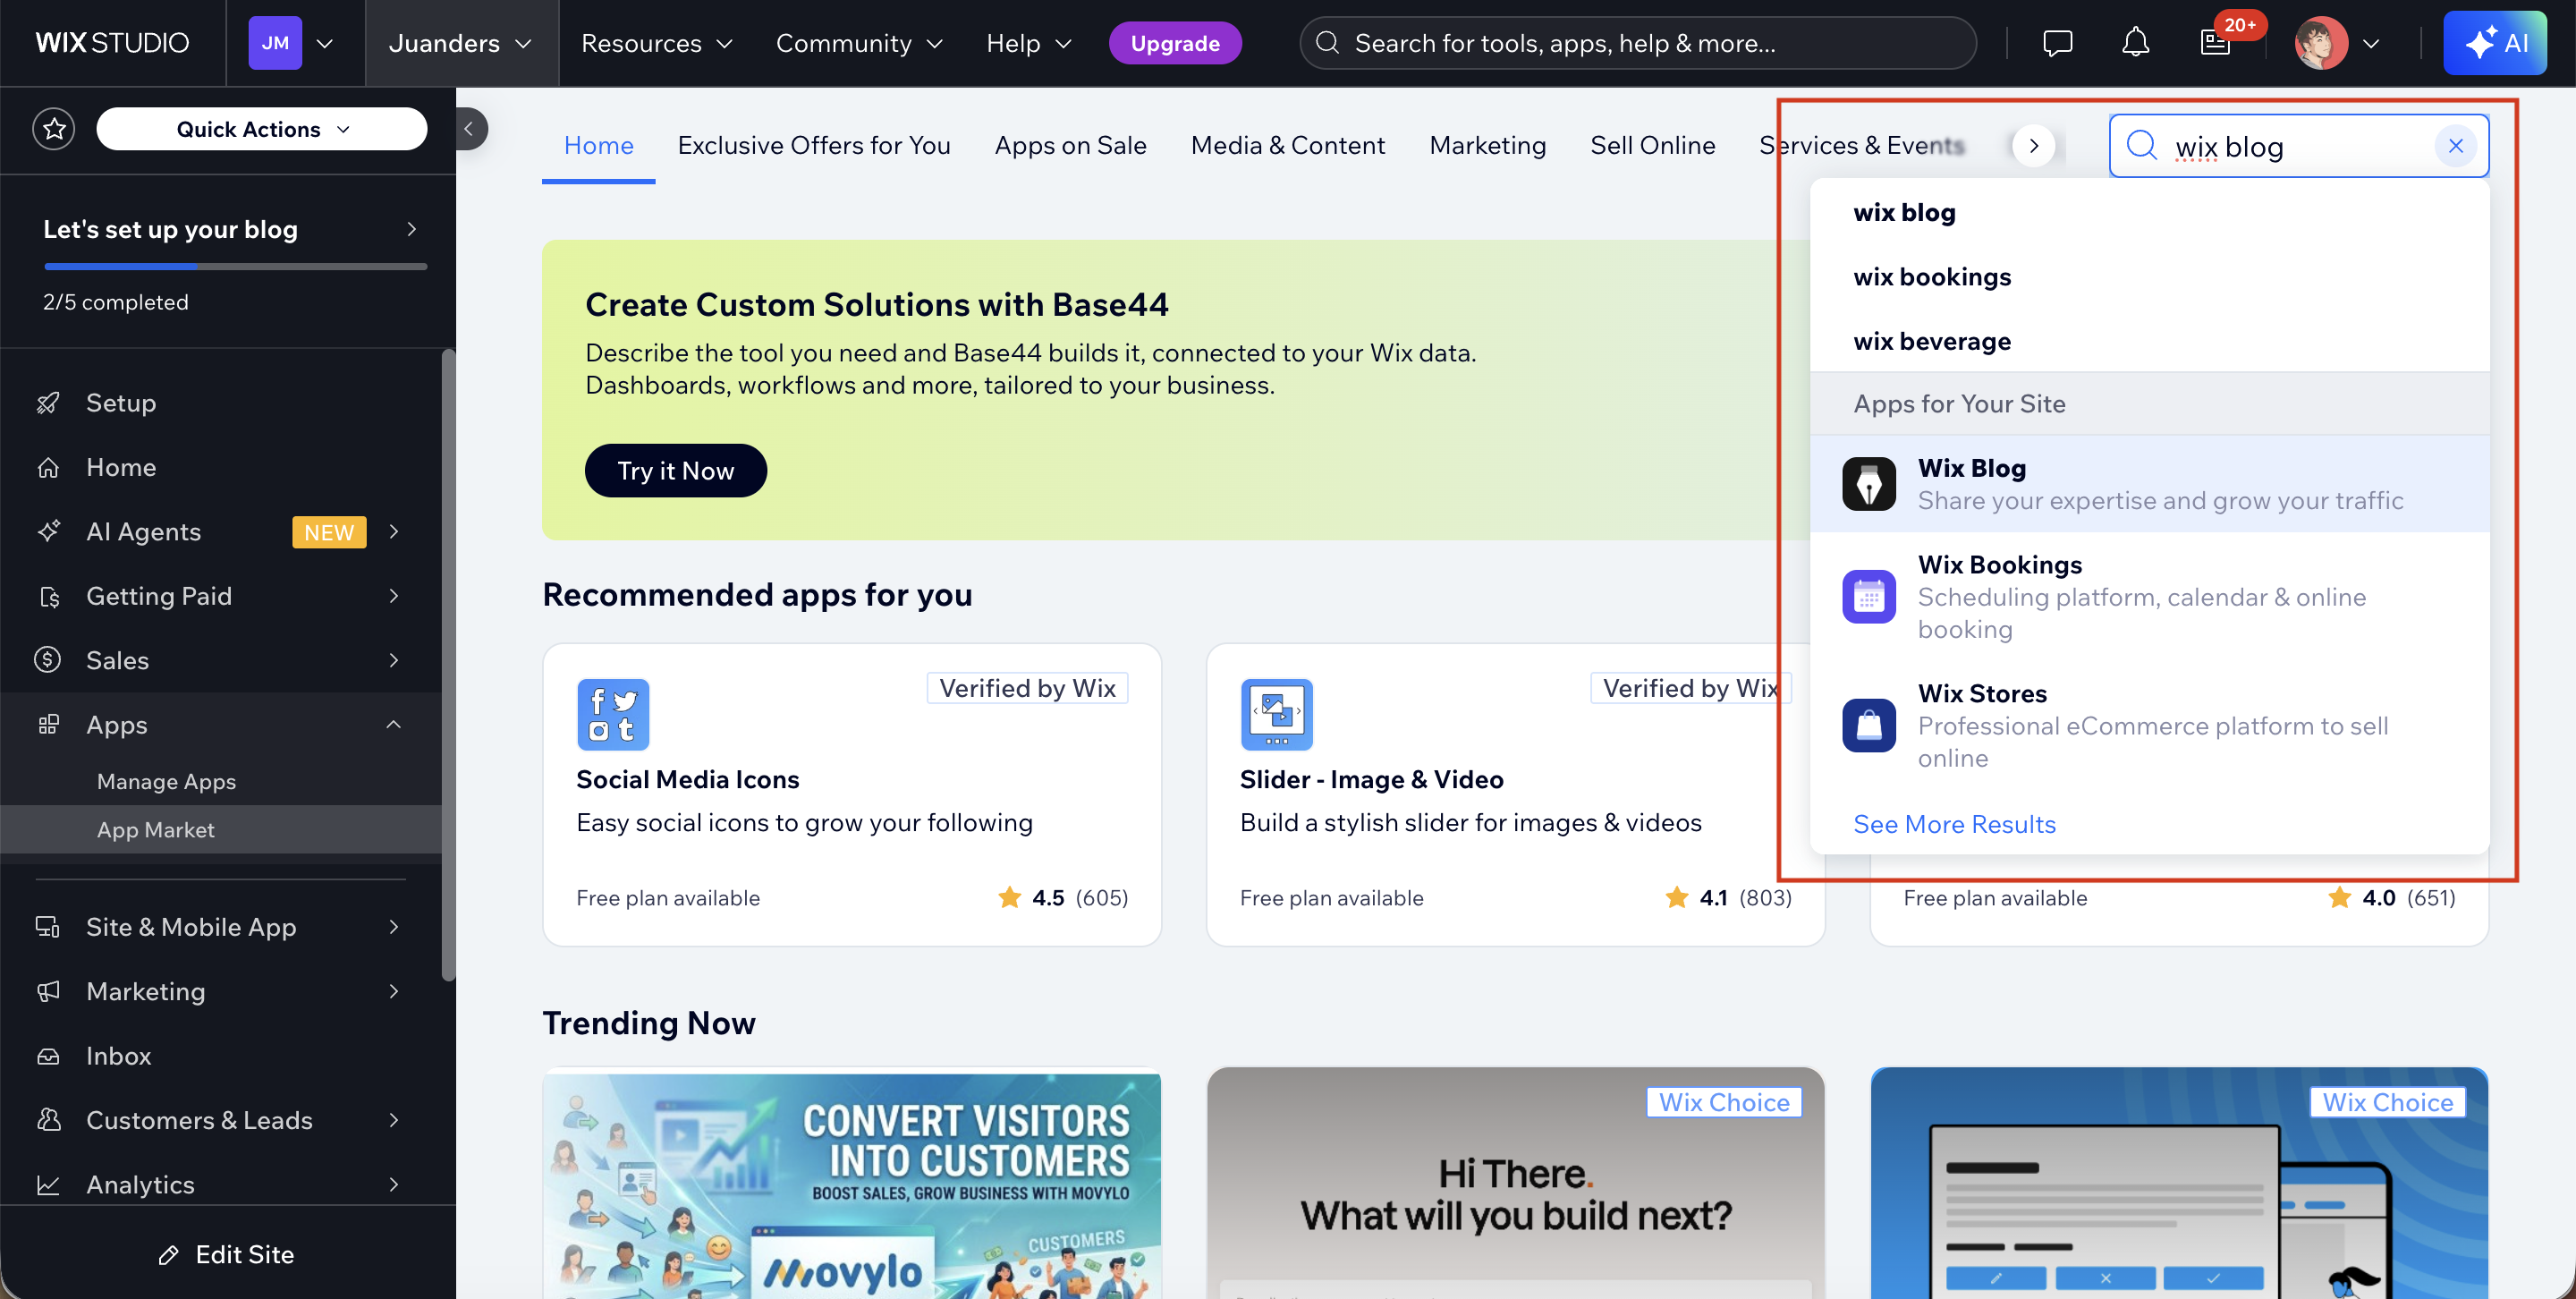
Step 29: Search for "Wix Blog"
In the App Market, locate the search bar in the top-right corner of the page and type "Wix Blog." As you type, a dropdown will appear with matching results — under Apps for Your Site, you'll see the Wix Blog app listed with a description: "Share your expertise and grow your traffic."
Click on the Wix Blog result to proceed.
Step 30: Install the Wix Blog App
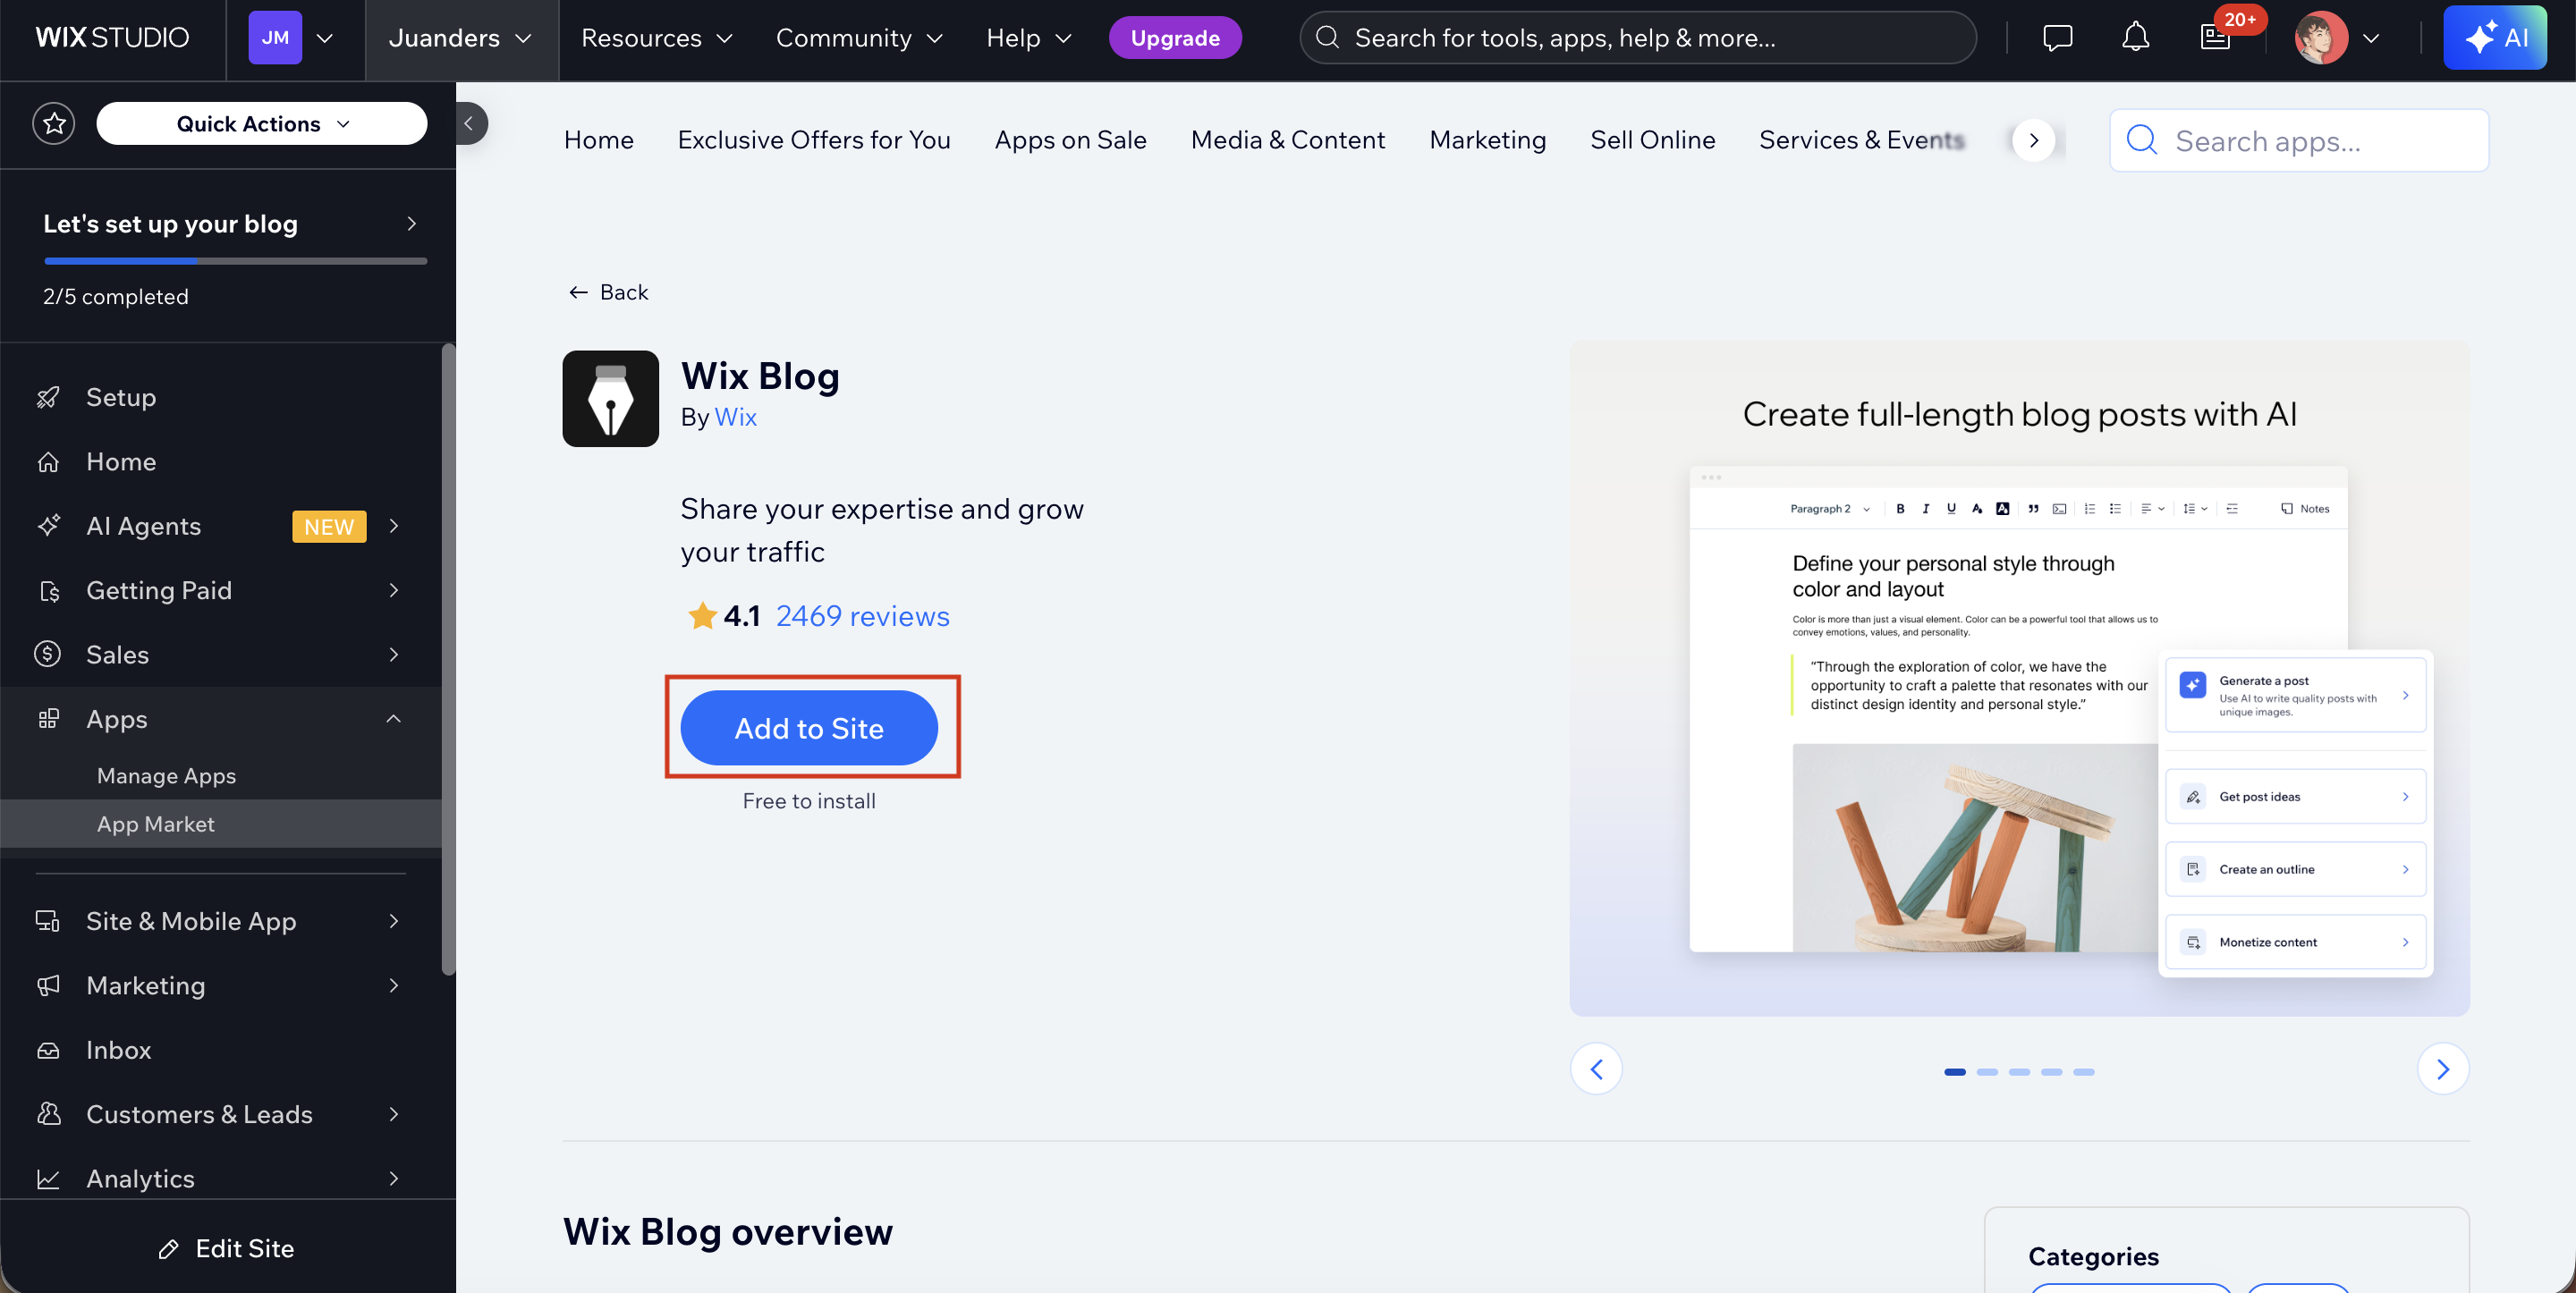
Clicking the Wix Blog result takes you to its app details page. Here you'll see an overview of the app, and a preview of its blog-writing features.
Click Add to Site to install the app — it's free to install.
Step 31: Confirm Installation and Review the Blog Setup
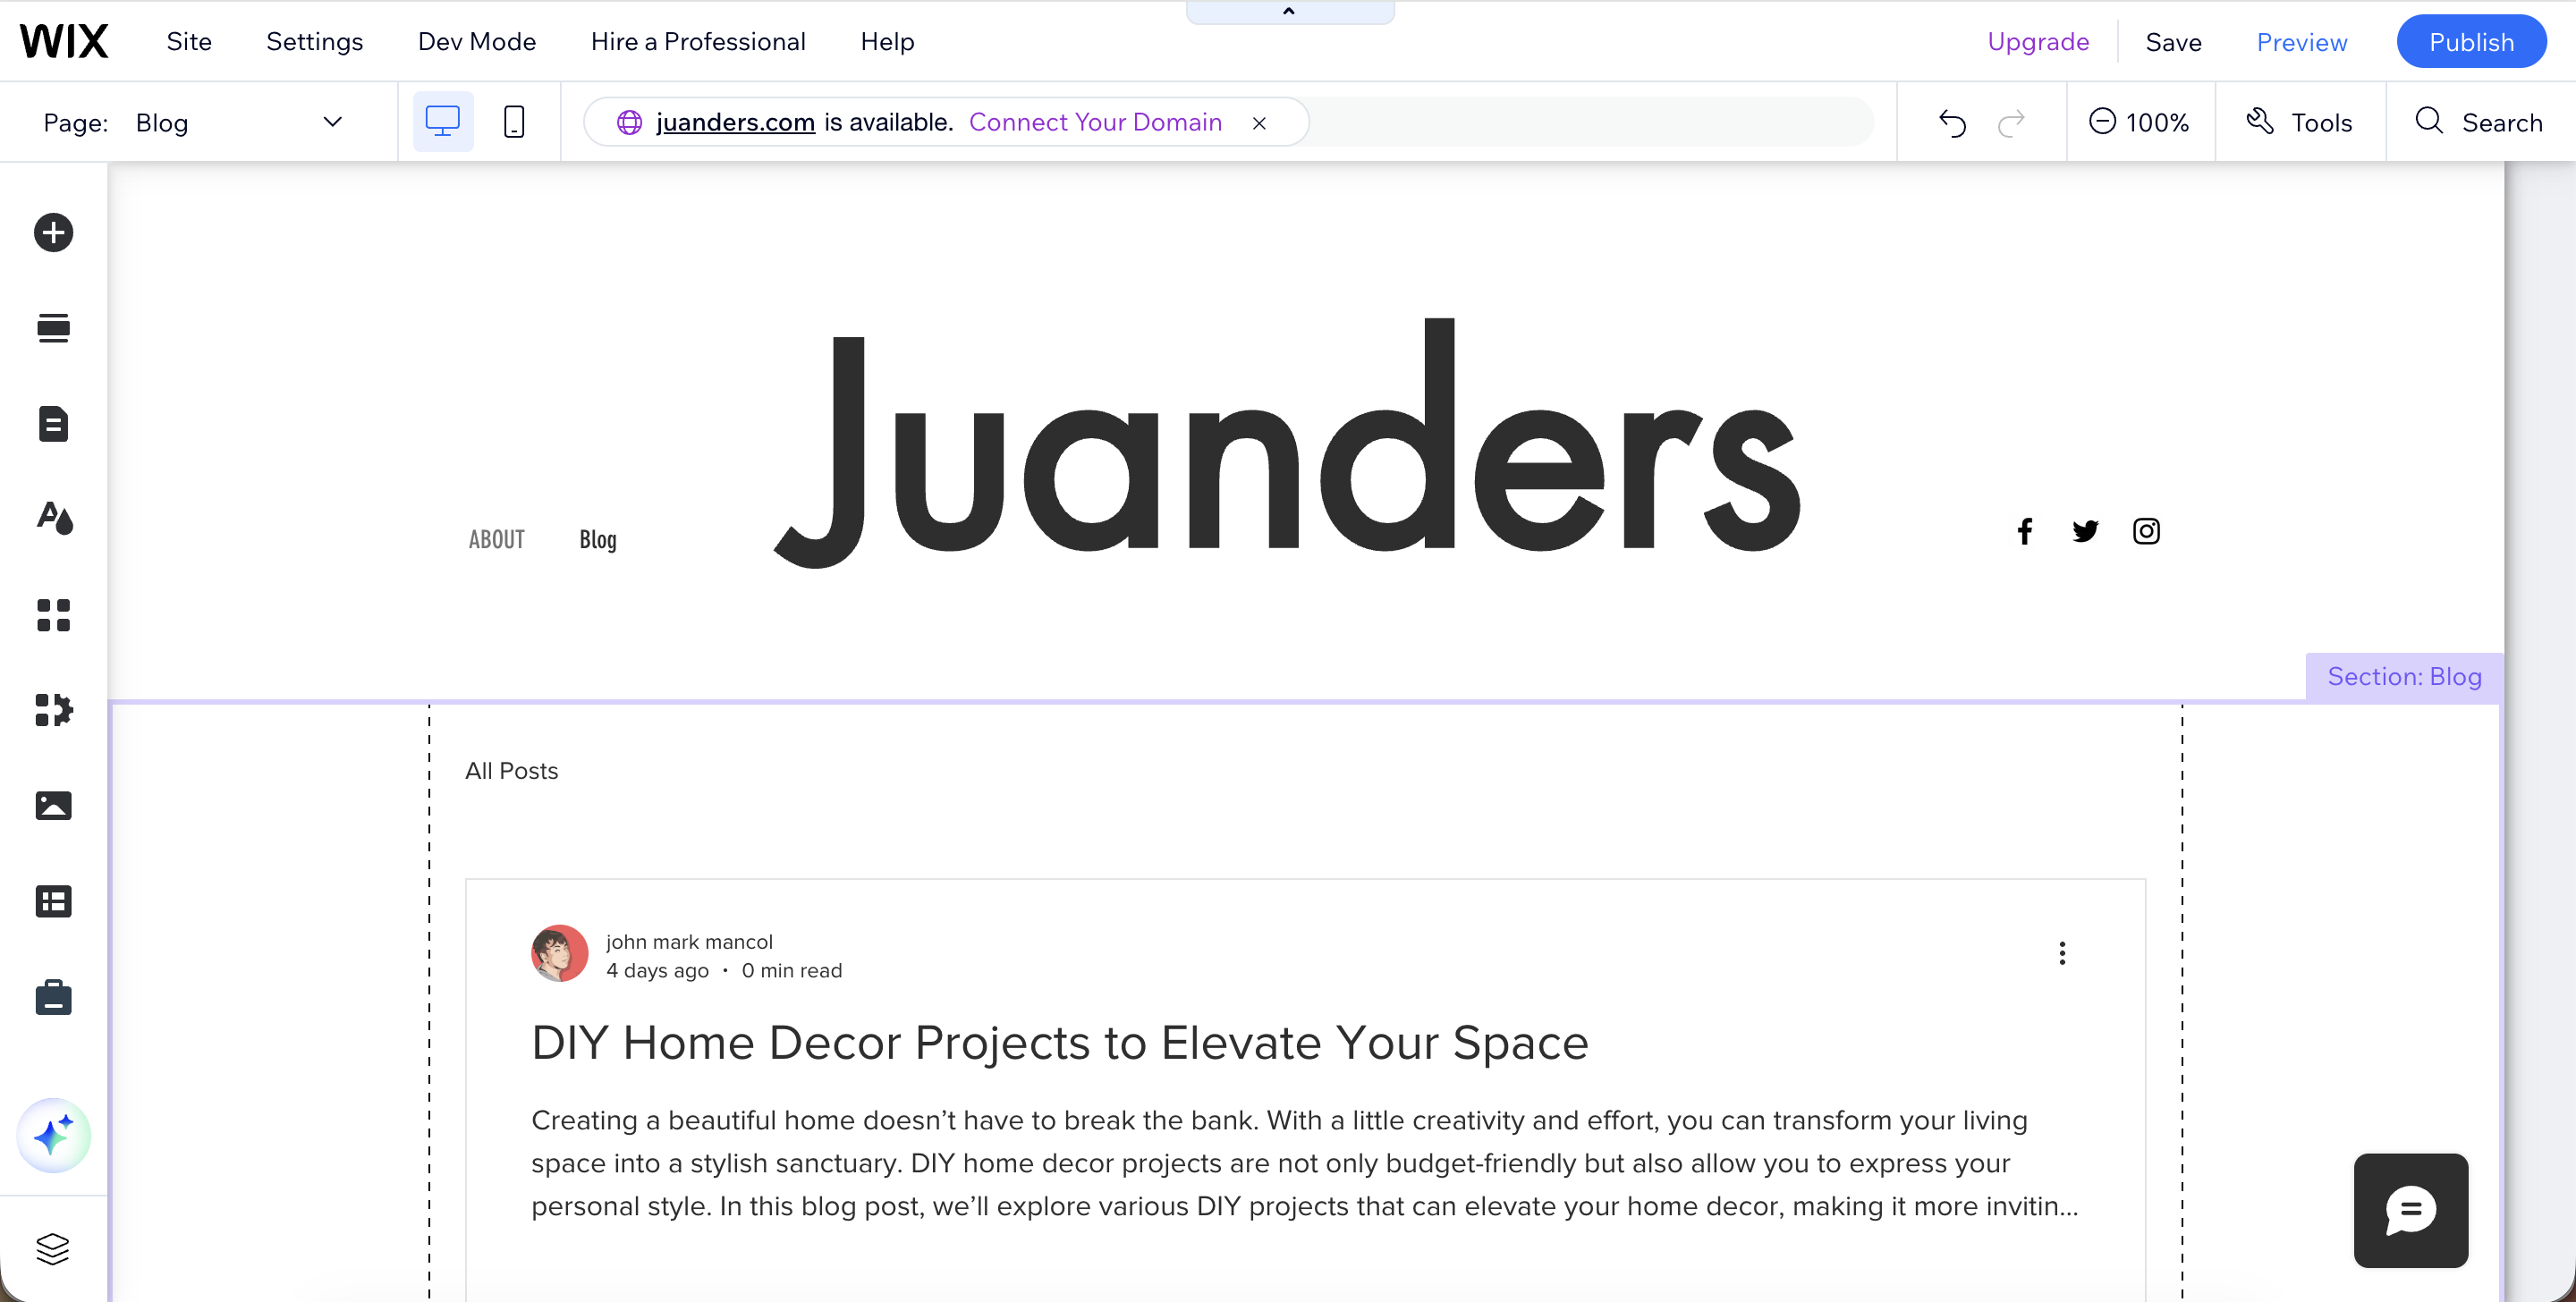
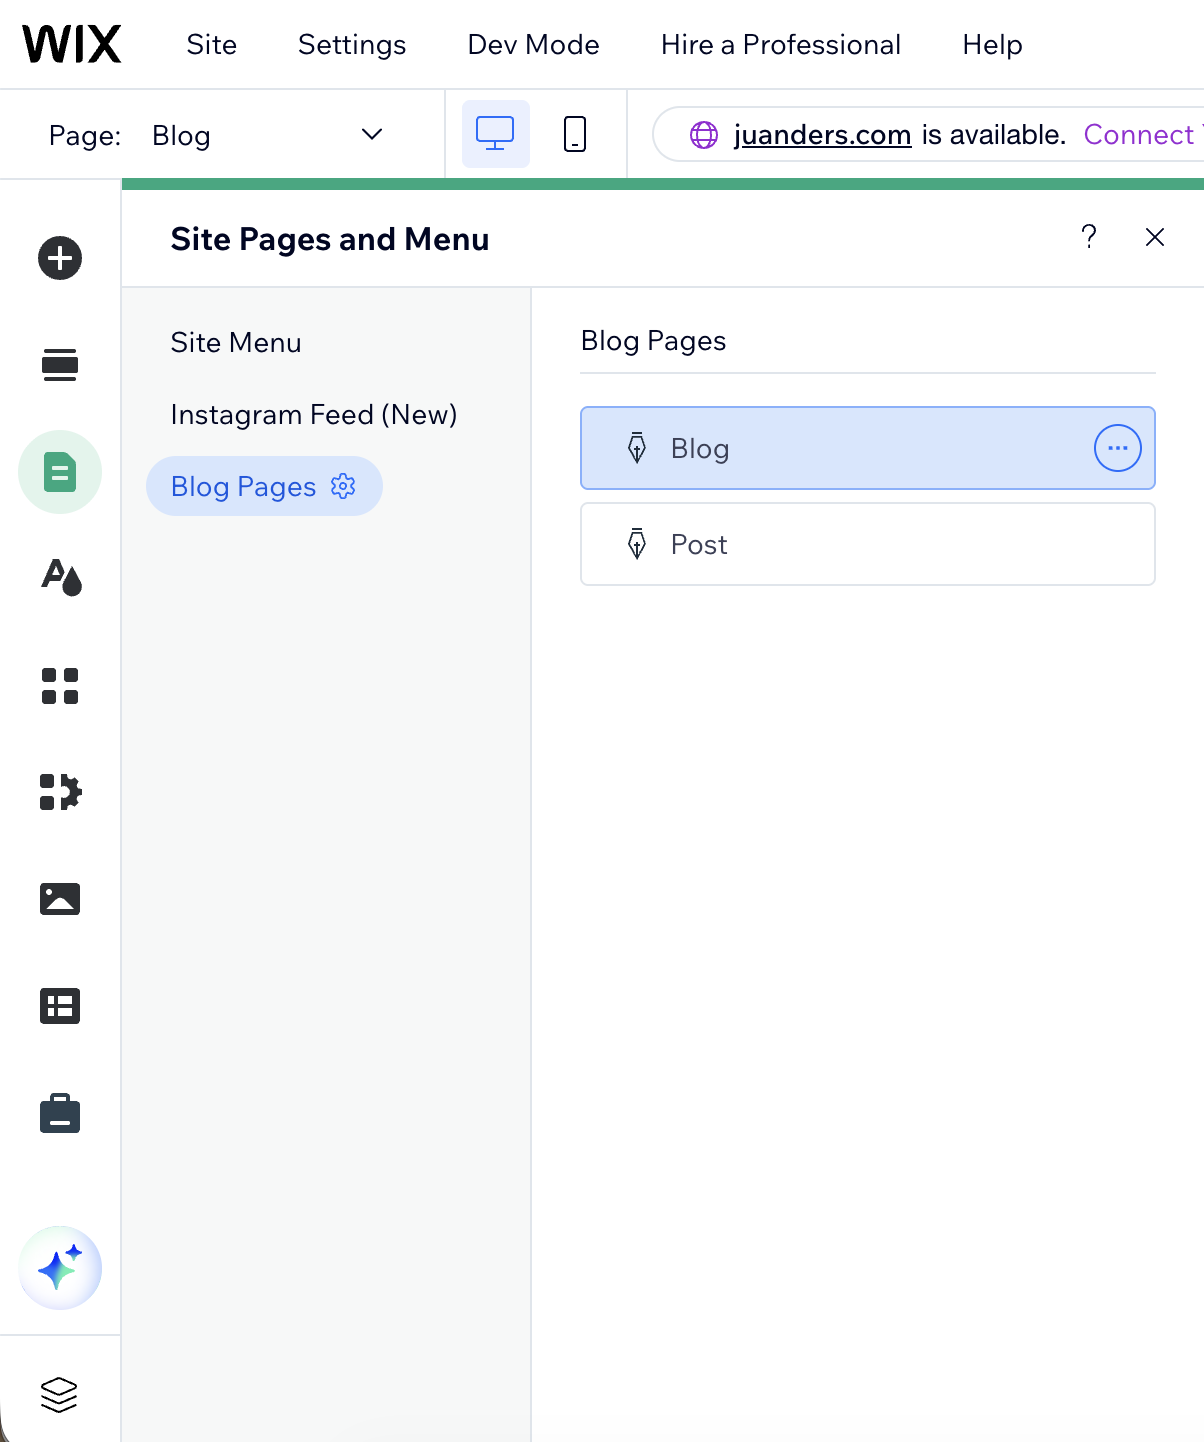
After clicking Add to Site, Wix will display a brief setup dialog while it installs the Blog app. Once complete, you'll be automatically redirected to the Wix Editor, where the app has already added a Blog page and a Post page to your site.
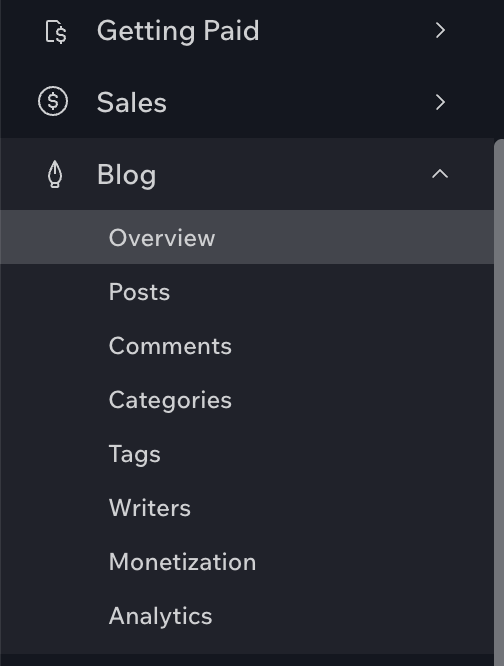
You'll also notice a new Blogs section added to your site's dashboard navigation, giving you access to manage blog settings, categories, and published posts going forward.
Note: Wix includes a sample blog post by default (e.g., "DIY Home Decor Projects to Elevate Your Space") — this can be edited or deleted once your site is live.
New pages added
New navigation on dashboard
Step 32: Publish the New Changes
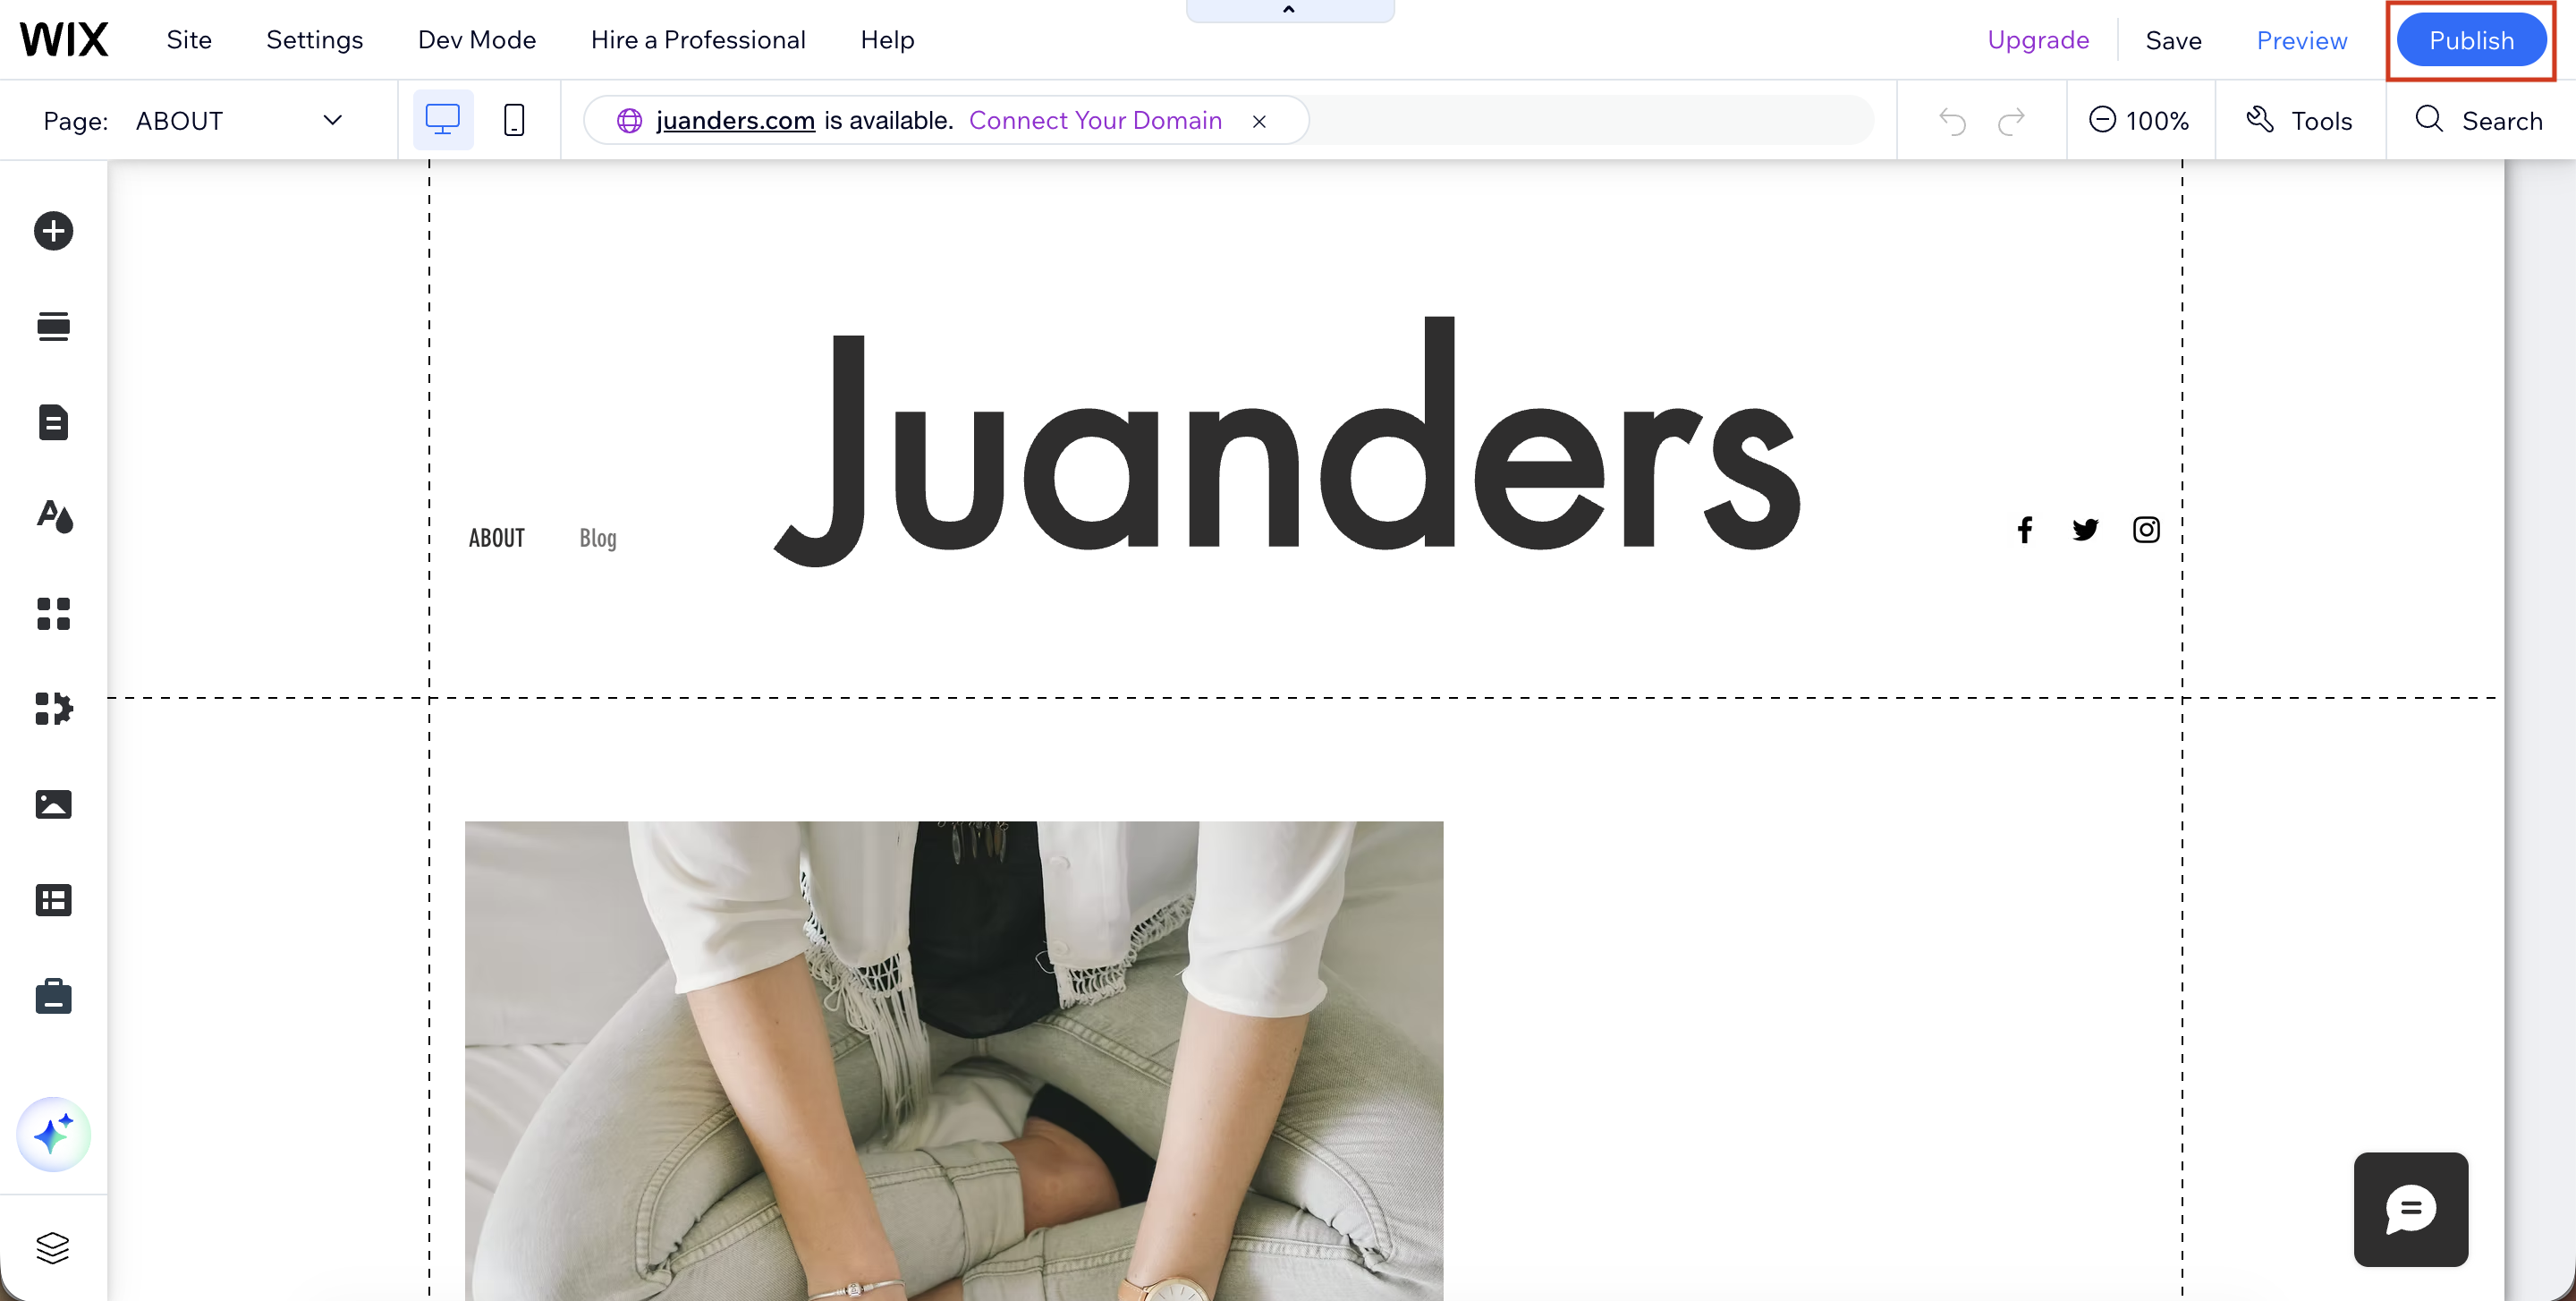
In the top-right corner of the Wix Editor, click Publish to make the Blog app changes live on your site.
Important: Installing the Wix Blog app only takes effect on your live site after publishing. Skipping this step means the Blog and Post pages will exist in the editor but won't be visible to visitors — or accessible for auto-posting through our platform.
You're All Set!
Your Wix site is now successfully connected to UP-TO-DATE. From here, you'll be able to manage and sync your blog content directly between Wix and your workspace.
A few things to keep in mind:
Your API key is scoped specifically to Wix Blog permissions, so only blog-related data (posts and categories) will be accessible through this integration.
If you ever need to revoke or regenerate your API key, you can do so anytime from your Wix Dashboard > Settings > API Keys.
Should you add more sites or need broader permissions later, simply repeat this guide and generate a new scoped key for each connection.
If you run into any issues during setup, double-check that your API Key, Site ID, and Website URL were entered correctly, and use the Test Connection button before finalizing.